2024年2月24日 星期六

Django 5.0:建置學生通訊錄資料庫

參考資料:Python架站特訓班django最強實戰

1..打開cmd,輸入mkvirtualenv django_first命令建立虛擬環境。


2.輸入pip install django建立Django套件。


3.輸入django-admin startproject students來建立Djano專案,利用cd students來切換目錄。


4.輸入Python manage.py startapp studentsapp來建立應用程式。


5.輸入python manage.py migrate指令進行模型(Model)與資料庫(Database)的同步。


6.輸入python manage.py runserver指令來啟動Server。


7.打開瀏覽器,輸入http://127.0.0.1:8000/網址,開啟首頁。


8. 修改students/settings.py

  1
  2
  3
  4
  5
  6
  7
  8
  9
 10
 11
 12
 13
 14
 15
 16
 17
 18
 19
 20
 21
 22
 23
 24
 25
 26
 27
 28
 29
 30
 31
 32
 33
 34
 35
 36
 37
 38
 39
 40
 41
 42
 43
 44
 45
 46
 47
 48
 49
 50
 51
 52
 53
 54
 55
 56
 57
 58
 59
 60
 61
 62
 63
 64
 65
 66
 67
 68
 69
 70
 71
 72
 73
 74
 75
 76
 77
 78
 79
 80
 81
 82
 83
 84
 85
 86
 87
 88
 89
 90
 91
 92
 93
 94
 95
 96
 97
 98
 99
100
101
102
103
104
105
106
107
108
109
110
111
112
113
114
115
116
117
118
119
120
121
122
123
124
"""
Django settings for students project.

Generated by 'django-admin startproject' using Django 5.0.2.

For more information on this file, see
https://docs.djangoproject.com/en/5.0/topics/settings/

For the full list of settings and their values, see
https://docs.djangoproject.com/en/5.0/ref/settings/
"""

from pathlib import Path

# Build paths inside the project like this: BASE_DIR / 'subdir'.
BASE_DIR = Path(__file__).resolve().parent.parent


# Quick-start development settings - unsuitable for production
# See https://docs.djangoproject.com/en/5.0/howto/deployment/checklist/

# SECURITY WARNING: keep the secret key used in production secret!
SECRET_KEY = 'django-insecure-52y=6w_01z!@bcyzkrs@eyl(^s0li20(i8$gokwhbvw-gcj59h'

# SECURITY WARNING: don't run with debug turned on in production!
DEBUG = True

ALLOWED_HOSTS = []


# Application definition

INSTALLED_APPS = [
    'django.contrib.admin',
    'django.contrib.auth',
    'django.contrib.contenttypes',
    'django.contrib.sessions',
    'django.contrib.messages',
    'django.contrib.staticfiles',
    'studentsapp',
]

MIDDLEWARE = [
    'django.middleware.security.SecurityMiddleware',
    'django.contrib.sessions.middleware.SessionMiddleware',
    'django.middleware.common.CommonMiddleware',
    'django.middleware.csrf.CsrfViewMiddleware',
    'django.contrib.auth.middleware.AuthenticationMiddleware',
    'django.contrib.messages.middleware.MessageMiddleware',
    'django.middleware.clickjacking.XFrameOptionsMiddleware',
]

ROOT_URLCONF = 'students.urls'

TEMPLATES = [
    {
        'BACKEND': 'django.template.backends.django.DjangoTemplates',
        'DIRS': [BASE_DIR/'templates'],
        'APP_DIRS': True,
        'OPTIONS': {
            'context_processors': [
                'django.template.context_processors.debug',
                'django.template.context_processors.request',
                'django.contrib.auth.context_processors.auth',
                'django.contrib.messages.context_processors.messages',
            ],
        },
    },
]

WSGI_APPLICATION = 'students.wsgi.application'


# Database
# https://docs.djangoproject.com/en/5.0/ref/settings/#databases

DATABASES = {
    'default': {
        'ENGINE': 'django.db.backends.sqlite3',
        'NAME': BASE_DIR / 'db.sqlite3',
    }
}


# Password validation
# https://docs.djangoproject.com/en/5.0/ref/settings/#auth-password-validators

AUTH_PASSWORD_VALIDATORS = [
    {
        'NAME': 'django.contrib.auth.password_validation.UserAttributeSimilarityValidator',
    },
    {
        'NAME': 'django.contrib.auth.password_validation.MinimumLengthValidator',
    },
    {
        'NAME': 'django.contrib.auth.password_validation.CommonPasswordValidator',
    },
    {
        'NAME': 'django.contrib.auth.password_validation.NumericPasswordValidator',
    },
]


# Internationalization
# https://docs.djangoproject.com/en/5.0/topics/i18n/

LANGUAGE_CODE = 'en-us'

TIME_ZONE = 'UTC'

USE_I18N = True

USE_TZ = True


# Static files (CSS, JavaScript, Images)
# https://docs.djangoproject.com/en/5.0/howto/static-files/

STATIC_URL = 'static/'

# Default primary key field type
# https://docs.djangoproject.com/en/5.0/ref/settings/#default-auto-field

DEFAULT_AUTO_FIELD = 'django.db.models.BigAutoField'

9.在students/urls.py新增一條鏈結。

 1
 2
 3
 4
 5
 6
 7
 8
 9
10
11
12
13
14
15
16
17
18
19
20
21
22
23
24
"""
URL configuration for students project.

The `urlpatterns` list routes URLs to views. For more information please see:
    https://docs.djangoproject.com/en/5.0/topics/http/urls/
Examples:
Function views
    1. Add an import:  from my_app import views
    2. Add a URL to urlpatterns:  path('', views.home, name='home')
Class-based views
    1. Add an import:  from other_app.views import Home
    2. Add a URL to urlpatterns:  path('', Home.as_view(), name='home')
Including another URLconf
    1. Import the include() function: from django.urls import include, path
    2. Add a URL to urlpatterns:  path('blog/', include('blog.urls'))
"""
from django.contrib import admin
from django.urls import path
from studentsapp.views import index

urlpatterns = [
    path('admin/', admin.site.urls),
    path('', index),
]

10.在studentsapp/views.py下,新增index()函式。

1
2
3
4
5
6
7
8
from django.shortcuts import render
from studentsapp.models import student

# Create your views here.

def index(request):
    students = student.objects.all().order_by('id')
    return render(request, "index.html", locals())

11.在studentsapp/models.py下,新增student資料模型。

 1
 2
 3
 4
 5
 6
 7
 8
 9
10
11
12
13
from django.db import models

# Create your models here.
class student(models.Model):
    cName = models.CharField(max_length = 20, null = False)
    cSex = models.CharField(max_length = 2, default = 'M', null = False)
    cBirthday = models.DateField(null = False)
    cEmail = models.CharField(max_length = 50, blank = True, default = '')
    cPhone = models.CharField(max_length = 50, blank = True, default = '')
    cAddr = models.CharField(max_length = 255, blank = True, default = '')

    def __str__(self):
        return self.cName

12.重新整理網頁

在執行網站的cmd畫面中,也看到錯誤訊息

13.模型與資料庫同步,請執行下列命令:
python manage.py makemigrations
python manage.py migrates
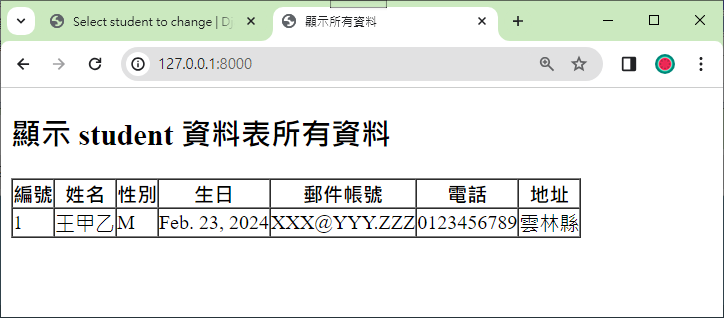
14.重新整理畫面

15.新增超級使用者帳號
python manage.py createsuperuser
帳號:admin
密碼:1234

15.在studentsapp/admin.py新增後台管理student資料庫的程式

1
2
3
4
5
from django.contrib import admin
from studentsapp.models import student

# Register your models here.
admin.site.register(student)

16.登錄後台

17.查看student資料庫

18.按下上圖students旁的Add鈕,新增一筆資料。

19.按下上圖的SAVE鈕。

20.重新整理前台畫面


2024年2月20日 星期二

如何讓micro:bit Python程式同時多做一些事

編輯器:makecode、micro:bit Python

micro:bit是一顆擁有許多感測器、按鈕且有一個顯示器(5x5矩陣LED)的微型電腦,簡單好用,但您有發現當顯示器在顯示文字時,按鈕的功能似乎會沒有作用,這是因為程式執行是採用阻斷式的程式設計,雖然在使用makecode來設計程式,都是採用事件驅動。


以上圖為例,當顯示器在顯示Hello!時,按下A鈕,顯示器並不會立即地更改顯示內容,而是讓Hello!顯示結束後才會有反應。今天要推薦一篇很棒的文章,從該篇文章您可以瞭解到使用Python程式設計會比積木式程式設計來得更靈活。

參考文章:Become a Time Lord with the BBC micro:bit

範例一、按鈕計次

1
2
3
4
5
6
from microbit import *
n = 0
while True:
  if button_a.was_pressed():
    n += 1
    display.scroll(str(n))

當執行上面程式時,一開始您快速連按幾個按鈕,您會發現按鈕次數統計上有問題。

範例二、採用wait關鍵字參數來提升程式效能

1
2
3
4
5
6
from microbit import *
n = 0
while True:
  if button_a.was_pressed():
    n += 1
    display.scroll(str(n), wait=False)

上面程式解決了按鈕次數統計錯誤的問題,但當您一直連續按鈕時,似乎不能看到您按了幾下,這是就可以採用定時顯示的方法。

範例三、採定時顯示按鈕次數

 1
 2
 3
 4
 5
 6
 7
 8
 9
10
from microbit import *
UPDATE_INTERVAL = 10000
next_update = 0
n = 0
while True:
  if running_time() > next_update:
    display.scroll(str(n), wait=False)
    next_update = running_time() + UPDATE_INTERVAL
  if button_a.was_pressed():
    n += 1


2024年2月19日 星期一

micro:bit植鞣皮套設計與Python程式設計


micro:bit植鞣皮套設計師:劉皇模/木莫皮革工作室

micro:bit植鞣皮套DIY手作課程:台灣工藝創客青創基地

micro:bit Python編輯器

範例一、LED顯示

1
2
3
4
5
6
7
8
9
# Imports go at the top
from microbit import *


# Code in a 'while True:' loop repeats forever
while True:
    display.show(Image.HEART)
    sleep(1000)
    display.scroll('Hello')

範例二、燈光控制
 1
 2
 3
 4
 5
 6
 7
 8
 9
10
11
12
13
14
15
16
17
# Imports go at the top
from microbit import *
import neopixel
import random


# Code in a 'while True:' loop repeats forever
while True:
    display.show(Image.HEART)
    sleep(1000)
    display.scroll('Hello')
    #底板有一顆NeoPixel 接在Pin2
    np = neopixel.NeoPixel(pin2, 1)
    np[0] = (random.randint(1, 255), 
             random.randint(1, 255),
             random.randint(1, 255))
    np.show()

範例三、振動控制
 1
 2
 3
 4
 5
 6
 7
 8
 9
10
11
12
13
14
15
16
17
18
19
20
21
22
23
# Imports go at the top
from microbit import *
import neopixel
import random


# Code in a 'while True:' loop repeats forever
while True:
    display.show(Image.HEART)
    sleep(1000)
    display.scroll('Hello')
    #底板有一顆NeoPixel 接在Pin2
    np = neopixel.NeoPixel(pin2, 1)
    np[0] = (random.randint(1, 255), 
             random.randint(1, 255),
             random.randint(1, 255))
    np.show()
    for i in range(1024):
        pin1.write_analog(i)
        sleep(3)
    sleep(1000)
    pin1.write_analog(0)
    sleep(2000)

範例四、音樂(http://www.86x.org/bbc/music.html)
 1
 2
 3
 4
 5
 6
 7
 8
 9
10
11
12
13
14
15
16
17
18
19
20
21
22
23
24
25
26
27
28
29
30
31
32
33
34
35
36
37
38
39
# Imports go at the top
from microbit import *
import neopixel
import random
import music
# play Prelude in C.
notes = [
    'c4:1', 'e', 'g', 'c5', 'e5', 'g4', 'c5', 'e5', 'c4', 'e', 'g', 'c5', 'e5', 'g4', 'c5', 'e5',
    'c4', 'd', 'a', 'd5', 'f5', 'a4', 'd5', 'f5', 'c4', 'd', 'a', 'd5', 'f5', 'a4', 'd5', 'f5',
    'b3', 'd4', 'g', 'd5', 'f5', 'g4', 'd5', 'f5', 'b3', 'd4', 'g', 'd5', 'f5', 'g4', 'd5', 'f5',
    'c4', 'e', 'g', 'c5', 'e5', 'g4', 'c5', 'e5', 'c4', 'e', 'g', 'c5', 'e5', 'g4', 'c5', 'e5',
    'c4', 'e', 'a', 'e5', 'a5', 'a4', 'e5', 'a5', 'c4', 'e', 'a', 'e5', 'a5', 'a4', 'e5', 'a5',
    'c4', 'd', 'f#', 'a', 'd5', 'f#4', 'a', 'd5', 'c4', 'd', 'f#', 'a', 'd5', 'f#4', 'a', 'd5',
    'b3', 'd4', 'g', 'd5', 'g5', 'g4', 'd5', 'g5', 'b3', 'd4', 'g', 'd5', 'g5', 'g4', 'd5', 'g5',
    'b3', 'c4', 'e', 'g', 'c5', 'e4', 'g', 'c5', 'b3', 'c4', 'e', 'g', 'c5', 'e4', 'g', 'c5',
    'a3', 'c4', 'e', 'g', 'c5', 'e4', 'g', 'c5', 'a3', 'c4', 'e', 'g', 'c5', 'e4', 'g', 'c5',
    'd3', 'a', 'd4', 'f#', 'c5', 'd4', 'f#', 'c5', 'd3', 'a', 'd4', 'f#', 'c5', 'd4', 'f#', 'c5',
    'g3', 'b', 'd4', 'g', 'b', 'd', 'g', 'b', 'g3', 'b3', 'd4', 'g', 'b', 'd', 'g', 'b'
]

# Code in a 'while True:' loop repeats forever
while True:
    display.show(Image.HEART)
    sleep(1000)
    display.scroll('Hello')
    #底板有一顆NeoPixel 接在Pin2
    np = neopixel.NeoPixel(pin2, 1)
    np[0] = (random.randint(1, 255), 
             random.randint(1, 255),
             random.randint(1, 255))
    np.show()
    for i in range(1024):
        pin1.write_analog(i)
        sleep(3)
    sleep(1000)
    pin1.write_analog(0)
    sleep(2000)
    music.play(notes)
    sleep(2000)

範例四、通訊

 1
 2
 3
 4
 5
 6
 7
 8
 9
10
11
12
13
14
15
16
17
18
19
20
21
22
23
24
25
26
27
28
29
30
31
32
33
34
35
36
37
38
39
40
41
42
43
44
# Imports go at the top
from microbit import *
import neopixel
import random
import music
import radio


radio.config(group=1)
radio.on()
# play Prelude in C.
notes = [
    'c4:1', 'e', 'g', 'c5', 'e5', 'g4', 'c5', 'e5', 'c4', 'e', 'g', 'c5', 'e5', 'g4', 'c5', 'e5',
    'c4', 'd', 'a', 'd5', 'f5', 'a4', 'd5', 'f5', 'c4', 'd', 'a', 'd5', 'f5', 'a4', 'd5', 'f5',
    'b3', 'd4', 'g', 'd5', 'f5', 'g4', 'd5', 'f5', 'b3', 'd4', 'g', 'd5', 'f5', 'g4', 'd5', 'f5',
    'c4', 'e', 'g', 'c5', 'e5', 'g4', 'c5', 'e5', 'c4', 'e', 'g', 'c5', 'e5', 'g4', 'c5', 'e5',
    'c4', 'e', 'a', 'e5', 'a5', 'a4', 'e5', 'a5', 'c4', 'e', 'a', 'e5', 'a5', 'a4', 'e5', 'a5',
    'c4', 'd', 'f#', 'a', 'd5', 'f#4', 'a', 'd5', 'c4', 'd', 'f#', 'a', 'd5', 'f#4', 'a', 'd5',
    'b3', 'd4', 'g', 'd5', 'g5', 'g4', 'd5', 'g5', 'b3', 'd4', 'g', 'd5', 'g5', 'g4', 'd5', 'g5',
    'b3', 'c4', 'e', 'g', 'c5', 'e4', 'g', 'c5', 'b3', 'c4', 'e', 'g', 'c5', 'e4', 'g', 'c5',
    'a3', 'c4', 'e', 'g', 'c5', 'e4', 'g', 'c5', 'a3', 'c4', 'e', 'g', 'c5', 'e4', 'g', 'c5',
    'd3', 'a', 'd4', 'f#', 'c5', 'd4', 'f#', 'c5', 'd3', 'a', 'd4', 'f#', 'c5', 'd4', 'f#', 'c5',
    'g3', 'b', 'd4', 'g', 'b', 'd', 'g', 'b', 'g3', 'b3', 'd4', 'g', 'b', 'd', 'g', 'b'
]

display.scroll('Hello')    
# Code in a 'while True:' loop repeats forever
while True:
    message = radio.receive()
    if message == 'smile':
        display.show(Image.HAPPY)
        for i in range(1024):
            pin1.write_analog(i)
            sleep(3)
        sleep(1000)
        pin1.write_analog(0)
        
    if message == 'heart': 
        display.show(Image.HEART)
        music.play(notes)
    if button_a.was_pressed():
        radio.send('smile')
    if button_b.was_pressed():
        radio.send('heart')

2024年2月14日 星期三

Kasper's micro:bit:把micro:bit當成遙控器的Python套件(MakeCode版本)

對大多數人而言,Python給人一種簡單易學的感覺,但大多數的Python程式設計,都是從基礎的語言談起,雖然簡單但是並不有趣。micro:bit是目前學童最常接觸到培養邏輯思維的一塊微型電腦的電路板,本篇將介紹Kasper's micro:bit,可以讓micro:bit成為遊戲的遙控器。

網站:https://kaspersmicrobit.readthedocs.io/en/stable/

範例一、測試micro:bit上的按鈕

1.打開makcode,請按下圖編輯程式,並下載到micro:bit。


執行結果:


2.請開啟cmd,並輸入pip install kaspersmicrobit。


3.開啟IDEL編輯下列程式,摘自kaspersmicrobit官方網站。
import time

from kaspersmicrobit import KaspersMicrobit


def pressed(button):
    print(f"button {button} pressed")

#讓microbit變數當成第一顆連線的micro:bit的變數
with KaspersMicrobit.find_one_microbit() as microbit:
    microbit.buttons.on_button_a(press=pressed)#偵測到按鈕被按下時呼叫pressed函式
    time.sleep(10)


執行結果:
執行步驟3的程式
您會看到micro:bit顯示連線。
接下來按下A鍵,可以在IDLE Shell看到。


最後看到micro:bit顯示斷線


2024年2月12日 星期一

Django 5.0: 在模版上(Template)使用filter過濾器

 參考資料:Python架站特訓班Django 3最強實戰

延續專案:用擲骰子來說視圖(View)如何傳送變數到模版(Template)

1. 設定filter的URL,passdata\urls.py。
 1
 2
 3
 4
 5
 6
 7
 8
 9
10
11
12
13
14
15
16
17
18
19
20
21
22
23
24
25
26
27
28
"""
URL configuration for passdata project.

The `urlpatterns` list routes URLs to views. For more information please see:
    https://docs.djangoproject.com/en/5.0/topics/http/urls/
Examples:
Function views
    1. Add an import:  from my_app import views
    2. Add a URL to urlpatterns:  path('', views.home, name='home')
Class-based views
    1. Add an import:  from other_app.views import Home
    2. Add a URL to urlpatterns:  path('', Home.as_view(), name='home')
Including another URLconf
    1. Import the include() function: from django.urls import include, path
    2. Add a URL to urlpatterns:  path('blog/', include('blog.urls'))
"""
from django.contrib import admin
from django.urls import path
from passdataapp.views import dice, dice2, dice3, show, filter

urlpatterns = [
    path('admin/', admin.site.urls),
    path('dice/', dice),
    path('dice2/', dice2),
    path('dice3/', dice3),
    path('show/', show),
    path('filter/', filter),
]

2.定義filter()函式passdataapp\views.py。
 1
 2
 3
 4
 5
 6
 7
 8
 9
10
11
12
13
14
15
16
17
18
19
20
21
22
23
24
25
26
27
28
29
30
31
32
33
34
35
36
37
38
39
40
41
from django.shortcuts import render
import random #加入random模組

# Create your views here.
def dice(request):
    no = random.randint(1, 6) #亂數產生1-6其中一個數字
    return render(request, "dice.html", {"no":no})

def dice2(request):
    no1 = random.randint(1, 6) #亂數產生1-6其中一個數字
    no2 = random.randint(1, 6) #亂數產生1-6其中一個數字
    no3 = random.randint(1, 6) #亂數產生1-6其中一個數字
    #使用locals()函式來傳遞所有的區域變數
    return render(request, "dice2.html", locals())
    
times = 0
def dice3(request):
    global times    #宣告global變數
    times = times + 1
    local_times = times
    username = "David"
    no = random.randint(1, 6) #亂數產生1-6其中一個數字
    return render(request, "dice3.html", locals())

def show(request):
	student1 = {"name":"王老五","phone":"0928-123456", "age":20}
	student2 = {"name":"林大智","phone":"0928-123457", "age":21}
	student3 = {"name":"陳三省","phone":"0928-123458", "age":22}
	student4 = {"name":"董小于","phone":"0928-123459", "age":20}
	student5 = {"name":"曾小平","phone":"0928-123450", "age":19}
	students = [student1, student2, student3, student4, student5]
	return render(request, "show.html", locals())
	
def filter(request):
	value = 100
	list1 = [1,2,3,4,5]
	password = "芝麻開門"
	html= "<h1>哈囉</h1>"
	value2 = False
	value3 = "a b c"
	return render(request, "filter.html", locals())

3.新增templates\filter.html檔案

 1
 2
 3
 4
 5
 6
 7
 8
 9
10
11
12
13
14
15
16
17
18
19
20
21
22
<!DOCTYPE html>
<html>
<head>
	<meta charset='utf-8'>
	<title>過濾器</title>
</head>
<body>
	<h6>
		value={{value}}, vlaue|add:"5"={{ value|add:"2" }} <br/>
		value|stringformat:"E"={{ value|stringformat:"E" }} <br/>
		list1= {{ list1 }}, list1|length = {{ list1|length }}, list1|slice:"2:" = {{ list1|slice:"2:" }} <br/>
		{% if password == "芝麻開門" %}
			密碼正確 <br/>
		{% else %}
			密碼錯誤 <br/>
		{% endif %}
			value2 = {{ value2 }}, value2|yesno:" 是, 否, 取消"={{ value2|yesno:" 是, 否, 取消" }} <br/>
		html={{ html }}, html|safe = {{ html|safe }} <br/>
		value3 = {{ value3 }}, value3|upper = {{ value3|upper }}, value3|slugify = {{ value3|slugify }}<br/>
	</h6>
</body>
</html>

執行結果:
開啟瀏覽器,輸入http://127.0.0.1:8000/filter/。


Django 5.0:視圖(View)傳送串列(List)資料到模版(Template)

參考資料:Python架站特訓班Django 3最強實戰

延續專案:用擲骰子來說視圖(View)如何傳送變數到模版(Template)

範例一、依序顯示學生資料

1.設定show的URL,passdata\urls.py。

 1
 2
 3
 4
 5
 6
 7
 8
 9
10
11
12
13
14
15
16
17
18
19
20
21
22
23
24
25
26
27
"""
URL configuration for passdata project.

The `urlpatterns` list routes URLs to views. For more information please see:
    https://docs.djangoproject.com/en/5.0/topics/http/urls/
Examples:
Function views
    1. Add an import:  from my_app import views
    2. Add a URL to urlpatterns:  path('', views.home, name='home')
Class-based views
    1. Add an import:  from other_app.views import Home
    2. Add a URL to urlpatterns:  path('', Home.as_view(), name='home')
Including another URLconf
    1. Import the include() function: from django.urls import include, path
    2. Add a URL to urlpatterns:  path('blog/', include('blog.urls'))
"""
from django.contrib import admin
from django.urls import path
from passdataapp.views import dice, dice2, dice3, show

urlpatterns = [
    path('admin/', admin.site.urls),
    path('dice/', dice),
    path('dice2/', dice2),
    path('dice3/', dice3),
    path('show/', show),
]

2.定義show()函式passdataapp\views.py。

 1
 2
 3
 4
 5
 6
 7
 8
 9
10
11
12
13
14
15
16
17
18
19
20
21
22
23
24
25
26
27
28
29
30
31
32
from django.shortcuts import render
import random #加入random模組

# Create your views here.
def dice(request):
    no = random.randint(1, 6) #亂數產生1-6其中一個數字
    return render(request, "dice.html", {"no":no})

def dice2(request):
    no1 = random.randint(1, 6) #亂數產生1-6其中一個數字
    no2 = random.randint(1, 6) #亂數產生1-6其中一個數字
    no3 = random.randint(1, 6) #亂數產生1-6其中一個數字
    #使用locals()函式來傳遞所有的區域變數
    return render(request, "dice2.html", locals())
    
times = 0
def dice3(request):
    global times    #宣告global變數
    times = times + 1
    local_times = times
    username = "David"
    no = random.randint(1, 6) #亂數產生1-6其中一個數字
    return render(request, "dice3.html", locals())

def show(request):
	student1 = {"name":"王老五","phone":"0928-123456", "age":20}
	student2 = {"name":"林大智","phone":"0928-123457", "age":21}
	student3 = {"name":"陳三省","phone":"0928-123458", "age":22}
	student4 = {"name":"董小于","phone":"0928-123459", "age":20}
	student5 = {"name":"曾小平","phone":"0928-123450", "age":19}
	students = [student1, student2, student3, student4, student5]
	return render(request, "show.html", locals())

3.新增templates\show.html檔案

 1
 2
 3
 4
 5
 6
 7
 8
 9
10
11
12
13
14
15
16
17
18
19
20
<!DOCTYPE html>
<html>
<head>
	<meta charset='utf-8'>
	<title>學生基本資料</title>
</head>
<body>
	<h4>
	{% for student in students %}
		<ul>
			<li> 姓名:{{student.name}} </li>
			<li> 手機:{{student.phone}} </li>
			<li> 年紀:{{student.age}} </li>
		</ul>
	{% empty %}
		沒有任何資料
	{% endfor %}
	</h4>
</body>
</html>

執行結果:
開啟瀏覽器,輸入http://127.0.0.1:8000/show/。


範例二、利用forloop變量及其屬性由1開始顯示資料第幾位學生
4.修訂templates\show.html檔案

 1
 2
 3
 4
 5
 6
 7
 8
 9
10
11
12
13
14
15
16
17
18
19
20
21
<!DOCTYPE html>
<html>
<head>
	<meta charset='utf-8'>
	<title>學生基本資料</title>
</head>
<body>
	<h6>
	{% for student in students %}
	{{forloop.counter}}位學生
		<ul>
			<li> 姓名:{{student.name}} </li>
			<li> 手機:{{student.phone}} </li>
			<li> 年紀:{{student.age}} </li>
		</ul>
	{% empty %}
		沒有任何資料
	{% endfor %}
	</h6>
</body>
</html>

執行結果:
開啟瀏覽器,輸入http://127.0.0.1:8000/show/。

範例三、for迴圈倒轉
5.修訂templates\show.html檔案

 1
 2
 3
 4
 5
 6
 7
 8
 9
10
11
12
13
14
15
16
17
18
19
20
21
<!DOCTYPE html>
<html>
<head>
	<meta charset='utf-8'>
	<title>學生基本資料</title>
</head>
<body>
	<h6>
	{% for student in students reversed %}{{forloop.revcounter}}位學生
		<ul>
			<li> 姓名:{{student.name}} </li>
			<li> 手機:{{student.phone}} </li>
			<li> 年紀:{{student.age}} </li>
		</ul>
	{% empty %}
		沒有任何資料
	{% endfor %}
	</h6>
</body>
</html>

執行結果:
開啟瀏覽器,輸入http://127.0.0.1:8000/show/。


Django 5.0:用擲骰子來說視圖(View)如何傳送變數到模版(Template)

 參考資料:Python架站特訓班Django 3最強實戰

1.打開cmd,輸入mkvirtualenv passdata命令建立虛擬環境。


2.輸入pip install django建立Django套件。

3.輸入django-admin startproject passdata來建立Djano專案,利用cd passdata來切換目錄

4.輸入python manage.py startapp passdataapp來建立應用程式,利用md static以及md templates來建立static以及templates目錄。

5.輸入python manage.py migrate指令進行模型(Model)與資料庫(Database)的同步。

6.輸入python manage.py runserver指令來啟動Server。

7.打開瀏覽器,輸入http://127.0.0.1:8000/網址,開啟首頁。

8.環境設定,設定settings.py,passdata\settings.py。

範例一、傳遞變數到Template模版
9.環境設定,設定settings.py,passdata\settings.py。
  1
  2
  3
  4
  5
  6
  7
  8
  9
 10
 11
 12
 13
 14
 15
 16
 17
 18
 19
 20
 21
 22
 23
 24
 25
 26
 27
 28
 29
 30
 31
 32
 33
 34
 35
 36
 37
 38
 39
 40
 41
 42
 43
 44
 45
 46
 47
 48
 49
 50
 51
 52
 53
 54
 55
 56
 57
 58
 59
 60
 61
 62
 63
 64
 65
 66
 67
 68
 69
 70
 71
 72
 73
 74
 75
 76
 77
 78
 79
 80
 81
 82
 83
 84
 85
 86
 87
 88
 89
 90
 91
 92
 93
 94
 95
 96
 97
 98
 99
100
101
102
103
104
105
106
107
108
109
110
111
112
113
114
115
116
117
118
119
120
121
122
123
124
125
126
"""
Django settings for passdata project.

Generated by 'django-admin startproject' using Django 5.0.2.

For more information on this file, see
https://docs.djangoproject.com/en/5.0/topics/settings/

For the full list of settings and their values, see
https://docs.djangoproject.com/en/5.0/ref/settings/
"""

from pathlib import Path

# Build paths inside the project like this: BASE_DIR / 'subdir'.
BASE_DIR = Path(__file__).resolve().parent.parent


# Quick-start development settings - unsuitable for production
# See https://docs.djangoproject.com/en/5.0/howto/deployment/checklist/

# SECURITY WARNING: keep the secret key used in production secret!
SECRET_KEY = 'django-insecure-&no51-lnfzi&69rr-zvymsabq0=ay5ydi-auxfn4%en^623xm)'

# SECURITY WARNING: don't run with debug turned on in production!
DEBUG = True

ALLOWED_HOSTS = []


# Application definition

INSTALLED_APPS = [
    'django.contrib.admin',
    'django.contrib.auth',
    'django.contrib.contenttypes',
    'django.contrib.sessions',
    'django.contrib.messages',
    'django.contrib.staticfiles',
    'passdataapp',
]

MIDDLEWARE = [
    'django.middleware.security.SecurityMiddleware',
    'django.contrib.sessions.middleware.SessionMiddleware',
    'django.middleware.common.CommonMiddleware',
    'django.middleware.csrf.CsrfViewMiddleware',
    'django.contrib.auth.middleware.AuthenticationMiddleware',
    'django.contrib.messages.middleware.MessageMiddleware',
    'django.middleware.clickjacking.XFrameOptionsMiddleware',
]

ROOT_URLCONF = 'passdata.urls'

TEMPLATES = [
    {
        'BACKEND': 'django.template.backends.django.DjangoTemplates',
        'DIRS': [BASE_DIR/'templates'],
        'APP_DIRS': True,
        'OPTIONS': {
            'context_processors': [
                'django.template.context_processors.debug',
                'django.template.context_processors.request',
                'django.contrib.auth.context_processors.auth',
                'django.contrib.messages.context_processors.messages',                
            ],
        },
    },
]

WSGI_APPLICATION = 'passdata.wsgi.application'


# Database
# https://docs.djangoproject.com/en/5.0/ref/settings/#databases

DATABASES = {
    'default': {
        'ENGINE': 'django.db.backends.sqlite3',
        'NAME': BASE_DIR / 'db.sqlite3',
    }
}


# Password validation
# https://docs.djangoproject.com/en/5.0/ref/settings/#auth-password-validators

AUTH_PASSWORD_VALIDATORS = [
    {
        'NAME': 'django.contrib.auth.password_validation.UserAttributeSimilarityValidator',
    },
    {
        'NAME': 'django.contrib.auth.password_validation.MinimumLengthValidator',
    },
    {
        'NAME': 'django.contrib.auth.password_validation.CommonPasswordValidator',
    },
    {
        'NAME': 'django.contrib.auth.password_validation.NumericPasswordValidator',
    },
]


# Internationalization
# https://docs.djangoproject.com/en/5.0/topics/i18n/

LANGUAGE_CODE = 'zh-hant'

TIME_ZONE = 'Asia/Taipei'

USE_I18N = True

USE_TZ = True


# Static files (CSS, JavaScript, Images)
# https://docs.djangoproject.com/en/5.0/howto/static-files/

STATIC_URL = 'static/'
STATICFILES_DIRS = [
    BASE_DIR/'static',
    ]
# Default primary key field type
# https://docs.djangoproject.com/en/5.0/ref/settings/#default-auto-field

DEFAULT_AUTO_FIELD = 'django.db.models.BigAutoField'

重新整理

10.設定URL,passdata\urls.py。
 1
 2
 3
 4
 5
 6
 7
 8
 9
10
11
12
13
14
15
16
17
18
19
20
21
22
23
24
"""
URL configuration for passdata project.

The `urlpatterns` list routes URLs to views. For more information please see:
    https://docs.djangoproject.com/en/5.0/topics/http/urls/
Examples:
Function views
    1. Add an import:  from my_app import views
    2. Add a URL to urlpatterns:  path('', views.home, name='home')
Class-based views
    1. Add an import:  from other_app.views import Home
    2. Add a URL to urlpatterns:  path('', Home.as_view(), name='home')
Including another URLconf
    1. Import the include() function: from django.urls import include, path
    2. Add a URL to urlpatterns:  path('blog/', include('blog.urls'))
"""
from django.contrib import admin
from django.urls import path
from passdataapp.views import dice

urlpatterns = [
    path('admin/', admin.site.urls),
    path('dice/', dice),
]

11.定義dice()函式passdataapp\views.py。

1
2
3
4
5
6
7
from django.shortcuts import render
import random #加入random模組

# Create your views here.
def dice(request):
    no = random.randint(1, 6) #亂數產生1-6其中一個數字
    return render(request, "dice.html", {"no":no})

12.新增templates\dice.html檔案

 1
 2
 3
 4
 5
 6
 7
 8
 9
10
<!DOCTYPE html>
<html>
<head>
	<meta charset='utf-8'>
	<title>擲骰子</title>
</head>
<body>
	<h1>點數:{{no}}</h1>
</body>
</html>

執行結果:
13.開啟瀏覽器,輸入http://127.0.0.1:8000/dice/。

範例二、使用locals()傳遞變數到Template模版(一)-同時顯示3顆骰子點數
14. 設定dice2的URL,passdata\urls.py。

 1
 2
 3
 4
 5
 6
 7
 8
 9
10
11
12
13
14
15
16
17
18
19
20
21
22
23
24
25
"""
URL configuration for passdata project.

The `urlpatterns` list routes URLs to views. For more information please see:
    https://docs.djangoproject.com/en/5.0/topics/http/urls/
Examples:
Function views
    1. Add an import:  from my_app import views
    2. Add a URL to urlpatterns:  path('', views.home, name='home')
Class-based views
    1. Add an import:  from other_app.views import Home
    2. Add a URL to urlpatterns:  path('', Home.as_view(), name='home')
Including another URLconf
    1. Import the include() function: from django.urls import include, path
    2. Add a URL to urlpatterns:  path('blog/', include('blog.urls'))
"""
from django.contrib import admin
from django.urls import path
from passdataapp.views import dice, dice2

urlpatterns = [
    path('admin/', admin.site.urls),
    path('dice/', dice),
    path('dice2/', dice2),
]

15.定義dice2()函式passdataapp\views.py。

 1
 2
 3
 4
 5
 6
 7
 8
 9
10
11
12
13
14
from django.shortcuts import render
import random #加入random模組

# Create your views here.
def dice(request):
    no = random.randint(1, 6) #亂數產生1-6其中一個數字
    return render(request, "dice.html", {"no":no})

def dice2(request):
    no1 = random.randint(1, 6) #亂數產生1-6其中一個數字
    no2 = random.randint(1, 6) #亂數產生1-6其中一個數字
    no3 = random.randint(1, 6) #亂數產生1-6其中一個數字
    #使用locals()函式來傳遞所有的區域變數
    return render(request, "dice2.html", locals())

16.新增templates\dice2.html檔案

 1
 2
 3
 4
 5
 6
 7
 8
 9
10
11
12
<!DOCTYPE html>
<html>
<head>
	<meta charset='utf-8'>
	<title>擲骰子 (二)</title>
</head>
<body>
	<h1>點數{{no1}}</h1>
	<h1>點數二:{{no2}}</h1>
	<h1>點數三:{{no3}}</h1>
</body>
</html>

執行結果:
17.開啟瀏覽器,輸入http://127.0.0.1:8000/dice2/。

範例三、使用locals()傳遞變數到Template模版(二)-顯示玩家名稱、骰子點數和累計數。
18. 設定dice3的URL,passdata\urls.py。

 1
 2
 3
 4
 5
 6
 7
 8
 9
10
11
12
13
14
15
16
17
18
19
20
21
22
23
24
25
26
"""
URL configuration for passdata project.

The `urlpatterns` list routes URLs to views. For more information please see:
    https://docs.djangoproject.com/en/5.0/topics/http/urls/
Examples:
Function views
    1. Add an import:  from my_app import views
    2. Add a URL to urlpatterns:  path('', views.home, name='home')
Class-based views
    1. Add an import:  from other_app.views import Home
    2. Add a URL to urlpatterns:  path('', Home.as_view(), name='home')
Including another URLconf
    1. Import the include() function: from django.urls import include, path
    2. Add a URL to urlpatterns:  path('blog/', include('blog.urls'))
"""
from django.contrib import admin
from django.urls import path
from passdataapp.views import dice, dice2, dice3

urlpatterns = [
    path('admin/', admin.site.urls),
    path('dice/', dice),
    path('dice2/', dice2),
    path('dice3/', dice3),
]

19.定義dice3()函式passdataapp\views.py。

 1
 2
 3
 4
 5
 6
 7
 8
 9
10
11
12
13
14
15
16
17
18
19
20
21
22
23
from django.shortcuts import render
import random #加入random模組

# Create your views here.
def dice(request):
    no = random.randint(1, 6) #亂數產生1-6其中一個數字
    return render(request, "dice.html", {"no":no})

def dice2(request):
    no1 = random.randint(1, 6) #亂數產生1-6其中一個數字
    no2 = random.randint(1, 6) #亂數產生1-6其中一個數字
    no3 = random.randint(1, 6) #亂數產生1-6其中一個數字
    #使用locals()函式來傳遞所有的區域變數
    return render(request, "dice2.html", locals())
    
times = 0
def dice3(request):
    global times    #宣告global變數
    times = times + 1
    local_times = times
    username = "David"
    no = random.randint(1, 6) #亂數產生1-6其中一個數字
    return render(request, "dice3.html", locals())

20.新增templates\dice3.html檔案
 1
 2
 3
 4
 5
 6
 7
 8
 9
10
11
12
<!DOCTYPE html>
<html>
<head>
	<meta charset='utf-8'>
	<title>擲骰子 (三)</title>
</head>
<body>
	<h1>玩家:{{username}}</h1>
	<h1>點數:{{no}}</h1>
	<h1>累計次數:{{local_times}}</h1>
</body>
</html>

執行結果:
17.開啟瀏覽器,輸入http://127.0.0.1:8000/dice3/。


2024年2月11日 星期日

建立Django 5.0的專案以及app

參考資料:Python架站特訓班Django 3最強實戰,碁峰。


1.打開cmd,輸入mkvirtualenv django_first命令建立虛擬環境。


2.輸入pip install django建立Django套件。


3.使用pip list命令檢查Django版本。


4.輸入django-admin startproject firstproject來建立Djano專案,利用cd firstproject來切換目錄,再利用dir來查看目錄中的檔案。


5.輸入Python manage.py startapp myapp來建立應用程式,利用md static來建立static目錄。


6.輸入python manage.py migrate指令進行模型(Model)與資料庫(Database)的同步。


7.輸入python manage.py runserver指令來啟動Server。


8.打開瀏覽器,輸入http://127.0.0.1:8000/網址,開啟首頁。


9.環境設定,設定settings.py,firstproject\settings.py。

  1
  2
  3
  4
  5
  6
  7
  8
  9
 10
 11
 12
 13
 14
 15
 16
 17
 18
 19
 20
 21
 22
 23
 24
 25
 26
 27
 28
 29
 30
 31
 32
 33
 34
 35
 36
 37
 38
 39
 40
 41
 42
 43
 44
 45
 46
 47
 48
 49
 50
 51
 52
 53
 54
 55
 56
 57
 58
 59
 60
 61
 62
 63
 64
 65
 66
 67
 68
 69
 70
 71
 72
 73
 74
 75
 76
 77
 78
 79
 80
 81
 82
 83
 84
 85
 86
 87
 88
 89
 90
 91
 92
 93
 94
 95
 96
 97
 98
 99
100
101
102
103
104
105
106
107
108
109
110
111
112
113
114
115
116
117
118
119
120
121
122
123
124
125
126
127
"""
Django settings for firstproject project.

Generated by 'django-admin startproject' using Django 5.0.2.

For more information on this file, see
https://docs.djangoproject.com/en/5.0/topics/settings/

For the full list of settings and their values, see
https://docs.djangoproject.com/en/5.0/ref/settings/
"""

from pathlib import Path

# Build paths inside the project like this: BASE_DIR / 'subdir'.
BASE_DIR = Path(__file__).resolve().parent.parent


# Quick-start development settings - unsuitable for production
# See https://docs.djangoproject.com/en/5.0/howto/deployment/checklist/

# SECURITY WARNING: keep the secret key used in production secret!
SECRET_KEY = 'django-insecure-+f^d-9+pr$ii+cb4aqa4out6pgey@#y-r9k*vva=x#s&dhf4nj'

# SECURITY WARNING: don't run with debug turned on in production!
DEBUG = False

ALLOWED_HOSTS = ['127.0.0.1']


# Application definition

INSTALLED_APPS = [
    'django.contrib.admin',
    'django.contrib.auth',
    'django.contrib.contenttypes',
    'django.contrib.sessions',
    'django.contrib.messages',
    'django.contrib.staticfiles',
    'myapp',
]

MIDDLEWARE = [
    'django.middleware.security.SecurityMiddleware',
    'django.contrib.sessions.middleware.SessionMiddleware',
    'django.middleware.common.CommonMiddleware',
    'django.middleware.csrf.CsrfViewMiddleware',
    'django.contrib.auth.middleware.AuthenticationMiddleware',
    'django.contrib.messages.middleware.MessageMiddleware',
    'django.middleware.clickjacking.XFrameOptionsMiddleware',
]

ROOT_URLCONF = 'firstproject.urls'

TEMPLATES = [
    {
        'BACKEND': 'django.template.backends.django.DjangoTemplates',
        'DIRS': [BASE_DIR/'templates'],
        'APP_DIRS': True,
        'OPTIONS': {
            'context_processors': [
                'django.template.context_processors.debug',
                'django.template.context_processors.request',
                'django.contrib.auth.context_processors.auth',
                'django.contrib.messages.context_processors.messages',
            ],
        },
    },
]

WSGI_APPLICATION = 'firstproject.wsgi.application'


# Database
# https://docs.djangoproject.com/en/5.0/ref/settings/#databases

DATABASES = {
    'default': {
        'ENGINE': 'django.db.backends.sqlite3',
        'NAME': BASE_DIR / 'db.sqlite3',
    }
}


# Password validation
# https://docs.djangoproject.com/en/5.0/ref/settings/#auth-password-validators

AUTH_PASSWORD_VALIDATORS = [
    {
        'NAME': 'django.contrib.auth.password_validation.UserAttributeSimilarityValidator',
    },
    {
        'NAME': 'django.contrib.auth.password_validation.MinimumLengthValidator',
    },
    {
        'NAME': 'django.contrib.auth.password_validation.CommonPasswordValidator',
    },
    {
        'NAME': 'django.contrib.auth.password_validation.NumericPasswordValidator',
    },
]


# Internationalization
# https://docs.djangoproject.com/en/5.0/topics/i18n/

LANGUAGE_CODE = 'zh-hant'

TIME_ZONE = 'Asia/Taipei'

USE_I18N = True

USE_TZ = True


# Static files (CSS, JavaScript, Images)
# https://docs.djangoproject.com/en/5.0/howto/static-files/

STATIC_URL = 'static/'
STATICFILES_DIRS = [
    BASE_DIR/'static',
    ]

# Default primary key field type
# https://docs.djangoproject.com/en/5.0/ref/settings/#default-auto-field

DEFAULT_AUTO_FIELD = 'django.db.models.BigAutoField'

重新整理


10.設定URL,firstproject\urls.py。

 1
 2
 3
 4
 5
 6
 7
 8
 9
10
11
12
13
14
15
16
17
18
19
20
21
22
23
24
"""
URL configuration for firstproject project.

The `urlpatterns` list routes URLs to views. For more information please see:
    https://docs.djangoproject.com/en/5.0/topics/http/urls/
Examples:
Function views
    1. Add an import:  from my_app import views
    2. Add a URL to urlpatterns:  path('', views.home, name='home')
Class-based views
    1. Add an import:  from other_app.views import Home
    2. Add a URL to urlpatterns:  path('', Home.as_view(), name='home')
Including another URLconf
    1. Import the include() function: from django.urls import include, path
    2. Add a URL to urlpatterns:  path('blog/', include('blog.urls'))
"""
from django.contrib import admin
from django.urls import path
from myapp.views import sayhello

urlpatterns = [
    path('admin/', admin.site.urls),
    path('', sayhello),
]

11.定義函式myapp\views.py。

1
2
3
4
5
6
from django.shortcuts import render
from django.http import HttpResponse

# Create your views here.
def sayhello(request):
    return HttpResponse("Hello Django")

重新整理


12.利用網址傳送參數
12.1 新增sayhello2,firstproject\ulrs.py
 1
 2
 3
 4
 5
 6
 7
 8
 9
10
11
12
13
14
15
16
17
18
19
20
21
22
23
24
25
"""
URL configuration for firstproject project.

The `urlpatterns` list routes URLs to views. For more information please see:
    https://docs.djangoproject.com/en/5.0/topics/http/urls/
Examples:
Function views
    1. Add an import:  from my_app import views
    2. Add a URL to urlpatterns:  path('', views.home, name='home')
Class-based views
    1. Add an import:  from other_app.views import Home
    2. Add a URL to urlpatterns:  path('', Home.as_view(), name='home')
Including another URLconf
    1. Import the include() function: from django.urls import include, path
    2. Add a URL to urlpatterns:  path('blog/', include('blog.urls'))
"""
from django.contrib import admin
from django.urls import path
from myapp.views import sayhello, sayhello2

urlpatterns = [
    path('admin/', admin.site.urls),
    path('', sayhello),
    path('hello2/<str:username>', sayhello2),
]

12.2定義sayhello2函式,修改myapp\views.py。

1
2
3
4
5
6
7
8
9
from django.shortcuts import render
from django.http import HttpResponse

# Create your views here.
def sayhello(request):
    return HttpResponse("Hello Django")
    
def sayhello2(request, username):
    return HttpResponse("Hello " + username)

執行結果:
13.模版的使用
13.1 建立templates目錄,並新增templates\hello3.html檔案
 1
 2
 3
 4
 5
 6
 7
 8
 9
10
11
<!DOCTYPE html>
<html>
<head>
	<meta charset='utf-8'>
	<title>雲林虎尾</title>
</head>
<body>
	<h1> 歡迎光臨:{{username}} </h1>
	<h2> 現在時間:{{now}} </h2>
</body>
</html>

13.2 設定firstproject\urls.py。

 1
 2
 3
 4
 5
 6
 7
 8
 9
10
11
12
13
14
15
16
17
18
19
20
21
22
23
24
25
26
"""
URL configuration for firstproject project.

The `urlpatterns` list routes URLs to views. For more information please see:
    https://docs.djangoproject.com/en/5.0/topics/http/urls/
Examples:
Function views
    1. Add an import:  from my_app import views
    2. Add a URL to urlpatterns:  path('', views.home, name='home')
Class-based views
    1. Add an import:  from other_app.views import Home
    2. Add a URL to urlpatterns:  path('', Home.as_view(), name='home')
Including another URLconf
    1. Import the include() function: from django.urls import include, path
    2. Add a URL to urlpatterns:  path('blog/', include('blog.urls'))
"""
from django.contrib import admin
from django.urls import path
from myapp.views import sayhello, sayhello2, sayhello3

urlpatterns = [
    path('admin/', admin.site.urls),
    path('', sayhello),
    path('hello2/<str:username>', sayhello2),
    path('hello3/<str:username>', sayhello3),    
]

13.3 設定視圖函式myapp\views.py。

 1
 2
 3
 4
 5
 6
 7
 8
 9
10
11
12
13
14
from django.shortcuts import render
from django.http import HttpResponse
from datetime import datetime

# Create your views here.
def sayhello(request):
    return HttpResponse("Hello Django")
    
def sayhello2(request, username):
    return HttpResponse("Hello " + username)

def sayhello3(request, username):
    now = datetime.now()
    return render(request, "hello3.html", locals())

13.4 在瀏覽器上輸入127.0.0.1:8000/hello3/虎尾鎮。

14.加入static靜態檔案
14.1 加入hello4鏈結,firstproject\urls.py

 1
 2
 3
 4
 5
 6
 7
 8
 9
10
11
12
13
14
15
16
17
18
19
20
21
22
23
24
25
26
27
"""
URL configuration for firstproject project.

The `urlpatterns` list routes URLs to views. For more information please see:
    https://docs.djangoproject.com/en/5.0/topics/http/urls/
Examples:
Function views
    1. Add an import:  from my_app import views
    2. Add a URL to urlpatterns:  path('', views.home, name='home')
Class-based views
    1. Add an import:  from other_app.views import Home
    2. Add a URL to urlpatterns:  path('', Home.as_view(), name='home')
Including another URLconf
    1. Import the include() function: from django.urls import include, path
    2. Add a URL to urlpatterns:  path('blog/', include('blog.urls'))
"""
from django.contrib import admin
from django.urls import path
from myapp.views import sayhello, sayhello2, sayhello3, sayhello4

urlpatterns = [
    path('admin/', admin.site.urls),
    path('', sayhello),
    path('hello2/<str:username>', sayhello2),
    path('hello3/<str:username>', sayhello3),  
    path('hello4/<str:username>', sayhello4),      
]

14.2 修改視圖myapp\views.py
 1
 2
 3
 4
 5
 6
 7
 8
 9
10
11
12
13
14
15
16
17
18
from django.shortcuts import render
from django.http import HttpResponse
from datetime import datetime

# Create your views here.
def sayhello(request):
    return HttpResponse("Hello Django")
    
def sayhello2(request, username):
    return HttpResponse("Hello " + username)

def sayhello3(request, username):
    now = datetime.now()
    return render(request, "hello3.html", locals())
    
def sayhello4(request, username):
    now = datetime.now()
    return render(request, "hello4.html", locals())

14.3 修改様版templates\hello4.html。
 1
 2
 3
 4
 5
 6
 7
 8
 9
10
11
12
13
14
15
16
<!DOCTYPE html>
<html>
<head>
	<meta charset = 'utf-8'>
	<title>雲林虎尾</title>
	{% load static %}
	<link rel="stylesheet" href="{% static "css/style.css" %}">
</head>
<body>
	<div id="home">
		<img src="{% static "images/ball.png" %}" alt="歡迎光臨" width="32" height="32"/>
		<span class="info"> 歡迎光臨:{{username}} </span>
		<h2> 現在時間:{{now}} </h2>
	</div>
</body>
</html>

14.3 新增css,static/css/style.css。
1
2
3
4
.info {
	color:red;
	font-size: 1.5em;
}

執行結果: