2019年10月30日 星期三

[ Python ] Python就是好玩,三行指令串接股票市場一點都不難

1.安裝虛擬環境twstock

2.安裝串接台灣股票市場的套件
https://twstock.readthedocs.io/zh_TW/latest/quickstart.html

3.查看股票代碼,台積電的代碼是2330。
https://www.tej.com.tw/webtej/doc/uid.htm

4.撰寫列印股票代碼的程式,本範例採用Python的IDLE工,儲存成stock.py程式。

5.在cmd上執行程式,python stock.py發現少了lxml套件

6.執行安裝lxml套件
https://lxml.de/

 7.再度執行python程式,python stock.py

8.撰寫回傳台積電各日之收盤價的程式

9.回傳台積電各日之收盤價

10.撰寫回傳台積電各日之最高價的程式

11. 執行回傳台積電各日之最高價的程式

12.取得台積電及時股票資訊

13.執行取得及時股票資訊的程式,但產生錯誤

14.加入設定mock=True的指令

15.成功取得台積電即時股票資訊

2019年10月28日 星期一

[ Django ] 如何執行現有Django檔案

我們以碁峰,Python架站特訓班Django最強實戰第三章範例為例,步驟如下:
1.複製Django資料夾

2.建立虛擬環境

3. 執行migrate指令,發生問題,因為我們沒有事先裝Django

4.安裝Django

5.再執行migrate指令以及runserver指令,啟動網站

6.沒有定首頁,所以找不到

7.執行127.0.0.1:800/dice

8.執行127.0.0.1:8000/filter

9.利用filter撰寫模版

10.視圖程式

[ Django ] 在模版中加入迴圈的控制

以下範例是參考:碁峰,Python架站特訓班Django最強實戰

1.建立虛擬環境,安裝Django,建立專案以及應用程式

2.編輯personproj/personproj/settings.py (黃底字表示新增的)
  1
  2
  3
  4
  5
  6
  7
  8
  9
 10
 11
 12
 13
 14
 15
 16
 17
 18
 19
 20
 21
 22
 23
 24
 25
 26
 27
 28
 29
 30
 31
 32
 33
 34
 35
 36
 37
 38
 39
 40
 41
 42
 43
 44
 45
 46
 47
 48
 49
 50
 51
 52
 53
 54
 55
 56
 57
 58
 59
 60
 61
 62
 63
 64
 65
 66
 67
 68
 69
 70
 71
 72
 73
 74
 75
 76
 77
 78
 79
 80
 81
 82
 83
 84
 85
 86
 87
 88
 89
 90
 91
 92
 93
 94
 95
 96
 97
 98
 99
100
101
102
103
104
105
106
107
108
109
110
111
112
113
114
115
116
117
118
119
120
121
"""
Django settings for personproj project.

Generated by 'django-admin startproject' using Django 2.2.6.

For more information on this file, see
https://docs.djangoproject.com/en/2.2/topics/settings/

For the full list of settings and their values, see
https://docs.djangoproject.com/en/2.2/ref/settings/
"""

import os

# Build paths inside the project like this: os.path.join(BASE_DIR, ...)
BASE_DIR = os.path.dirname(os.path.dirname(os.path.abspath(__file__)))


# Quick-start development settings - unsuitable for production
# See https://docs.djangoproject.com/en/2.2/howto/deployment/checklist/

# SECURITY WARNING: keep the secret key used in production secret!
SECRET_KEY = '#ko&e#_pg+pk%80s674tpo&d&e_rdb)rh-v)!+uu)z$z)0eyj*'

# SECURITY WARNING: don't run with debug turned on in production!
DEBUG = True

ALLOWED_HOSTS = []


# Application definition

INSTALLED_APPS = [
    'django.contrib.admin',
    'django.contrib.auth',
    'django.contrib.contenttypes',
    'django.contrib.sessions',
    'django.contrib.messages',
    'django.contrib.staticfiles',
    'personapp',
]

MIDDLEWARE = [
    'django.middleware.security.SecurityMiddleware',
    'django.contrib.sessions.middleware.SessionMiddleware',
    'django.middleware.common.CommonMiddleware',
    'django.middleware.csrf.CsrfViewMiddleware',
    'django.contrib.auth.middleware.AuthenticationMiddleware',
    'django.contrib.messages.middleware.MessageMiddleware',
    'django.middleware.clickjacking.XFrameOptionsMiddleware',
]

ROOT_URLCONF = 'personproj.urls'

TEMPLATES = [
    {
        'BACKEND': 'django.template.backends.django.DjangoTemplates',
        'DIRS': [os.path.join(BASE_DIR, 'templates')],
        'APP_DIRS': True,
        'OPTIONS': {
            'context_processors': [
                'django.template.context_processors.debug',
                'django.template.context_processors.request',
                'django.contrib.auth.context_processors.auth',
                'django.contrib.messages.context_processors.messages',
            ],
        },
    },
]

WSGI_APPLICATION = 'personproj.wsgi.application'


# Database
# https://docs.djangoproject.com/en/2.2/ref/settings/#databases

DATABASES = {
    'default': {
        'ENGINE': 'django.db.backends.sqlite3',
        'NAME': os.path.join(BASE_DIR, 'db.sqlite3'),
    }
}


# Password validation
# https://docs.djangoproject.com/en/2.2/ref/settings/#auth-password-validators

AUTH_PASSWORD_VALIDATORS = [
    {
        'NAME': 'django.contrib.auth.password_validation.UserAttributeSimilarityValidator',
    },
    {
        'NAME': 'django.contrib.auth.password_validation.MinimumLengthValidator',
    },
    {
        'NAME': 'django.contrib.auth.password_validation.CommonPasswordValidator',
    },
    {
        'NAME': 'django.contrib.auth.password_validation.NumericPasswordValidator',
    },
]


# Internationalization
# https://docs.djangoproject.com/en/2.2/topics/i18n/

LANGUAGE_CODE = 'en-us'

TIME_ZONE = 'UTC'

USE_I18N = True

USE_L10N = True

USE_TZ = True


# Static files (CSS, JavaScript, Images)
# https://docs.djangoproject.com/en/2.2/howto/static-files/

STATIC_URL = '/static/'

3.編輯personproj/personproj/urls.py (黃底字表示新增的)
 1
 2
 3
 4
 5
 6
 7
 8
 9
10
11
12
13
14
15
16
17
18
19
20
21
22
23
"""personproj URL Configuration

The `urlpatterns` list routes URLs to views. For more information please see:
    https://docs.djangoproject.com/en/2.2/topics/http/urls/
Examples:
Function views
    1. Add an import:  from my_app import views
    2. Add a URL to urlpatterns:  path('', views.home, name='home')
Class-based views
    1. Add an import:  from other_app.views import Home
    2. Add a URL to urlpatterns:  path('', Home.as_view(), name='home')
Including another URLconf
    1. Import the include() function: from django.urls import include, path
    2. Add a URL to urlpatterns:  path('blog/', include('blog.urls'))
"""
from django.contrib import admin
from django.urls import path
from personapp.views import show

urlpatterns = [
    path('admin/', admin.site.urls),
    path('show/', show)
]

4.編輯personproj/views.py  (黃底字表示新增的)

 1
 2
 3
 4
 5
 6
 7
 8
 9
10
11
from django.shortcuts import render

# Create your views here.

def show(request):
    person1={"name":"Amy","phone":"049-1234567","age":20}
    person2={"name":"Jack","phone":"02-4455666","age":25}
    person3={"name":"Nacy","phone":"04-9876543","age":17}
    person4={"name":"王老五","phone":"04-123456","age":29}
    persons=[person1,person2,person3,person4]
    return render(request,"index.html",locals())

5.編輯personproj/templates/index.html

6.執行migrate和runserver指令,啟動網站

7.打開瀏覽器輸入
127.0.0.1:8000/show

2019年10月27日 星期日

[ Django ] 擲骰子

以下範例是參考:碁峰,Python架站特訓班Django最強實戰

1. 建立dice虛擬環境、安裝Django、建立diceproj專案以及diceapp應用程式

2.編輯程式
2.1 diceproj/diceproj/settings.py

  1
  2
  3
  4
  5
  6
  7
  8
  9
 10
 11
 12
 13
 14
 15
 16
 17
 18
 19
 20
 21
 22
 23
 24
 25
 26
 27
 28
 29
 30
 31
 32
 33
 34
 35
 36
 37
 38
 39
 40
 41
 42
 43
 44
 45
 46
 47
 48
 49
 50
 51
 52
 53
 54
 55
 56
 57
 58
 59
 60
 61
 62
 63
 64
 65
 66
 67
 68
 69
 70
 71
 72
 73
 74
 75
 76
 77
 78
 79
 80
 81
 82
 83
 84
 85
 86
 87
 88
 89
 90
 91
 92
 93
 94
 95
 96
 97
 98
 99
100
101
102
103
104
105
106
107
108
109
110
111
112
113
114
115
116
117
118
119
120
121
"""
Django settings for diceproj project.

Generated by 'django-admin startproject' using Django 2.2.6.

For more information on this file, see
https://docs.djangoproject.com/en/2.2/topics/settings/

For the full list of settings and their values, see
https://docs.djangoproject.com/en/2.2/ref/settings/
"""

import os

# Build paths inside the project like this: os.path.join(BASE_DIR, ...)
BASE_DIR = os.path.dirname(os.path.dirname(os.path.abspath(__file__)))


# Quick-start development settings - unsuitable for production
# See https://docs.djangoproject.com/en/2.2/howto/deployment/checklist/

# SECURITY WARNING: keep the secret key used in production secret!
SECRET_KEY = '9nehr73)zu99=_upne2^5la0(!y-@0hm5$bs)8v_4skj-^4sad'

# SECURITY WARNING: don't run with debug turned on in production!
DEBUG = True

ALLOWED_HOSTS = []


# Application definition

INSTALLED_APPS = [
    'django.contrib.admin',
    'django.contrib.auth',
    'django.contrib.contenttypes',
    'django.contrib.sessions',
    'django.contrib.messages',
    'django.contrib.staticfiles',
    'diceapp',
]

MIDDLEWARE = [
    'django.middleware.security.SecurityMiddleware',
    'django.contrib.sessions.middleware.SessionMiddleware',
    'django.middleware.common.CommonMiddleware',
    'django.middleware.csrf.CsrfViewMiddleware',
    'django.contrib.auth.middleware.AuthenticationMiddleware',
    'django.contrib.messages.middleware.MessageMiddleware',
    'django.middleware.clickjacking.XFrameOptionsMiddleware',
]

ROOT_URLCONF = 'diceproj.urls'

TEMPLATES = [
    {
        'BACKEND': 'django.template.backends.django.DjangoTemplates',
        'DIRS': [os.path.join(BASE_DIR, 'templates')],
        'APP_DIRS': True,
        'OPTIONS': {
            'context_processors': [
                'django.template.context_processors.debug',
                'django.template.context_processors.request',
                'django.contrib.auth.context_processors.auth',
                'django.contrib.messages.context_processors.messages',
            ],
        },
    },
]

WSGI_APPLICATION = 'diceproj.wsgi.application'


# Database
# https://docs.djangoproject.com/en/2.2/ref/settings/#databases

DATABASES = {
    'default': {
        'ENGINE': 'django.db.backends.sqlite3',
        'NAME': os.path.join(BASE_DIR, 'db.sqlite3'),
    }
}


# Password validation
# https://docs.djangoproject.com/en/2.2/ref/settings/#auth-password-validators

AUTH_PASSWORD_VALIDATORS = [
    {
        'NAME': 'django.contrib.auth.password_validation.UserAttributeSimilarityValidator',
    },
    {
        'NAME': 'django.contrib.auth.password_validation.MinimumLengthValidator',
    },
    {
        'NAME': 'django.contrib.auth.password_validation.CommonPasswordValidator',
    },
    {
        'NAME': 'django.contrib.auth.password_validation.NumericPasswordValidator',
    },
]


# Internationalization
# https://docs.djangoproject.com/en/2.2/topics/i18n/

LANGUAGE_CODE = 'en-us'

TIME_ZONE = 'UTC'

USE_I18N = True

USE_L10N = True

USE_TZ = True


# Static files (CSS, JavaScript, Images)
# https://docs.djangoproject.com/en/2.2/howto/static-files/

STATIC_URL = '/static/'

2.2 diceproj/diceproj/urls.py

 1
 2
 3
 4
 5
 6
 7
 8
 9
10
11
12
13
14
15
16
17
18
19
20
21
22
23
"""diceproj URL Configuration

The `urlpatterns` list routes URLs to views. For more information please see:
    https://docs.djangoproject.com/en/2.2/topics/http/urls/
Examples:
Function views
    1. Add an import:  from my_app import views
    2. Add a URL to urlpatterns:  path('', views.home, name='home')
Class-based views
    1. Add an import:  from other_app.views import Home
    2. Add a URL to urlpatterns:  path('', Home.as_view(), name='home')
Including another URLconf
    1. Import the include() function: from django.urls import include, path
    2. Add a URL to urlpatterns:  path('blog/', include('blog.urls'))
"""
from django.contrib import admin
from django.urls import path
from diceapp.views import dice

urlpatterns = [
    path('admin/', admin.site.urls),
    path('dice/', dice),
]

2.3 diceproj/diceapp/views.py

1
2
3
4
5
6
7
8
from django.shortcuts import render
import random

# Create your views here.

def dice(request):
    no=random.randint(1, 6)
    return render(request, 'dice.html', locals()) 

2.4 diceproj/templates/dice.html

3.執行結果

4.diceproj/diceapp/views.py 變成三個變數

 1
 2
 3
 4
 5
 6
 7
 8
 9
10
from django.shortcuts import render
import random

# Create your views here.

def dice(request):
    no1=random.randint(1, 6)
    no2=random.randint(1, 6)
    no3=random.randint(1, 6)
    return render(request, 'dice.html', locals()) 

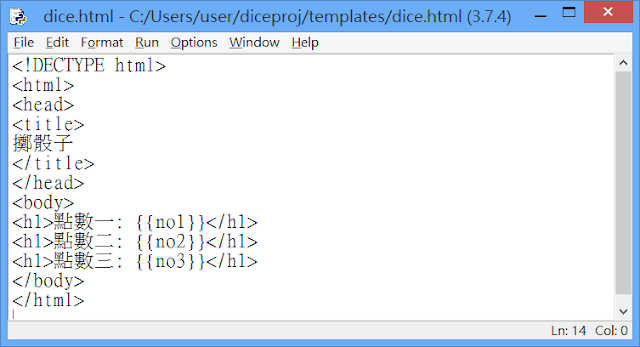
5.修改diceproj/templates/dice.html


6.執行結果

7.全域變數和區域變數

 1
 2
 3
 4
 5
 6
 7
 8
 9
10
11
12
13
14
from django.shortcuts import render
import random

# Create your views here.
times=0

def dice(request):
    global times
    times=times+1
    local_times=times
    no1=random.randint(1, 6)
    no2=random.randint(1, 6)
    no3=random.randint(1, 6)
    return render(request, 'dice.html', locals()) 

8.修訂模版

9.執行結果


[ Django ] 在MTV架構下的視圖與模版

Django採用MTV的架構來設計網站,主要是讓程式變得更有結構,MTV三個重要元素分述如下:

模型(Model):處理商業邏輯以及資料庫存取。
模版或樣版(Template):使用模版變數,建構前台UI的介面,讓後台能將資料傳到模版變數。
視圖(View):讀取資料庫中的資料,運算後再寫入資料庫,並依照使用者需求呼叫相對應的模版,並傳送運算後的變數到模版中。


參考資料:https://mropengate.blogspot.com/2015/08/mvcdjangomtv.html

以下範例是參考:碁峰,Python架站特訓班Django最強實戰

範例:取得現在時刻

1.建立now虛擬環境

2.安裝Django

3.建立nowproj專案

4. 建立nowapp應用程式

5.編輯首頁路徑,呼叫gettime函式

6. 安裝nowapp以及設定模版目錄

7.編輯首頁HTML檔,並建立templates目錄,儲存index.html

8.編輯視圖中的get_time函式

9. 執行產生資料庫表單各種初始化

10.啟動網站

11.查看結果


2019年10月20日 星期日

[ Django 教學 ] 建立Model資料表到樣版程式的設計

1.建立student虛擬環境

2.安裝Django

3.建立students專案

4-1.切換目錄


4-2建立studentapp應用程式

5.移植資料庫

6.啟動網站

7.打開網站

8.在settings.py輸入已安裝APP,studentapp

9-1.建立學生資料庫

9-2.將資料表加入後台

10.建立超級使用者

11.再度啟動

12.進入管理模式
127.0.0.1:8000/admin

13.輸入帳號和密碼

14.點選Student的Add鍵,建立一筆資料

15.輸入第一筆資料

16.發生錯誤,沒有studentapp_student資料表

17.重新遷移資料表


 18.已建立第一筆資料

19.再建一筆資料

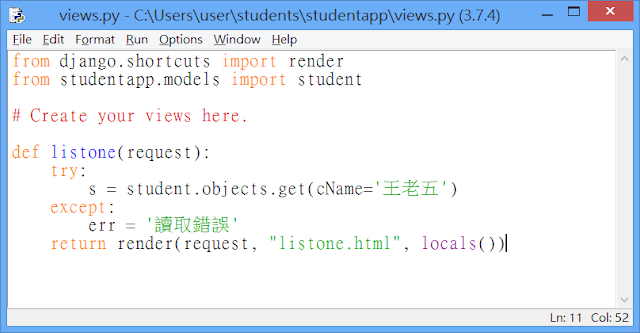
20.在views.py中建立listone函式

21.在urls.py中加入一個path

22.建立listone.html的樣版程式,並在students目前下建立templates目錄

23.在settings.py中建立templates目錄的路徑

24.重新啟動網站

25.設計能顯示所有資料的listall函式

26.又多出一條path

27.執行結果

28. 建立基礎樣版base.html

29.建立延伸基礎樣版的首頁樣版index.html

31.增加首頁的path

32.加入呼叫首頁的視域程式

33.啟動網站

34.測試