2010年3月31日 星期三

Android 按鍵處理程序教學


Android Hello應用程式教學


Xshell

對Linux的使用者而言,我們最需要的就是能遠端連線到機器做管理。文字模式連線主要有以『明碼』傳送資料的 telnet,及以加密技術進行封包加密來傳送的 SSH 。雖然 telnet 可以支援的 client 端軟體比較多,不過由於他是使用明碼來傳送資料, 資料很容易遭到有心人士的擷取。所以近來所有的Linux版本都使用 SSH 這一種連線方式,而捨棄掉 telnet 這個比較不安全的協定。

在 Windows 作業系統底下,我們可以使用 putty 連線到 SSH 伺服器呢。它是免費的自由軟體,但功能還是不足。另一個選擇就是SecureCRT,但它是付費的軟體,所以不考慮。今天介紹大家使用一個 ssh client 軟體,也就是 Xshell。它雖然是付費軟體,但對個人和學交使用是免費的。它支援 SSSH1, SSH2, SFTP, TELNET, RLOGIN, SERIAL 等協定,功能和SecureCRT相比一點都不遜色。而我最欣賞它的地方就是它的多國語言支援能力。很多連線軟體遇到中文或UTF-8的文字常常會變亂碼,而Xshell是我用過對中文處理最好的。

有興趣的讀者可以到 http://www.netsarang.com/ 下載
NetSarang的另一套 Xftp 也是一個不錯的ftp client,對個人和學交也是免費使用。

2010年3月30日 星期二

Tera Term

對於嵌入式系統開發者而言,串列埠的終端軟體應該是最常使用到的。在 Windows XP 時代有一個「超級終端機」可以用,但自從微軟在 Vista 中移除了據說「年久失修」的超級端機後,Windows Vista 的使用者幾乎只剩 PuTTY 或付費的 SecureCRT 可以用了。

這裡介紹一個好用的軟體工具 -- Tera Term。

它是一個採用 BSD 授權的開放源碼產品,而且支援 Windows XP 和 Vista,更重要的是它也支援 zmodem 協議,相當方便好用。

有興趣的讀者可以到 http://ttssh2.sourceforge.jp/ 下載 Tera Term 試試唷!

openremote project-用iPhone 或 Android 手機遙控家裡的電器

官網:http://openremote.org/display/HOME/OpenRemote

打造「智慧住家」(Smart Home)所需的居家自動化技術,目前多半用的是專屬的技術和協定,缺乏互通和替換性。因為廠商想要把顧客鎖在他們自家的產品裡,顧客很難自行客製化或擴充產品的功能,這常常造成裝機成本的上升。
OpenRemote 是個用 GPL 授權釋出的開放源碼專案,想要打造一個居家自動化的自由開放平台。它是基於 Linux 和 Java runtime 的一個中介軟體,可以在一般 PC 上執行。OpenRemote 社群把好幾種居家自動化的協定和設備整合起來,希望能解放智慧住家的真正潛力,而且讓一般人都負擔得起。

Demo:http://www.youtube.com/user/openremote#p/a/u/0/kOp07U82cRs

Android 2.0 Platform Highlights

巨量輸出控制實驗

我們來談談如何撰寫USB巨量傳輸控制(個人電腦傳送資料給USB設備)
有三個非常重要的暫存器
xdata char OUT2BUF[64] _at_ 0x7DC0;//端點2的輸出共佔記憶體64位元
xdata char OUT2BC _at_ 0x7FC9; //此暫存器是表示共接收到電腦傳來的資料長
//設定為0表示可以再接收
xdata char OUT2CS _at_ 0x7FC8; // EP2OUT 控制/狀態暫存器

以下是完整的程式列表
// CH-10 巨量傳輸至LED程式範例 01/08/02, SYH
// 透過USB 端點2OUT來傳送資料至LED顯示器上


//設定I/O埠A,B,C,D控制的相關暫存器記憶體位址
xdata char PORTACFG _at_ 0x7F93;
xdata char PORTBCFG _at_ 0x7F94;
xdata char PORTCCFG _at_ 0x7F95;
xdata char OUTA _at_ 0x7F96;
xdata char OUTB _at_ 0x7F97;
xdata char OUTC _at_ 0x7F98;
xdata char PINSA _at_ 0x7F99;
xdata char PINSB _at_ 0x7F9A;
xdata char PINSC _at_ 0x7F9B;
xdata char OEA _at_ 0x7F9C;
xdata char OEB _at_ 0x7F9D;
xdata char OEC _at_ 0x7F9E;
xdata char OUTD _at_ 0x7841;
xdata char PINSD _at_ 0x7842;
xdata char OED _at_ 0x7843;


xdata char OUT2BUF[64] _at_ 0x7DC0;
xdata char OUT2BC _at_ 0x7FC9;
xdata char OUT2CS _at_ 0x7FC8; // EP2OUT 控制/狀態暫存器

#define bBSY 0x02 // OUT2CS.1為忙碌位元
#define DISPLAYTIME 400 // approx. milliseconds

char count,j; // 傳送至EP2OUT2緩衝區共'count'數值
void delay (int time);

main()
{
PORTACFG = 0x00; // 規劃PA為輸出
PORTBCFG = 0x00;
OEA = 0xFF;
OEB = 0xFF;
OED = 0xFF;
OUTA = 0x00; // 清除LED列的顯示
OUTB = 0x00;
OUTD = 0x00;
while (1) // 無限迴圈
{
while (OUT2CS & bBSY);// EP2OUT端點忙碌位元為HI持續等待
count = OUT2BC; // 計數EP2OUT端點傳送位元組值
for(j=0; j<count; j+=3)// 將計數值次數用來閃爍PA LED
{
OUTA=OUT2BUF[j]; //資料在PA LED顯示
OUTB=OUT2BUF[j+1]; //資料在PB LED顯示
OUTC=OUT2BUF[j+2]; //資料在PD LED顯示
delay(DISPLAYTIME); // 延遲副程式
OUTA=0x00; // 清除PA LED
OUTB=0x00; // 清除PB LED
OUTD=0x00; // 清除PD LED
delay(DISPLAYTIME);
}
OUT2BC = 0; // 配賦下一個OUT2傳輸(BC為任意值)
}
}

int i,k;
void delay (int time)
{
for (k=0; k<time; k++) // 延遲迴圈
for (i=0; i<400; i++);
}

2010年3月29日 星期一

Google 應用服務引擎介紹

Google App Engine是Google 提供的一項雲端應用,可以讓你很快的建立web服務,分享一下我的簡報,有興趣的可以玩看看哦~~

南開android車載閘道器


南開科大電資所學生參賽作品構想。

2010年3月28日 星期日

南開電通車載節能器


南開科大電通系學生參加嵌入式系統比賽的創意想法

Linux Device Driver教學資源分享

在學習嵌入式系統專業課程,驅動程式的設計是非常重要的,但國內驅動程式的書籍偏少,在這裏跟各位社員介紹免費的電子書,Linux Device Drivers, Third Edition。另外,Jollen 的 Linux Device Driver 專欄、教學文件與教育訓練,也是不錯的選擇。

2010年3月27日 星期六

部署應用程式至Android手機


部署應用程式至Android手機,筆者以HTC Hero手機為例,其步驟如下:

1. 將手機以USB與電腦連接,此時您會看到尋找新增硬體精靈的畫面,「是,只有現在(Y)」的選項,再按下「下一步(N)」的按鈕。

2. 選擇「從清單或特定位置安裝(進階)(S)」的選項,再按下「下一步(N)」的按鈕。

3.勾選「搜尋時包括這個位置(O)」的選項,並並瀏覽至Android SDK的USB Driver目錄,再按下「下一步(N)」的按鈕。

4. 安裝完成後,再按下「完成」的按鈕。

5. 接下來執行eclipse程式,會跳出Device Chooser的視窗,選擇手機後即可在您的手機上執行應用程式。

2010年3月26日 星期五

Android on openmoko: G-Sensor重力球

利用感測器模擬程式來開發感測器應用程式

在Android SDK中的ApiDemos內有sensor.java的程式,該程式是在教我們如何使用SensorManager來讀取感測器的資料,然而在模擬器上郤無法摸擬感測器的動作,本篇文章嘗試把SensorManager換成SensorManagerSimulator,其步驟如下:
1. 先建立一個Sensors的專案
package com.example.sensor;

import android.app.Activity;
import android.os.Bundle;

public class Sensors extends Activity {
/** Called when the activity is first created. */
@Override
public void onCreate(Bundle savedInstanceState) {
super.onCreate(savedInstanceState);
setContentView(R.layout.main);
}
}


2. 將ApiDemos放在os下的Sensor.java程式剪貼到sensors的專案,程式如下:
package com.example.sensor;

import android.app.Activity;
import android.content.Context;
import android.graphics.Bitmap;
import android.graphics.Canvas;
import android.graphics.Color;
import android.graphics.Paint;
import android.graphics.Path;
import android.graphics.RectF;
import android.hardware.SensorListener;
import android.hardware.SensorManager;
import android.os.Bundle;
import android.view.View;

public class Sensors extends Activity {
/** Called when the activity is first created. */
/** Tag string for our debug logs */
private static final String TAG = "Sensors";

private SensorManager mSensorManager;
private GraphView mGraphView;

private class GraphView extends View implements SensorListener
{
private Bitmap mBitmap;
private Paint mPaint = new Paint();
private Canvas mCanvas = new Canvas();
private Path mPath = new Path();
private RectF mRect = new RectF();
private float mLastValues[] = new float[3*2];
private float mOrientationValues[] = new float[3];
private int mColors[] = new int[3*2];
private float mLastX;
private float mScale[] = new float[2];
private float mYOffset;
private float mMaxX;
private float mSpeed = 1.0f;
private float mWidth;
private float mHeight;

public GraphView(Context context) {
super(context);
mColors[0] = Color.argb(192, 255, 64, 64);
mColors[1] = Color.argb(192, 64, 128, 64);
mColors[2] = Color.argb(192, 64, 64, 255);
mColors[3] = Color.argb(192, 64, 255, 255);
mColors[4] = Color.argb(192, 128, 64, 128);
mColors[5] = Color.argb(192, 255, 255, 64);

mPaint.setFlags(Paint.ANTI_ALIAS_FLAG);
mRect.set(-0.5f, -0.5f, 0.5f, 0.5f);
mPath.arcTo(mRect, 0, 180);
}

@Override
protected void onSizeChanged(int w, int h, int oldw, int oldh) {
mBitmap = Bitmap.createBitmap(w, h, Bitmap.Config.RGB_565);
mCanvas.setBitmap(mBitmap);
mCanvas.drawColor(0xFFFFFFFF);
mYOffset = h * 0.5f;
mScale[0] = - (h * 0.5f * (1.0f / (SensorManager.STANDARD_GRAVITY * 2)));
mScale[1] = - (h * 0.5f * (1.0f / (SensorManager.MAGNETIC_FIELD_EARTH_MAX)));
mWidth = w;
mHeight = h;
if (mWidth < mHeight) {
mMaxX = w;
} else {
mMaxX = w-50;
}
mLastX = mMaxX;
super.onSizeChanged(w, h, oldw, oldh);
}

@Override
protected void onDraw(Canvas canvas) {
synchronized (this) {
if (mBitmap != null) {
final Paint paint = mPaint;
final Path path = mPath;
final int outer = 0xFFC0C0C0;
final int inner = 0xFFff7010;

if (mLastX >= mMaxX) {
mLastX = 0;
final Canvas cavas = mCanvas;
final float yoffset = mYOffset;
final float maxx = mMaxX;
final float oneG = SensorManager.STANDARD_GRAVITY * mScale[0];
paint.setColor(0xFFAAAAAA);
cavas.drawColor(0xFFFFFFFF);
cavas.drawLine(0, yoffset, maxx, yoffset, paint);
cavas.drawLine(0, yoffset+oneG, maxx, yoffset+oneG, paint);
cavas.drawLine(0, yoffset-oneG, maxx, yoffset-oneG, paint);
}
canvas.drawBitmap(mBitmap, 0, 0, null);

float[] values = mOrientationValues;
if (mWidth < mHeight) {
float w0 = mWidth * 0.333333f;
float w = w0 - 32;
float x = w0*0.5f;
for (int i=0 ; i<3 ; i++) {
canvas.save(Canvas.MATRIX_SAVE_FLAG);
canvas.translate(x, w*0.5f + 4.0f);
canvas.save(Canvas.MATRIX_SAVE_FLAG);
paint.setColor(outer);
canvas.scale(w, w);
canvas.drawOval(mRect, paint);
canvas.restore();
canvas.scale(w-5, w-5);
paint.setColor(inner);
canvas.rotate(-values[i]);
canvas.drawPath(path, paint);
canvas.restore();
x += w0;
}
} else {
float h0 = mHeight * 0.333333f;
float h = h0 - 32;
float y = h0*0.5f;
for (int i=0 ; i<3 ; i++) {
canvas.save(Canvas.MATRIX_SAVE_FLAG);
canvas.translate(mWidth - (h*0.5f + 4.0f), y);
canvas.save(Canvas.MATRIX_SAVE_FLAG);
paint.setColor(outer);
canvas.scale(h, h);
canvas.drawOval(mRect, paint);
canvas.restore();
canvas.scale(h-5, h-5);
paint.setColor(inner);
canvas.rotate(-values[i]);
canvas.drawPath(path, paint);
canvas.restore();
y += h0;
}
}

}
}
}

public void onSensorChanged(int sensor, float[] values) {
//Log.d(TAG, "sensor: " + sensor + ", x: " + values[0] + ", y: " + values[1] + ", z: " + values[2]);
synchronized (this) {
if (mBitmap != null) {
final Canvas canvas = mCanvas;
final Paint paint = mPaint;
if (sensor == SensorManager.SENSOR_ORIENTATION) {
for (int i=0 ; i<3 ; i++) {
mOrientationValues[i] = values[i];
}
} else {
float deltaX = mSpeed;
float newX = mLastX + deltaX;

int j = (sensor == SensorManager.SENSOR_MAGNETIC_FIELD) ? 1 : 0;
for (int i=0 ; i<3 ; i++) {
int k = i+j*3;
final float v = mYOffset + values[i] * mScale[j];
paint.setColor(mColors[k]);
canvas.drawLine(mLastX, mLastValues[k], newX, v, paint);
mLastValues[k] = v;
}
if (sensor == SensorManager.SENSOR_MAGNETIC_FIELD)
mLastX += mSpeed;
}
invalidate();
}
}
}

public void onAccuracyChanged(int sensor, int accuracy) {
// TODO Auto-generated method stub

}
}

/**
* Initialization of the Activity after it is first created. Must at least
* call {@link android.app.Activity#setContentView setContentView()} to
* describe what is to be displayed in the screen.
*/
@Override
protected void onCreate(Bundle savedInstanceState) {
// Be sure to call the super class.
super.onCreate(savedInstanceState);

mSensorManager = (SensorManager) getSystemService(SENSOR_SERVICE);
mGraphView = new GraphView(this);
setContentView(mGraphView);
}

@Override
protected void onResume() {
super.onResume();
mSensorManager.registerListener(mGraphView,
SensorManager.SENSOR_ACCELEROMETER |
SensorManager.SENSOR_MAGNETIC_FIELD |
SensorManager.SENSOR_ORIENTATION,
SensorManager.SENSOR_DELAY_FASTEST);
}

@Override
protected void onStop() {
mSensorManager.unregisterListener(mGraphView);
super.onStop();
}
}
3. 把感測器模擬程式內sensorsimulator-1.0.0-beta1\samples\SensorDemo目錄下的lib目錄複製到sensors專案下
4. 在AndroidManifest檔案中增加Internet的選項,因為感測器的模擬軟體是用TCP/IP來和應用程式溝通。(粗體字)
<?xml version="1.0" encoding="utf-8"?>
<manifest xmlns:android="http://schemas.android.com/apk/res/android"
package="com.example.sensor"
android:versionCode="1"
android:versionName="1.0">
<application android:icon="@drawable/icon" android:label="@string/app_name">
<activity android:name=".Sensors"
android:label="@string/app_name">
<intent-filter>
<action android:name="android.intent.action.MAIN" />
<category android:name="android.intent.category.LAUNCHER" />
</intent-filter>
</activity>

</application>
<uses-sdk android:minSdkVersion="2" />


<uses-permission android:name="android.permission.INTERNET"></uses-permission>
</manifest>

5. 增加感測器模擬程式的控制程式(粗體字)
package com.example.sensor;

import org.openintents.sensorsimulator.hardware.SensorManagerSimulator;
import android.app.Activity;
import android.content.Context;
import android.graphics.Bitmap;
import android.graphics.Canvas;
import android.graphics.Color;
import android.graphics.Paint;
import android.graphics.Path;
import android.graphics.RectF;
import android.hardware.SensorListener;
import android.hardware.SensorManager;
import android.os.Bundle;
import android.view.View;

public class Sensors extends Activity {
/** Called when the activity is first created. */
/** Tag string for our debug logs */
private static final String TAG = "Sensors";

// private SensorManager mSensorManager;
private SensorManagerSimulator mSensorManager;
private GraphView mGraphView;

private class GraphView extends View implements SensorListener
{
private Bitmap mBitmap;
private Paint mPaint = new Paint();
private Canvas mCanvas = new Canvas();
private Path mPath = new Path();
private RectF mRect = new RectF();
private float mLastValues[] = new float[3*2];
private float mOrientationValues[] = new float[3];
private int mColors[] = new int[3*2];
private float mLastX;
private float mScale[] = new float[2];
private float mYOffset;
private float mMaxX;
private float mSpeed = 1.0f;
private float mWidth;
private float mHeight;

public GraphView(Context context) {
super(context);
mColors[0] = Color.argb(192, 255, 64, 64);
mColors[1] = Color.argb(192, 64, 128, 64);
mColors[2] = Color.argb(192, 64, 64, 255);
mColors[3] = Color.argb(192, 64, 255, 255);
mColors[4] = Color.argb(192, 128, 64, 128);
mColors[5] = Color.argb(192, 255, 255, 64);

mPaint.setFlags(Paint.ANTI_ALIAS_FLAG);
mRect.set(-0.5f, -0.5f, 0.5f, 0.5f);
mPath.arcTo(mRect, 0, 180);
}

@Override
protected void onSizeChanged(int w, int h, int oldw, int oldh) {
mBitmap = Bitmap.createBitmap(w, h, Bitmap.Config.RGB_565);
mCanvas.setBitmap(mBitmap);
mCanvas.drawColor(0xFFFFFFFF);
mYOffset = h * 0.5f;
mScale[0] = - (h * 0.5f * (1.0f / (SensorManager.STANDARD_GRAVITY * 2)));
mScale[1] = - (h * 0.5f * (1.0f / (SensorManager.MAGNETIC_FIELD_EARTH_MAX)));
mWidth = w;
mHeight = h;
if (mWidth < mHeight) {
mMaxX = w;
} else {
mMaxX = w-50;
}
mLastX = mMaxX;
super.onSizeChanged(w, h, oldw, oldh);
}

@Override
protected void onDraw(Canvas canvas) {
synchronized (this) {
if (mBitmap != null) {
final Paint paint = mPaint;
final Path path = mPath;
final int outer = 0xFFC0C0C0;
final int inner = 0xFFff7010;

if (mLastX >= mMaxX) {
mLastX = 0;
final Canvas cavas = mCanvas;
final float yoffset = mYOffset;
final float maxx = mMaxX;
final float oneG = SensorManager.STANDARD_GRAVITY * mScale[0];
paint.setColor(0xFFAAAAAA);
cavas.drawColor(0xFFFFFFFF);
cavas.drawLine(0, yoffset, maxx, yoffset, paint);
cavas.drawLine(0, yoffset+oneG, maxx, yoffset+oneG, paint);
cavas.drawLine(0, yoffset-oneG, maxx, yoffset-oneG, paint);
}
canvas.drawBitmap(mBitmap, 0, 0, null);

float[] values = mOrientationValues;
if (mWidth < mHeight) {
float w0 = mWidth * 0.333333f;
float w = w0 - 32;
float x = w0*0.5f;
for (int i=0 ; i<3 ; i++) {
canvas.save(Canvas.MATRIX_SAVE_FLAG);
canvas.translate(x, w*0.5f + 4.0f);
canvas.save(Canvas.MATRIX_SAVE_FLAG);
paint.setColor(outer);
canvas.scale(w, w);
canvas.drawOval(mRect, paint);
canvas.restore();
canvas.scale(w-5, w-5);
paint.setColor(inner);
canvas.rotate(-values[i]);
canvas.drawPath(path, paint);
canvas.restore();
x += w0;
}
} else {
float h0 = mHeight * 0.333333f;
float h = h0 - 32;
float y = h0*0.5f;
for (int i=0 ; i<3 ; i++) {
canvas.save(Canvas.MATRIX_SAVE_FLAG);
canvas.translate(mWidth - (h*0.5f + 4.0f), y);
canvas.save(Canvas.MATRIX_SAVE_FLAG);
paint.setColor(outer);
canvas.scale(h, h);
canvas.drawOval(mRect, paint);
canvas.restore();
canvas.scale(h-5, h-5);
paint.setColor(inner);
canvas.rotate(-values[i]);
canvas.drawPath(path, paint);
canvas.restore();
y += h0;
}
}

}
}
}

public void onSensorChanged(int sensor, float[] values) {
//Log.d(TAG, "sensor: " + sensor + ", x: " + values[0] + ", y: " + values[1] + ", z: " + values[2]);
synchronized (this) {
if (mBitmap != null) {
final Canvas canvas = mCanvas;
final Paint paint = mPaint;
if (sensor == SensorManager.SENSOR_ORIENTATION) {
for (int i=0 ; i<3 ; i++) {
mOrientationValues[i] = values[i];
}
} else {
float deltaX = mSpeed;
float newX = mLastX + deltaX;

int j = (sensor == SensorManager.SENSOR_MAGNETIC_FIELD) ? 1 : 0;
for (int i=0 ; i<3 ; i++) {
int k = i+j*3;
final float v = mYOffset + values[i] * mScale[j];
paint.setColor(mColors[k]);
canvas.drawLine(mLastX, mLastValues[k], newX, v, paint);
mLastValues[k] = v;
}
if (sensor == SensorManager.SENSOR_MAGNETIC_FIELD)
mLastX += mSpeed;
}
invalidate();
}
}
}

public void onAccuracyChanged(int sensor, int accuracy) {
// TODO Auto-generated method stub

}
}

/**
* Initialization of the Activity after it is first created. Must at least
* call {@link android.app.Activity#setContentView setContentView()} to
* describe what is to be displayed in the screen.
*/
@Override
protected void onCreate(Bundle savedInstanceState) {
// Be sure to call the super class.
super.onCreate(savedInstanceState);

// mSensorManager = (SensorManager) getSystemService(SENSOR_SERVICE);
mSensorManager = SensorManagerSimulator.getSystemService(this, SENSOR_SERVICE);
mSensorManager.connectSimulator();
mGraphView = new GraphView(this);
setContentView(mGraphView);
}

@Override
protected void onResume() {
super.onResume();
mSensorManager.registerListener(mGraphView,
SensorManager.SENSOR_ACCELEROMETER |
SensorManager.SENSOR_MAGNETIC_FIELD |
SensorManager.SENSOR_ORIENTATION,
SensorManager.SENSOR_DELAY_FASTEST);
}

@Override
protected void onStop() {
mSensorManager.unregisterListener(mGraphView);
super.onStop();
}
}


6. 在模擬器上執行模擬感測器的設定程式,進行IP設定。


7. 執行連線並勾選感測器


8. 最後執行調整感測器模擬程式觀察感測器應用程式的變化

2010年3月25日 星期四

CAN and LIN Bus Transceiver

Introduction to CAN

CAN or Controller Area Network Protocol (ISO15765)

CAN Bus Protection

OBD2 ...WIFI AND IPHONE ..TESTING IN DISCOVERY 3

OBD2 or OBD II Protocols

遊戲樣版程式改造教學之一


在3月26日我們曾介紹Google Android 遊戲樣版程式----2D Android Game Template,我們將它修改成小精靈控制程式,其修改的程式以粗體字顯示:

package eu.MrSnowflake.android.gametemplate;

import android.content.Context;
import android.graphics.Bitmap;
import android.graphics.BitmapFactory;
import android.graphics.Canvas;
import android.graphics.Paint;
import android.os.Handler;
import android.os.Message;
import android.util.AttributeSet;
import android.view.KeyEvent;
import android.view.SurfaceHolder;
import android.view.SurfaceView;

/**
* View that draws, takes keystrokes, etc. for a simple LunarLander game.
*
* Has a mode which RUNNING, PAUSED, etc. Has a x, y, dx, dy, ... capturing the
* current ship physics. All x/y etc. are measured with (0,0) at the lower left.
* updatePhysics() advances the physics based on realtime. draw() renders the
* ship, and does an invalidate() to prompt another draw() as soon as possible
* by the system.
*/
class GameView extends SurfaceView implements SurfaceHolder.Callback {
class GameThread extends Thread {
/*
* State-tracking constants
*/
public static final int STATE_LOSE = 1;
public static final int STATE_PAUSE = 2;
public static final int STATE_READY = 3;
public static final int STATE_RUNNING = 4;
public static final int STATE_WIN = 5;

private float x;
private float y;

private static final int SPEED = 100;
private boolean dRight;
private boolean dLeft;
private boolean dUp;
private boolean dDown;

private int mCanvasWidth;
private int mCanvasHeight;

private long mLastTime;
private Bitmap[] mSnowflake;
/** Message handler used by thread to post stuff back to the GameView */
private Handler mHandler;

/** The state of the game. One of READY, RUNNING, PAUSE, LOSE, or WIN */
private int mMode;
/** Indicate whether the surface has been created & is ready to draw */
private boolean mRun = false;
/** Handle to the surface manager object we interact with */
private SurfaceHolder mSurfaceHolder;

private int mDirect=0;


public GameThread(SurfaceHolder surfaceHolder, Context context,
Handler handler) {
// get handles to some important objects
mSurfaceHolder = surfaceHolder;
mHandler = handler;
mContext = context;

x = 10;
y = 10;

mSnowflake = new Bitmap[8];
mSnowflake[0] = BitmapFactory.decodeResource(mContext.getResources(), R.drawable.packman_right);
mSnowflake[1] = BitmapFactory.decodeResource(mContext.getResources(), R.drawable.packman_rightt2);
mSnowflake[2] = BitmapFactory.decodeResource(mContext.getResources(), R.drawable.packman_left);
mSnowflake[3] = BitmapFactory.decodeResource(mContext.getResources(), R.drawable.packman_left2);
mSnowflake[4] = BitmapFactory.decodeResource(mContext.getResources(), R.drawable.packman_up);
mSnowflake[5] = BitmapFactory.decodeResource(mContext.getResources(), R.drawable.packman_up2);
mSnowflake[6] = BitmapFactory.decodeResource(mContext.getResources(), R.drawable.packman_down);
mSnowflake[7] = BitmapFactory.decodeResource(mContext.getResources(), R.drawable.packman_down2);
}

/**
* Starts the game, setting parameters for the current difficulty.
*/
public void doStart() {
synchronized (mSurfaceHolder) {
// Initialize game here!

x = 10;
y = 10;

mLastTime = System.currentTimeMillis() + 100;
setState(STATE_RUNNING);
}
}

/**
* Pauses the physics update & animation.
*/
public void pause() {
synchronized (mSurfaceHolder) {
if (mMode == STATE_RUNNING)
setState(STATE_PAUSE);
}
}

@Override
public void run() {
while (mRun) {
Canvas c = null;
try {
c = mSurfaceHolder.lockCanvas(null);
synchronized (mSurfaceHolder) {
if (mMode == STATE_RUNNING)
updateGame();
doDraw(c);
}
} finally {
// do this in a finally so that if an exception is thrown
// during the above, we don't leave the Surface in an
// inconsistent state
if (c != null) {
mSurfaceHolder.unlockCanvasAndPost(c);
}
}
}
}

/**
* Used to signal the thread whether it should be running or not.
* Passing true allows the thread to run; passing false will shut it
* down if it's already running. Calling start() after this was most
* recently called with false will result in an immediate shutdown.
*
* @param b true to run, false to shut down
*/
public void setRunning(boolean b) {
mRun = b;
}

/**
* Sets the game mode. That is, whether we are running, paused, in the
* failure state, in the victory state, etc.
*
* @see #setState(int, CharSequence)
* @param mode one of the STATE_* constants
*/
public void setState(int mode) {
synchronized (mSurfaceHolder) {
setState(mode, null);
}
}

/**
* Sets the game mode. That is, whether we are running, paused, in the
* failure state, in the victory state, etc.
*
* @param mode one of the STATE_* constants
* @param message string to add to screen or null
*/
public void setState(int mode, CharSequence message) {
synchronized (mSurfaceHolder) {
mMode = mode;
}
}

/* Callback invoked when the surface dimensions change. */
public void setSurfaceSize(int width, int height) {
// synchronized to make sure these all change atomically
synchronized (mSurfaceHolder) {
mCanvasWidth = width;
mCanvasHeight = height;
}
}

/**
* Resumes from a pause.
*/
public void unpause() {
// Move the real time clock up to now
synchronized (mSurfaceHolder) {
mLastTime = System.currentTimeMillis() + 100;
}
setState(STATE_RUNNING);
}

/**
* Handles a key-down event.
*
* @param keyCode the key that was pressed
* @param msg the original event object
* @return true
*/
boolean doKeyDown(int keyCode, KeyEvent msg) {
boolean handled = false;
synchronized (mSurfaceHolder) {
if (keyCode == KeyEvent.KEYCODE_DPAD_RIGHT){
dRight = true;
handled = true;
mDirect = (mDirect+1) %2; }
if (keyCode == KeyEvent.KEYCODE_DPAD_LEFT){
dLeft = true;
handled = true;
mDirect = (mDirect+1) %2+2; }
if (keyCode == KeyEvent.KEYCODE_DPAD_UP){
dUp = true;
handled = true;
mDirect = (mDirect+1) %2+4; }
if (keyCode == KeyEvent.KEYCODE_DPAD_DOWN){
dDown = true;
handled = true;
mDirect = (mDirect+1) %2+6; }
return handled;
}
}

/**
* Handles a key-up event.
*
* @param keyCode the key that was pressed
* @param msg the original event object
* @return true if the key was handled and consumed, or else false
*/
boolean doKeyUp(int keyCode, KeyEvent msg) {
boolean handled = false;
synchronized (mSurfaceHolder) {
if (keyCode == KeyEvent.KEYCODE_DPAD_RIGHT){
dRight = false;
handled = true;

}
if (keyCode == KeyEvent.KEYCODE_DPAD_LEFT){
dLeft = false;
handled = true;
}
if (keyCode == KeyEvent.KEYCODE_DPAD_UP){
dUp = false;
handled = true;
}
if (keyCode == KeyEvent.KEYCODE_DPAD_DOWN){
dDown = false;
handled = true;
}
return handled;
}
}

/**
* Draws the ship, fuel/speed bars, and background to the provided
* Canvas.
*/
private void doDraw(Canvas canvas) {
// empty canvas
canvas.drawARGB(255, 192, 192, 192);

canvas.drawBitmap(mSnowflake[mDirect], x, y, new Paint());

}

/**
* Updates the game.
*/
private void updateGame() {
////
long now = System.currentTimeMillis();
// Do nothing if mLastTime is in the future.
// This allows the game-start to delay the start of the physics
// by 100ms or whatever.
if (mLastTime > now)
return;
double elapsed = (now - mLastTime) / 1000.0;
mLastTime = now;
////


/*
* Why use mLastTime, now and elapsed?
* Well, because the frame rate isn't always constant, it could happen your normal frame rate is 25fps
* then your char will walk at a steady pace, but when your frame rate drops to say 12fps, without elapsed
* your character will only walk half as fast as at the 25fps frame rate. Elapsed lets you manage the slowdowns
* and speedups!
*/

if (dUp)
y -= elapsed * SPEED;
if (dDown)
y += elapsed * SPEED;
if (y < 0)
y = 0;
else if (y >= mCanvasHeight - mSnowflake[0].getHeight())
y = mCanvasHeight - mSnowflake[0].getHeight();
if (dLeft)
x -= elapsed * SPEED;
if (dRight)
x += elapsed * SPEED;
if (x < 0)
x = 0;
else if (x >= mCanvasWidth - mSnowflake[0].getWidth())
x = mCanvasWidth - mSnowflake[0].getWidth();
}
}

/** Handle to the application context, used to e.g. fetch Drawables. */
private Context mContext;

/** The thread that actually draws the animation */
private GameThread thread;

public GameView(Context context, AttributeSet attrs) {
super(context, attrs);

// register our interest in hearing about changes to our surface
SurfaceHolder holder = getHolder();
holder.addCallback(this);

// create thread only; it's started in surfaceCreated()
thread = new GameThread(holder, context, new Handler() {
@Override
public void handleMessage(Message m) {
// Use for pushing back messages.
}
});

setFocusable(true); // make sure we get key events
}

/**
* Fetches the animation thread corresponding to this LunarView.
*
* @return the animation thread
*/
public GameThread getThread() {
return thread;
}

/**
* Standard override to get key-press events.
*/
@Override
public boolean onKeyDown(int keyCode, KeyEvent msg) {
return thread.doKeyDown(keyCode, msg);
}

/**
* Standard override for key-up. We actually care about these, so we can
* turn off the engine or stop rotating.
*/
@Override
public boolean onKeyUp(int keyCode, KeyEvent msg) {
return thread.doKeyUp(keyCode, msg);
}

/**
* Standard window-focus override. Notice focus lost so we can pause on
* focus lost. e.g. user switches to take a call.
*/
@Override
public void onWindowFocusChanged(boolean hasWindowFocus) {
if (!hasWindowFocus)
thread.pause();
}

/* Callback invoked when the surface dimensions change. */
public void surfaceChanged(SurfaceHolder holder, int format, int width,
int height) {
thread.setSurfaceSize(width, height);
}

/*
* Callback invoked when the Surface has been created and is ready to be
* used.
*/
public void surfaceCreated(SurfaceHolder holder) {
// start the thread here so that we don't busy-wait in run()
// waiting for the surface to be created
thread.setRunning(true);
thread.start();
}

/*
* Callback invoked when the Surface has been destroyed and must no longer
* be touched. WARNING: after this method returns, the Surface/Canvas must
* never be touched again!
*/
public void surfaceDestroyed(SurfaceHolder holder) {
// we have to tell thread to shut down & wait for it to finish, or else
// it might touch the Surface after we return and explode
boolean retry = true;
thread.setRunning(false);
while (retry) {
try {
thread.join();
retry = false;
} catch (InterruptedException e) {
}
}
}
}

2010年3月24日 星期三

大師談遊戲程式設計教學資源分享

前些日子到圖書館借了一本"大師談遊戲程式設計",今天想上網查一下是否有教學資源,想不到看到一整書的原稿。網址為:http://www.tar.hu/gamealgorithms/index.html

將感測器模擬軟體的數值傳送到車用虛擬儀表


今天教導學生如何安裝SensorSimulator的軟體,並將感測器的模擬訊號當成汽車的時速值,我還修改了SensorDemo部份程式,讓它能顯示虛擬儀表,其程式如下(粗體字為新增部份、斜體字為刪除部份):

package org.openintents.samples.SensorDemo;

import org.openintents.sensorsimulator.hardware.SensorManagerSimulator;

import android.app.Activity;
import android.content.Context;
import android.graphics.Canvas;
import android.graphics.Color;
import android.graphics.Paint;
import android.graphics.Path;
import android.graphics.RectF;
import android.hardware.SensorListener;
import android.hardware.SensorManager;
import android.os.Bundle;
import android.view.View;
import android.widget.TextView;

public class SensorDemoActivity extends Activity implements SensorListener {

private SensorManagerSimulator mSensorManager;

TextView mTextView1;
TextView mTextView2;
TextView mTextView3;

private float[] Oritation;

private VirtualMeterView mVirtualMeterView;


/** Called when the activity is first created. */
@Override
public void onCreate(Bundle savedInstanceState) {
super.onCreate(savedInstanceState);
// setContentView(R.layout.main);
Oritation = new float[3];
mVirtualMeterView=new VirtualMeterView(this);
setContentView(mVirtualMeterView);

/* mTextView1 = (TextView) findViewById(R.id.text1);
mTextView2 = (TextView) findViewById(R.id.text2);
mTextView3 = (TextView) findViewById(R.id.text3);*/


////////////////////////////////////////////////////////////////
// INSTRUCTIONS
// ============

// 1) Use the separate application SensorSimulatorSettings
// to enter the correct IP address of the SensorSimulator.
// This should work before you proceed, because the same
// settings are used for your custom sensor application.

// 2) Include sensorsimulator-lib.jar in your project.
// Put that file into the 'lib' folder.
// In Eclipse, right-click on your project in the
// Package Explorer, select
// Properties > Java Build Path > (tab) Libraries
// then click Add JARs to add this jar.

// 3) You need the permission
//
// in your Manifest file!

// 4) Instead of calling the system service to obtain the Sensor manager,
// you should obtain it from the SensorManagerSimulator:

//mSensorManager = (SensorManager) getSystemService(SENSOR_SERVICE);
mSensorManager = SensorManagerSimulator.getSystemService(this, SENSOR_SERVICE);

// 5) Connect to the sensor simulator, using the settings
// that have been set previously with SensorSimulatorSettings
mSensorManager.connectSimulator();

// The rest of your application can stay unmodified.
////////////////////////////////////////////////////////////////

}


@Override
protected void onResume() {
super.onResume();
mSensorManager.registerListener(this, SensorManager.SENSOR_ACCELEROMETER
| SensorManager.SENSOR_MAGNETIC_FIELD
| SensorManager.SENSOR_ORIENTATION,
SensorManager.SENSOR_DELAY_FASTEST);
}

@Override
protected void onStop() {
mSensorManager.unregisterListener(this);
super.onStop();
}

public void onAccuracyChanged(int sensor, int accuracy) {
}

public void onSensorChanged(int sensor, float[] values) {
switch(sensor) {
/* case SensorManager.SENSOR_ACCELEROMETER:
mTextView1.setText("Accelerometer: "
+ values[0] + ", "
+ values[1] + ", "
+ values[2]);
break;
case SensorManager.SENSOR_MAGNETIC_FIELD:
mTextView2.setText("Compass: "
+ values[0] + ", "
+ values[1] + ", "
+ values[2]);
break;*/

case SensorManager.SENSOR_ORIENTATION:

/* mTextView3.setText("Orientation: "
+ values[0] + ", "
+ values[1] + ", "
+ values[2]);*/


for(int i=0; i<3; i++)
Oritation[i]=values[i];
mVirtualMeterView.invalidate();
break;
}
}
private class VirtualMeterView extends View{
private static final String TEXTONMETER = "0 20 40 60 80 100 120 140 160 180 200 220 240 260 280 300";
private Path mPath;

public VirtualMeterView(Context context) {
super(context);
// TODO Auto-generated constructor stub

mPath = new Path();
RectF oval = new RectF(40,20,260,240);
mPath.addArc(oval , 120, 300);


}

@Override
protected void onDraw(Canvas canvas) {
// TODO Auto-generated method stub
super.onDraw(canvas);
Paint paint = new Paint();;
RectF oval = new RectF(50,30,250,230);
paint.setColor(Color.BLUE);
paint.setStyle(Paint.Style.STROKE);
canvas.drawArc(oval , 120, 300, true, paint );

paint.setStyle(Paint.Style.FILL);
paint.setColor(Color.RED);
paint.setTextSize(20);
paint.setTextAlign(Paint.Align.CENTER);
canvas.drawTextOnPath(TEXTONMETER, mPath, 0, 0, paint);

float angle;
if(Oritation[0]>300)
angle = 300;
else
angle = Oritation[0];
float x = (float) (105 * Math.cos((120+angle)/180*3.14));
float y = (float) (105 * Math.sin((120+angle)/180*3.14));
canvas.drawLine(150+x, 130+y, 150, 130, paint);
}

}

}

2010年3月23日 星期二

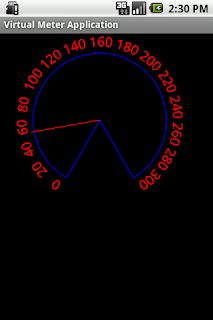
車用虛擬儀表設計

延伸閱讀車用虛擬儀表設計(二)

設計車用虛擬儀表步驟如下:

1. 先按右圖建立一個新的專案
Project Name : VirtualMeter
Application Name : Virtual Meter Application
Package Name : com.example.meter
Activity Name : VirtualMeterActivity
2. 按下Finish鍵,在src目錄下可以看到以上的程式:
package com.example.meter;

import android.app.Activity;
import android.os.Bundle;

public class VirtualMeterActivity extends Activity {
/** Called when the activity is first created. */
@Override
public void onCreate(Bundle savedInstanceState) {
super.onCreate(savedInstanceState);
setContentView(R.layout.main);
}
}
3. 建立內嵌視域類別的程式(粗體字)
package com.example.meter;

import android.app.Activity;
import android.content.Context;
import android.graphics.Canvas;
import android.os.Bundle;
import android.view.View;
public class VirtualMeterActivity extends Activity {
/** Called when the activity is first created. */
@Override
public void onCreate(Bundle savedInstanceState) {
super.onCreate(savedInstanceState);
setContentView(new VirtualMeterView(this));
}
private class VirtualMeterView extends View{

public VirtualMeterView(Context context) {
super(context);
// TODO Auto-generated constructor stub
}

@Override
protected void onDraw(Canvas canvas) {
// TODO Auto-generated method stub
super.onDraw(canvas);
}

}
}

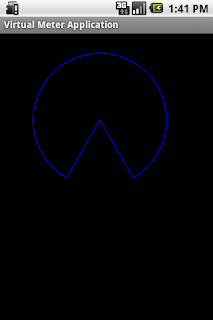
4. 利用drawArc指令先畫出一個扇形
protected void onDraw(Canvas canvas) {
// TODO Auto-generated method stub
super.onDraw(canvas);
Paint paint = new Paint();;
RectF oval = new RectF(50,30,250,230);
paint.setColor(Color.BLUE);
paint.setStyle(Paint.Style.STROKE);
canvas.drawArc(oval , 120, 300, true, paint );
}

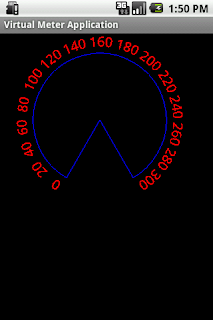
5. 利用drawTextOnPath函式畫出刻度
private class VirtualMeterView extends View{

private static final String TEXTONMETER = "0 20 40 60 80 100 120 140 160 180 200 220 240 260 280 300";
private Path mPath;


public VirtualMeterView(Context context) {
super(context);
// TODO Auto-generated constructor stub
mPath = new Path();
RectF oval = new RectF(40,20,260,240);
mPath.addArc(oval , 120, 300);
}

@Override
protected void onDraw(Canvas canvas) {
// TODO Auto-generated method stub
super.onDraw(canvas);
Paint paint = new Paint();;
RectF oval = new RectF(50,30,250,230);
paint.setColor(Color.BLUE);
paint.setStyle(Paint.Style.STROKE);
canvas.drawArc(oval , 120, 300, true, paint );

paint.setStyle(Paint.Style.FILL);
paint.setColor(Color.RED);
paint.setTextSize(20);
paint.setTextAlign(Paint.Align.CENTER);
canvas.drawTextOnPath(TEXTONMETER, mPath, 0, 0, paint);

}

}


6. 最後畫上指針
protected void onDraw(Canvas canvas) {
// TODO Auto-generated method stub
super.onDraw(canvas);
Paint paint = new Paint();;
RectF oval = new RectF(50,30,250,230);
paint.setColor(Color.BLUE);
paint.setStyle(Paint.Style.STROKE);
canvas.drawArc(oval , 120, 300, true, paint );

paint.setStyle(Paint.Style.FILL);
paint.setColor(Color.RED);
paint.setTextSize(20);
paint.setTextAlign(Paint.Align.CENTER);
canvas.drawTextOnPath(TEXTONMETER, mPath, 0, 0, paint);

float angle = 50;
float x = (float) (105 * Math.cos((120+angle)/180*3.14));
float y = (float) (105 * Math.sin((120+angle)/180*3.14));
canvas.drawLine(150+x, 130+y, 150, 130, paint);
}

RFID新的創意應用-荷蘭圖書館的椅子(Take a seat )

安裝Android SDK開發環境

老師,同學大家好:
上星期四 (3/18)老師在逢甲上課結束前說明關於Android的開發環境建置部分,大家要自行先安裝,所以我就來灌水一篇文章囉!以下是我安裝的心得紀錄,希望對於有修課且還沒有寫過Android程式的同學們能有一些些的幫助。

學生另類抄筆記的方式


最近上電腦課,常要求學生要抄筆記,不過許多同學並不拿筆作筆記,而是拿起他們隨身攜帶的手機,按下快門在短短1,2秒時間,便完成他們的筆記,或許這正是現代人類講究速食主義的最佳寫照。

3/23 學生使用USB設備實作七段顯示器控制程式


同學實作七段顯示器控制程式,撰寫0000-9999每次遞增1的控制程式。


//8051 7S的程式碼範例

//規劃I/O埠A,B,C,D控制的相關暫存器記憶體位址
xdata char PORTACFG _at_ 0x7F93;
xdata char PORTBCFG _at_ 0x7F94;
xdata char PORTCCFG _at_ 0x7F95;
xdata char OUTA _at_ 0x7F96;
xdata char OUTB _at_ 0x7F97;
xdata char OUTC _at_ 0x7F98;
xdata char PINSA _at_ 0x7F99;
xdata char PINSB _at_ 0x7F9A;
xdata char PINSC _at_ 0x7F9B;
xdata char OEA _at_ 0x7F9C;
xdata char OEB _at_ 0x7F9D;
xdata char OEC _at_ 0x7F9E;
xdata char OUTD _at_ 0x7841;
xdata char PINSD _at_ 0x7842;
xdata char OED _at_ 0x7843;

#define DISPLAYTIME 1 // approx. milliseconds
unsigned char Da[]={0xc0,0xf9,0xa4,0xb0,0x99,0x92,0x82,0xf8,0x80,0x90};
void delay (int time)
{
int i,k;
for (k=0; k for (i=0; i<300; i++);
}
// 共陽極7-SEG解碼電路


void main()
{
unsigned char a=0,b,c,d;
int num[4]={0,0,0,0},num2=0;
PORTBCFG = 0x00;
OEB = 0xFF;
OED = 0xFF;

while(1)
{

for(d=0;d<250;d++)
{

b=0x0e;
for(c= 0; c<4;c++)
{
OUTD=Da[num[c]];
OUTB=b;
b=(b<<1)|1;
delay(DISPLAYTIME);

}
}

num2++;
num[0]=num2/1000;
num[1]=num2/100%10;
num[2]=num2/10%10;
num[3]=num2%10;
}
}

USB 七段顯示器實驗


1 //8051 7S的程式碼範例
2
3 //規劃I/O埠A,B,C,D控制的相關暫存器記憶體位址
4 xdata char PORTACFG _at_ 0x7F93;
5 xdata char PORTBCFG _at_ 0x7F94;
6 xdata char PORTCCFG _at_ 0x7F95;
7 xdata char OUTA _at_ 0x7F96;
8 xdata char OUTB _at_ 0x7F97;
9 xdata char OUTC _at_ 0x7F98;
10 xdata char PINSA _at_ 0x7F99;
11 xdata char PINSB _at_ 0x7F9A;
12 xdata char PINSC _at_ 0x7F9B;
13 xdata char OEA _at_ 0x7F9C;
14 xdata char OEB _at_ 0x7F9D;
15 xdata char OEC _at_ 0x7F9E;
16 xdata char OUTD _at_ 0x7841;
17 xdata char PINSD _at_ 0x7842;
18 xdata char OED _at_ 0x7843;
19
20 #define DISPLAYTIME 500 // approx. milliseconds
21 unsigned char Da[]={0xc0,0xf9,0xa4,0xb0,0x99,0x92,0x82,0xf8,0x80,0x90};
22 void delay (int time)
23 {
24 1 int i,k;
25 1 for (k=0; k26 1 for (i=0; i<400; i++);
27 1 }
28 // 共陽極7-SEG解碼電路
29
30
31 void main()
32 {
33 1 unsigned char a=0;
34 1 PORTBCFG = 0x00;
35 1 OEB = 0xFF;
36 1 OED = 0xFF;
37 1
38 1 while(1)
39 1 {
40 2 for( a=0 ; a<=9 ; a++)
41 2 {
42 3
43 3 OUTD=Da[a];
44 3 OUTB=0x0e;
45 3 delay(DISPLAYTIME);
46 3
47 3 }
48 2
49 2 }
50 1 }

如何設計有代理人的網頁


設計有代理人的網頁,其步驟如下:
1. 先下載安裝MASH
2. 執行MASH程式,在Character選項中選擇一個角色,例如:Merlin。
3. 然後按下Show按鈕,此時您會看到梅林大法師現身,記得按下Add Last Hide按鈕。
4. 此時您會看到Merlin.Show的腳本,Merlin是物件名稱,Show是方法。
5. 這時您可以試試看其他功能,我們試著設計下列腳本:
Merlin.Show
Merlin.MoveTo MerlinLeftX, MerlinTopY
Merlin.MoveTo MerlinRightX, MerlinBottomY
Merlin.GestureAt MerlinLeftX, MerlinTopY
Merlin.Play "Congratulate_2"
Merlin.Speak "Welcome to the Microsoft Agent Scripting Helper!"
Merlin.Hide
6. 接下來麻煩您在左邊的選項上有一個Script Output選項,然後在Template中選擇VBScript HTML,再按下Save to File按鈕,將腳本存成HTML檔案。
7. 最後當您開啟您儲存的HTML文件就可以看到梅林大法師現身您的網頁。

MASH讓您輕輕鬆鬆應用網路代理人


代理人可以接受我們的委託處理一些事務性工作,本學期的福祉科技實習便是教導學生如何運用代理人來製作會說話且具備靈活動作的角色之網頁,讓您設計網頁除了可以吸引觀看者的目光外,還會念網頁內容。另外我們也將教學生設計會說各國語言的代理人來替代您做簡報。本學期所使用到的工具是MASH它是一套免費好用的軟體,您不妨下載來試試看。另外在MS Agent Ring提供很多代理人角色可供大家使用。

2010年3月22日 星期一

USB驅動程式實作教學資源分享


USB是目前電腦介面的主流,隨著USB 3.0高達5G bps的通訊速度,USB即將稱霸電腦的介面,在幾年的USB教學經驗把常接觸的三個網站分享給社員們,第一個網站是USB官方網站,該網站提供USB的規格及技術,在選擇Developers選項後,再選擇Document就可以看USB的規格書,在該網頁的最下方有presentation,存放許多有用的投影片,是不錯的教學資源;第二個網站是USB Central其中HID的網頁是我最常下載的教學範例程式;最後一個是SoC聯盟的課程網站,該網站有各校所製作的SoC相關課程的投影片,提到USB在南開科大您必須認識電通系鍾明政老師,您在網頁中所提供的課程搜尋,在分類搜尋選擇課程主持人,在關鍵字搜尋鍵入鍾明政,按下搜尋,就可以找到鍾老師精心設計的實驗教材。

Android感測器模擬軟體測試心得

今天測試Android Sensor Simultor軟體,感覺很好玩。它使用一個替代的方法,其程式如下所示:
////////////////////////////////////////////////////////////////
// INSTRUCTIONS
// ============

// 1) Use the separate application SensorSimulatorSettings
// to enter the correct IP address of the SensorSimulator.
// This should work before you proceed, because the same
// settings are used for your custom sensor application.

// 2) Include sensorsimulator-lib.jar in your project.
// Put that file into the 'lib' folder.
// In Eclipse, right-click on your project in the
// Package Explorer, select
// Properties > Java Build Path > (tab) Libraries
// then click Add JARs to add this jar.

// 3) You need the permission
//
// in your Manifest file!

// 4) Instead of calling the system service to obtain the Sensor manager,
// you should obtain it from the SensorManagerSimulator:

//mSensorManager = (SensorManager) getSystemService(SENSOR_SERVICE);
mSensorManager = SensorManagerSimulator.getSystemService(this, SENSOR_SERVICE);

// 5) Connect to the sensor simulator, using the settings
// that have been set previously with SensorSimulatorSettings
mSensorManager.connectSimulator();

// The rest of your application can stay unmodified.
////////////////////////////////////////////////////////////////

四個步驟在Windows CE最簡單的LED控制程式

1.利用Visual Studio建立一個Dialog-based的專案, 專案名稱是SimpleLED, 並產生原始程式
2.修改OnInitDialog()中粗體字
BOOL CSimpleLEDDlg::OnInitDialog()
{
CDialog::OnInitDialog();

// Set the icon for this dialog. The framework does this automatically
// when the application's main window is not a dialog
SetIcon(m_hIcon, TRUE); // Set big icon
SetIcon(m_hIcon, FALSE); // Set small icon

m_hled = CreateFile(TEXT("LED1:"), GENERIC_READ | GENERIC_WRITE, 0, NULL, OPEN_EXISTING, 0, 0);
if(m_hled == INVALID_HANDLE_VALUE )
{
::MessageBox(NULL,L"Open LED Driver error!",NULL,MB_OK);
}
m_Value = FALSE;

return TRUE; // return TRUE unless you set the focus to a control
}
3.在對話盒上增加一個按鈕, 點選按鈕並選擇Add Event Handler,並命名為OnBnClickedLED, 選擇Add & Edit 在函式內增加藍色文字的程式
void CSimpleLEDDlg::OnBnClickedLED()
{
int m_control = 0;

if(m_Value)
{
::DeviceIoControl(m_hled, LED_OFF, &m_control, NULL, NULL, NULL, NULL, NULL);
m_LED.SetWindowTextW(L"OFF");
m_Value = FALSE;
}
else
{
::DeviceIoControl(m_hled, LED_ON, &m_control, NULL, NULL, NULL, NULL, NULL);
m_LED.SetWindowTextW(L"ON");
m_Value = TRUE;
}
}
4.最後再到CSimpleLEDDlg.h增加一些常數和變數(粗體字)
// SimpleLEDDlg.h : header file
//

#pragma once
#include "afxwin.h"
#define LED_ON 0x10
#define LED_OFF 0x11


// CSimpleLEDDlg dialog
class CSimpleLEDDlg : public CDialog
{
private:
bool m_Value;
HANDLE m_hled;

// Construction
public:
CSimpleLEDDlg(CWnd* pParent = NULL); // standard constructor

// Dialog Data
enum { IDD = IDD_SIMPLELED_DIALOG };


protected:
virtual void DoDataExchange(CDataExchange* pDX); // DDX/DDV support

// Implementation
protected:
HICON m_hIcon;

// Generated message map functions
virtual BOOL OnInitDialog();
#if defined(_DEVICE_RESOLUTION_AWARE) && !defined(WIN32_PLATFORM_WFSP)
afx_msg void OnSize(UINT /*nType*/, int /*cx*/, int /*cy*/);
#endif
DECLARE_MESSAGE_MAP()
public:
afx_msg void OnBnClickedLED();
CButton m_LED;
};

2010年3月21日 星期日

介紹台灣創新科技的影片

Android開發教學影片

騎乘動力學的教學影片

「基礎福祉科技實習(二)」基本實驗單元 - 代理人技術

【實驗目的】:
著重在代理人技術的介紹,希望提供學員運用資通訊領域的代理人概念,熟悉利用代理人技術設計能協助老年人使用電腦的軟體或資訊產品。
【實驗器材】
1. 電腦安裝Windows XP作業系統。
2. 微軟MS Agent發展工具。(下載網址:http://www.microsoft.com/products/msagent/main.aspx)
3. MASM 工具。(下載網址:http://www.bellcraft.com/mash/)
4. 自備耳機。
【實驗原理說明】:
ㄧ、何謂網路代理人?
如同物件導向中的函式、物件、方法般,代理人是一種軟體抽像概念,可輕易表達出複雜軟體的極高層次軟體概念。可以使用者的角度和想法處理事務代理人的構成是以“行為” 來定義, 而非屬性和方式。
代理人為一程式,可以輔助使用者或代表使用者。由系統的角度觀察,代理人必須為於其執行環境中,具互動性、自主性、目的驅動等,以及正交的屬性、溝通能力、移動力、學習力等.。
二、網路代理人可協助銀髮族那些事?
網路代理人可以協助銀髮族處理事務性工作,如購物、股票交易、購票、過濾電子郵件、協助上網、代替簡報、文書工作等。

三、何謂MS Agent?
MS Agent是一個ActiveX控制元件。主要是應用在使用者介面上,在Windows視窗介面利用人物方式顯示對話藉著人物方式指引(如Microsoft Office 中 Office 小幫手)讓使用者操作更輕易、自然學習使用電腦,進而也可將這些動態人物與應用程式或是網頁結合創造革新的談話介面。而這些MS Agent角色(Character)可在電腦畫面中做手勢、移動、講話(藉著以文字輸出或錄音),甚至可接收使用者語音命令。
【參考資料】:
1. 逢甲大學行動計算實驗室,「代理人技術課程網站」講義。
2. 微軟,「MS Agent發展工具」。
3. Microsoft Agent Ring
4. MASM
5. Agent Character Editor

2010年3月20日 星期六

Google Android遊戲的様版程式


要如何設計一支2D Google Android的遊戲,我在anddev.org網站上找到一個遊戲的様版程式,該程式是由兩個Java檔案所組成,分別是GameTemplate.java和GameView.java,GameTemplate.java為使用者互動的介面程式,其部份程式片段如下:
public class GameTemplate extends Activity {
:
:
/** A handle to the thread that's actually running the animation. */
private GameThread mGameThread;

/** A handle to the View in which the game is running. */
private GameView mGameView;
:
@Override
public boolean onOptionsItemSelected(MenuItem item) {
switch (item.getItemId()) {
case MENU_START:
mGameThread.doStart();
return true;
case MENU_STOP:
mGameThread.setState(GameThread.STATE_LOSE);
return true;
case MENU_PAUSE:
mGameThread.pause();
return true;
case MENU_RESUME:
mGameThread.unpause();
return true;
}

return false;
}
}
從上面程式可以看到兩個重要的資料成員:mGameThread和mGameView,他們分別是屬於GameThread和GameView類別的物件。我們可以在GameView.java看到這兩個類別的宣告。
class GameView extends SurfaceView implements SurfaceHolder.Callback {
class GameThread extends Thread {
:
}
:
}
其執行結果如右上圖。

2010年3月19日 星期五

閱讀第一篇自行車研究文章心得分享

近年來自行車變成了全民運動,特別是在能源危機的時代中,更能突顯它的重要性,然而隨著都市化的發展,愈來愈多的自行車將帶來都市交通上許多問題,因此如何建立新的模型就變得很重要,在2009年9月IEEE Intelligent Transportation Systems Magazine刊登一篇由Danya Yao等學者發表的文章"Behaviour Modeling and Simulation for Conflicts in Vehicles-Bicycles Mixed Flow",他們提出了Cellular Automata Model提供給後續研究使用。

智慧型手機教學資源

要說智慧生活科技一定離不開智慧型手機,隨著Apple iPhoneMicrosft Mobile WindowsGoogle Android等產品的推出,創造不少商機,也引領智慧生活科技的風潮。宏達電最近也推出不少HTC手機,並將它的開發資源放在Developer Center網站上。

從「i-Taiwan之i236推動策略」來看智慧生活科技


近年來由於我國基礎網路環境愈趨成熟,更在全球居於領先的地位,特別是在資通訊科技(ICT)上,更是在全球扮演著龍頭角色,我國政府有鑑於相關資通訊科技發展日漸成熟,一方面為了能快速地提升我國民眾生活的品質,另一方面可將資通訊科技巧妙地運用之市場,使我國資通訊技術能居於領先的地位。在「愛台灣十二建設藍圖」中明確地揭露出「智慧台灣」、「智慧生活」產業與環境的營造,優先規劃基礎建設,以建設台灣成為全球U化應用的展示櫥窗。於是依據經濟部於97年行政院第28次行政院科技顧問會議之議題三-優質生活,子題三-智慧生活科技運用推動策略中,訂定「i-Taiwan之i236推動策略」,作為實現將智慧生活科技應用於生活的具體策略。本計畫的主要目標為成立智慧生活科技專業社群來因應未來產業發展趨勢並配合政府的規劃來培育更多資通訊的人才,推動並研究如何運用資訊科技導入生活的相關專業課程。本社群的研究主題包括:智慧型手機、智慧車輛、智慧住家等。預計的主要成果有提升智慧生活科技實驗室教學及研究能量,促進教師在智慧生活科技上的教學及研究合作。