1.安裝套件
pip install django
pip install paho-mqtt
2.建立mqtttest專案
django-admin startproject mqtttest
3.進入專案
cd mqtttest
4.建立app
python manage.py startapp mqttapp
5.修改mqtttest/mqtttest/settings.py
1 2 3 4 5 6 7 8 9 10 11 12 13 14 15 16 17 18 19 20 21 22 23 24 25 26 27 28 29 30 31 32 33 34 35 36 37 38 39 40 41 42 43 44 45 46 47 48 49 50 51 52 53 54 55 56 57 58 59 60 61 62 63 64 65 66 67 68 69 70 71 72 73 74 75 76 77 78 79 80 81 82 83 84 85 86 87 88 89 90 91 92 93 94 95 96 97 98 99 100 101 102 103 104 105 106 107 108 109 110 111 112 113 114 115 116 117 118 119 120 121 122 123 124 125 126 127 128 129 130 | """ Django settings for mqtttest project. Generated by 'django-admin startproject' using Django 4.2.9. For more information on this file, see https://docs.djangoproject.com/en/4.2/topics/settings/ For the full list of settings and their values, see https://docs.djangoproject.com/en/4.2/ref/settings/ """ from pathlib import Path # Build paths inside the project like this: BASE_DIR / 'subdir'. BASE_DIR = Path(__file__).resolve().parent.parent # Quick-start development settings - unsuitable for production # See https://docs.djangoproject.com/en/4.2/howto/deployment/checklist/ # SECURITY WARNING: keep the secret key used in production secret! SECRET_KEY = 'django-insecure-q2ia=(7x3d5_mxao#-sl)+)crp9j%e*732fg4jhid-f&sln5k(' # SECURITY WARNING: don't run with debug turned on in production! DEBUG = True ALLOWED_HOSTS = [] # Application definition INSTALLED_APPS = [ 'django.contrib.admin', 'django.contrib.auth', 'django.contrib.contenttypes', 'django.contrib.sessions', 'django.contrib.messages', 'django.contrib.staticfiles', 'mqttapp', ] MIDDLEWARE = [ 'django.middleware.security.SecurityMiddleware', 'django.contrib.sessions.middleware.SessionMiddleware', 'django.middleware.common.CommonMiddleware', 'django.middleware.csrf.CsrfViewMiddleware', 'django.contrib.auth.middleware.AuthenticationMiddleware', 'django.contrib.messages.middleware.MessageMiddleware', 'django.middleware.clickjacking.XFrameOptionsMiddleware', ] ROOT_URLCONF = 'mqtttest.urls' TEMPLATES = [ { 'BACKEND': 'django.template.backends.django.DjangoTemplates', 'DIRS': [BASE_DIR / 'templates'], 'APP_DIRS': True, 'OPTIONS': { 'context_processors': [ 'django.template.context_processors.debug', 'django.template.context_processors.request', 'django.contrib.auth.context_processors.auth', 'django.contrib.messages.context_processors.messages', ], }, }, ] WSGI_APPLICATION = 'mqtttest.wsgi.application' # Database # https://docs.djangoproject.com/en/4.2/ref/settings/#databases DATABASES = { 'default': { 'ENGINE': 'django.db.backends.sqlite3', 'NAME': BASE_DIR / 'db.sqlite3', } } # Password validation # https://docs.djangoproject.com/en/4.2/ref/settings/#auth-password-validators AUTH_PASSWORD_VALIDATORS = [ { 'NAME': 'django.contrib.auth.password_validation.UserAttributeSimilarityValidator', }, { 'NAME': 'django.contrib.auth.password_validation.MinimumLengthValidator', }, { 'NAME': 'django.contrib.auth.password_validation.CommonPasswordValidator', }, { 'NAME': 'django.contrib.auth.password_validation.NumericPasswordValidator', }, ] # Internationalization # https://docs.djangoproject.com/en/4.2/topics/i18n/ LANGUAGE_CODE = 'en-us' TIME_ZONE = 'UTC' USE_I18N = True USE_TZ = True # Static files (CSS, JavaScript, Images) # https://docs.djangoproject.com/en/4.2/howto/static-files/ STATIC_URL = 'static/' # Default primary key field type # https://docs.djangoproject.com/en/4.2/ref/settings/#default-auto-field DEFAULT_AUTO_FIELD = 'django.db.models.BigAutoField' MQTT_SERVER = 'broker.MQTTGO.io' MQTT_PORT = 1883 MQTT_KEEPALIVE = 60 MQTT_USER = '' MQTT_PASSWORD = '' |
6.修改mqtttest/mqtttest/urls.py
1 2 3 4 5 6 7 8 9 10 11 12 13 14 15 16 17 18 19 20 21 22 23 24 25 26 | """ URL configuration for mqtttest project. The `urlpatterns` list routes URLs to views. For more information please see: https://docs.djangoproject.com/en/4.2/topics/http/urls/ Examples: Function views 1. Add an import: from my_app import views 2. Add a URL to urlpatterns: path('', views.home, name='home') Class-based views 1. Add an import: from other_app.views import Home 2. Add a URL to urlpatterns: path('', Home.as_view(), name='home') Including another URLconf 1. Import the include() function: from django.urls import include, path 2. Add a URL to urlpatterns: path('blog/', include('blog.urls')) """ from django.contrib import admin from django.urls import path from mqttapp.views import home, publish_message, mqtt_messages_json urlpatterns = [ path('admin/', admin.site.urls), path('', home), path('publish/', publish_message, name='publish'), path('api/messages/', mqtt_messages_json, name='mqtt_messages_json'), ] |
7.mqtttest/mqttapp/models.py
1 2 3 4 5 6 7 8 9 10 11 | from django.db import models # Create your models here. class MQTTMessage(models.Model): received_at = models.DateTimeField(auto_now_add=True) # 自動紀錄訊息接收時間 topic = models.CharField(max_length=255) payload = models.TextField() def __str__(self): return f"{self.received_at} - {self.topic}" |
1 2 3 4 5 6 7 8 9 | from django.contrib import admin
from .models import MQTTMessage
@admin.register(MQTTMessage)
class MQTTMessageAdmin(admin.ModelAdmin):
list_display = ('received_at', 'topic', 'payload') # 可自訂顯示欄位
list_filter = ('topic',)
search_fields = ('topic', 'payload')
ordering = ('-received_at',)
|
9.mqtttest/mqttapp/views.py
1 2 3 4 5 6 7 8 9 10 11 12 13 14 15 16 17 18 19 20 21 22 23 24 25 26 27 28 29 30 31 32 33 34 35 36 37 38 39 40 41 42 | from django.shortcuts import render # Create your views here. import json from django.http import JsonResponse from mqttapp.models import MQTTMessage from django.views.decorators.csrf import csrf_exempt import paho.mqtt.client as mqtt def home(request): return render(request, 'index.html') @csrf_exempt def publish_message(request): if request.method == 'POST': try: data = json.loads(request.body) topic = data.get('topic', 'django/mqtt') msg = data.get('msg', 'test') # 即時建立連線並發送 client = mqtt.Client() client.connect('broker.MQTTGO.io', 1883, 60) rc, mid = client.publish(topic, msg) client.disconnect() return JsonResponse({'code': rc}) except Exception as e: return JsonResponse({'error': str(e)}, status=400) return JsonResponse({'error': 'Only POST allowed'}, status=405) def mqtt_messages_json(request): messages = MQTTMessage.objects.order_by('-received_at')[:20] data = [ { 'topic': m.topic, 'payload': m.payload, 'received_at': m.received_at.strftime('%Y-%m-%d %H:%M:%S') } for m in messages ] return JsonResponse(data, safe=False) |
10.在mqtttest下建立templates資料夾,並新增mqtttest/templates/index.html
1 2 3 4 5 6 7 8 9 10 11 12 13 14 15 16 17 18 19 20 21 22 23 24 25 26 27 28 29 30 31 32 33 34 35 36 37 38 39 40 41 42 43 44 45 46 47 48 49 50 51 52 53 54 55 56 57 58 | <!DOCTYPE html>
<html>
<head>
<title>MQTT 測試</title>
<script>
function loadMessages() {
fetch('/api/messages/')
.then(response => response.json())
.then(data => {
const tbody = document.getElementById('messages');
tbody.innerHTML = '';
data.forEach(item => {
const row = `<tr>
<td>${item.received_at}</td>
<td>${item.topic}</td>
<td>${item.payload}</td>
</tr>`;
tbody.innerHTML += row;
});
});
}
function publishMessage() {
const topic = document.getElementById('topic').value;
const msg = document.getElementById('msg').value;
fetch('/publish/', {
method: 'POST',
headers: { 'Content-Type': 'application/json' },
body: JSON.stringify({ topic, msg })
})
.then(response => response.json())
.then(data => {
alert('已送出 MQTT 訊息!');
})
.catch(error => {
alert('錯誤:' + error);
});
}
setInterval(loadMessages, 3000);
window.onload = loadMessages;
</script>
</head>
<body>
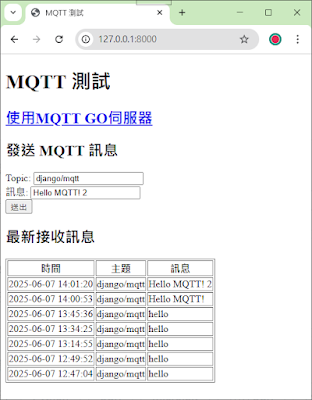
<h1>MQTT 測試</h1>
<h2><a href="https://broker.mqttgo.io/">使用MQTT GO伺服器</a></h2>
<h2>發送 MQTT 訊息</h2>
<label>Topic: <input id="topic" value="django/mqtt"></label><br>
<label>訊息: <input id="msg" value="Hello MQTT!"></label><br>
<button onclick="publishMessage()">送出</button>
<h2>最新接收訊息</h2>
<table border="1">
<thead>
<tr><th>時間</th><th>主題</th><th>訊息</th></tr>
</thead>
<tbody id="messages"></tbody>
</table>
</body>
</html>
|
12.在mqtttest根目錄下建立mqtt_listener.py
1 2 3 4 5 6 7 8 9 10 11 12 13 14 15 16 17 18 19 20 21 22 23 24 25 26 27 28 29 30 | import os
import django
import paho.mqtt.client as mqtt
# 初始化 Django 環境
os.environ.setdefault("DJANGO_SETTINGS_MODULE", "mqtttest.settings")
django.setup()
from mqttapp.models import MQTTMessage
from django.conf import settings
def on_connect(client, userdata, flags, rc):
if rc == 0:
print("Connected to MQTT broker.")
client.subscribe("django/mqtt")
else:
print("Connection failed with code", rc)
def on_message(client, userdata, msg):
payload = msg.payload.decode('utf-8')
print(f"Received message on topic: {msg.topic}, payload: {payload}")
MQTTMessage.objects.create(topic=msg.topic, payload=payload)
client = mqtt.Client()
client.on_connect = on_connect
client.on_message = on_message
client.username_pw_set(settings.MQTT_USER, settings.MQTT_PASSWORD)
client.connect(settings.MQTT_SERVER, settings.MQTT_PORT, settings.MQTT_KEEPALIVE)
client.loop_forever()
|
13.回到命令列,做資料庫同步,並建立超級使用者
python manage.py makemigrations
python manage.py migrate
14.執行網站
python manage.py runserver

15.再打啟另一個命令列
python mqtt_listener.py

16.啟動MQTT GO,連線並訂閱django/mqtt

17.打開瀏覽器進行測試,如最上圖


