1.下載Arduino軟體
2. 安裝第三方套件
https://github.com/ideashatch/HUB-8735/raw/main/amebapro2_arduino/Arduino_package/ideasHatch.json
請把上方鏈結,貼在Additional boards manager URLs
3.按下左側第二個選項或選擇Tools->Board->Board Manager,然後輸入8735,按下INSTALL。完成畫面如下:
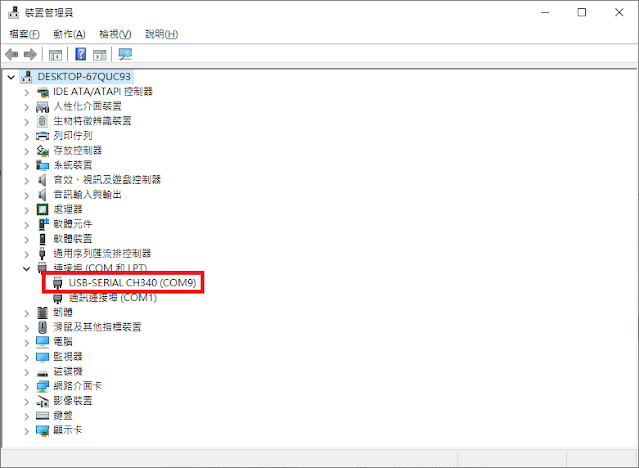
4.等待套件都裝完後,把國產WiFi晶片8735 Ultra接上USB線並接到電腦USB孔,並用裝置管理員檢查連接埠。
6.測試,打開Blink範例。
7.按下Upload鍵,此時會發現無法上傳的錯誤訊息,
8.打開serial monitor,並檢查鮑率設定在115200bps。
12.按下重置鍵,執行已燒錄的程式。
程式碼:
1 2 3 4 5 6 7 8 9 10 11 12 13 14 15 16 17 18 19 20 21 22 23 24 25 26 27 28 29 30 31 32 33 34 35 36 37 | /* Blink Turns an LED on for one second, then off for one second, repeatedly. Most Arduinos have an on-board LED you can control. On the UNO, MEGA and ZERO it is attached to digital pin 13, on MKR1000 on pin 6. LED_BUILTIN is set to the correct LED pin independent of which board is used. If you want to know what pin the on-board LED is connected to on your Arduino model, check the Technical Specs of your board at: https://www.arduino.cc/en/Main/Products modified 8 May 2014 by Scott Fitzgerald modified 2 Sep 2016 by Arturo Guadalupi modified 8 Sep 2016 by Colby Newman This example code is in the public domain. https://www.arduino.cc/en/Tutorial/BuiltInExamples/Blink */ // the setup function runs once when you press reset or power the board void setup() { // initialize digital pin LED_BUILTIN as an output. pinMode(LED_BUILTIN, OUTPUT); } // the loop function runs over and over again forever void loop() { digitalWrite(LED_BUILTIN, HIGH); // turn the LED on (HIGH is the voltage level) delay(1000); // wait for a second digitalWrite(LED_BUILTIN, LOW); // turn the LED off by making the voltage LOW delay(1000); // wait for a second } |


沒有留言:
張貼留言