2024年3月31日 星期日

在pythonanywhere設計Django網站的卡片(Card)功能


修改mysite/templates/vegetable.html程式

 1
 2
 3
 4
 5
 6
 7
 8
 9
10
11
12
13
14
15
16
17
18
19
20
21
22
23
24
25
26
27
28
29
30
31
32
33
34
35
36
37
38
39
40
41
42
43
44
45
46
47
48
49
50
51
52
53
54
55
56
57
58
59
60
61
62
<!DOCTYPE html>
<html>
<head>
  {% load bootstrap5 %}
  {% bootstrap_css %}
  {% bootstrap_javascript %}
  {% load static %}
</head>
<body>
<div class="container">
  <ul class="nav bg-info">
    <li class="nav-item">
      <a class="nav-link link-light" href="/">首頁</a>
    </li>
    <li class="nav-item">
      <a class="nav-link link-light" href="/vegetable/">蔬菜</a>
    </li>
    <li class="nav-item">
      <a class="nav-link link-light" href="/fruit/">水果</a>
    </li>
  </ul>

<h1>蔬菜</h1>
<div class="row">
    <div class="card" style="width:300px">
        <img class="card-img-top" src={% static "images/vegetable01.jpg" %} alt="Card image">
        <div class="card-img-overlay">
            <h4 class="card-title" style="color:white;">蔬菜01</h4>
            <p class="card-text" style="color:white;">好蔬菜在雲林</p>
            <a href="#" class="btn btn-primary">說明</a>
        </div>
    </div>
    <div class="card" style="width:300px">
        <img class="card-img-left" src={% static "images/vegetable02.jpg" %} alt="Card image">
        <div class="card-img-overlay">
            <h4 class="card-title" style="color:white;">蔬菜02</h4>
            <p class="card-text" style="color:white;">好蔬菜在雲林</p>
            <a href="#" class="btn btn-primary">說明</a>
        </div>
    </div>
    <div class="card" style="width:300px">
        <img class="card-img-top" src={% static "images/vegetable03.jpg" %} alt="Card image">
        <div class="card-img-overlay">
            <h4 class="card-title" style="color:white;">蔬菜03</h4>
            <p class="card-text" style="color:white;">好蔬菜在雲林</p>
            <a href="#" class="btn btn-primary">說明</a>
        </div>
    </div>
    <div class="card" style="width:300px">
        <img class="card-img-top" src={% static "images/vegetable04.jpg" %} alt="Card image">
        <div class="card-img-overlay">
            <h4 class="card-title" style="color:white;">蔬菜04</h4>
            <p class="card-text" style="color:white;">好蔬菜在雲林</p>
            <a href="#" class="btn btn-primary">說明</a>
        </div>
    </div>
</div>
  {% block content %}
  {% endblock %}
</div>
</body>
</html>


在pythonanywhere設計Django網站的輪播功能(新增For Template)

 前一篇文章:在pythonanywhere設計Django網站的輪播功能


1.修訂mysite/myapp/views.py

 1
 2
 3
 4
 5
 6
 7
 8
 9
10
11
12
13
14
15
from django.shortcuts import render

# Create your views here.
def index(request):
    slide1 = {'image':'fruits01.jpg', 'active':'active', 'interval':'10000', 'title':'水果01', 'subtitle':'好水果在雲林'}
    slide2 = {'image':'fruits02.jpg', 'active':'', 'interval':'2000', 'title':'水果02', 'subtitle':'好水果在雲林'}
    slide3 = {'image':'fruits03.jpg', 'active':'', 'interval':'3000', 'title':'水果03', 'subtitle':'好水果在雲林'}
    slides = [slide1, slide2, slide3]
    return render(request, 'index.html', locals())

def vegetable(request):
    return render(request, 'vegetable.html', locals())

def fruit(request):
    return render(request, 'fruit.html', locals())

2.修訂mysite/templates/index.html

 1
 2
 3
 4
 5
 6
 7
 8
 9
10
11
12
13
14
15
16
17
18
19
20
21
22
23
24
25
26
27
28
29
30
31
32
33
34
35
36
37
38
39
40
41
42
43
44
45
46
47
48
49
50
51
52
<!DOCTYPE html>
<html>
<head>
  {% load bootstrap5 %}
  {% bootstrap_css %}
  {% bootstrap_javascript %}
  {% load static %}
</head>
<body>
<div id="carouselExampleInterval" class="carousel slide" data-bs-ride="carousel">
  <div class="carousel-inner">
    {% for item in slides %}:
        <div class="carousel-item {{ item.active }}" data-bs-interval= {{ item.interval }}>
            <img src="{% static 'images/' %}{{ item.image }}" class="d-block w-100" alt="...">
            <div class="carousel-caption d-none d-md-block">
                <h5 style="color:white;">{{ item.title }}</h5>
                <p style="color:white;">{{ item.subtitle }}</p>
            </div>
        </div>
    {% endfor %}
  </div>
  <button class="carousel-control-prev" type="button" data-bs-target="#carouselExampleInterval" data-bs-slide="prev">
    <span class="carousel-control-prev-icon" aria-hidden="true"></span>
    <span class="visually-hidden">Previous</span>
  </button>
  <button class="carousel-control-next" type="button" data-bs-target="#carouselExampleInterval" data-bs-slide="next">
    <span class="carousel-control-next-icon" aria-hidden="true"></span>
    <span class="visually-hidden">Next</span>
  </button>
</div>

<div class="container">
  <ul class="nav bg-info">
    <li class="nav-item">
      <a class="nav-link link-light" href="/">首頁</a>
    </li>
    <li class="nav-item">
      <a class="nav-link link-light" href="/vegetable/">蔬菜</a>
    </li>
    <li class="nav-item">
      <a class="nav-link link-light" href="/fruit/">水果</a>
    </li>
  </ul>
<h1>虎科小農超市</h1>

<p>虎科大是一所很重視永續發展暨社會責任的大學</p>
  {% block content %}
  {% endblock %}
</div>

</body>
</html>


在pythonanywhere設計Django網站的輪播功能

參考文章:輪播 (Carousel)

本文章是延續上一篇文章:在pythonanywhere設計Django網站的功能表(Add Bootstrap 5)

1.準備輪播的圖片(1024*360)

fruits01.jpg


fruits02.jpg

fruits03.jpg


2.上傳到pythonanywhere的mysite/static/images目錄下

3.編修mysite/templates/index.html
 1
 2
 3
 4
 5
 6
 7
 8
 9
10
11
12
13
14
15
16
17
18
19
20
21
22
23
24
25
26
27
28
29
30
31
32
33
34
35
36
37
38
39
40
41
42
43
44
45
46
47
48
49
50
51
52
53
54
55
56
57
58
59
60
61
62
63
64
<!DOCTYPE html>
<html>
<head>
  {% load bootstrap5 %}
  {% bootstrap_css %}
  {% bootstrap_javascript %}
  {% load static %}
</head>
<body>
<div id="carouselExampleInterval" class="carousel slide" data-bs-ride="carousel">
  <div class="carousel-inner">
    <div class="carousel-item active" data-bs-interval="10000">
      <img src="{% static 'images/fruits01.jpg' %}" class="d-block w-100" alt="...">
      <div class="carousel-caption d-none d-md-block">
        <h5 style="color:white;">水果01</h5>
        <p style="color:white;">好水果在雲林</p>
      </div>
    </div>
    <div class="carousel-item" data-bs-interval="2000">
      <img src="{% static 'images/fruits02.jpg' %}" class="d-block w-100" alt="...">
      <div class="carousel-caption d-none d-md-block">
        <h5 style="color:white;">水果02</h5>
        <p style="color:white;">好水果在雲林</p>
      </div>
    </div>
    <div class="carousel-item">
      <img src="{% static 'images/fruits03.jpg' %}" class="d-block w-100" alt="...">
      <div class="carousel-caption d-none d-md-block">
        <h5 style="color:white;">水果03</h5>
        <p style="color:white;">好水果在雲林</p>
      </div>
    </div>
  </div>
  <button class="carousel-control-prev" type="button" data-bs-target="#carouselExampleInterval" data-bs-slide="prev">
    <span class="carousel-control-prev-icon" aria-hidden="true"></span>
    <span class="visually-hidden">Previous</span>
  </button>
  <button class="carousel-control-next" type="button" data-bs-target="#carouselExampleInterval" data-bs-slide="next">
    <span class="carousel-control-next-icon" aria-hidden="true"></span>
    <span class="visually-hidden">Next</span>
  </button>
</div>

<div class="container">
  <ul class="nav bg-info">
    <li class="nav-item">
      <a class="nav-link link-light" href="/">首頁</a>
    </li>
    <li class="nav-item">
      <a class="nav-link link-light" href="/vegetable/">蔬菜</a>
    </li>
    <li class="nav-item">
      <a class="nav-link link-light" href="/fruit/">水果</a>
    </li>
  </ul>
<h1>虎科小農超市</h1>

<p>虎科大是一所很重視永續發展暨社會責任的大學</p>
  {% block content %}
  {% endblock %}
</div>

</body>
</html>

4.重新整理

5.執行結果:


2024年3月27日 星期三

在pythonanywhere設計Django網站的功能表(Add Bootstrap 5)

參考網站:Add Bootstrap 5

請先閱讀上一篇文章,本篇文章只是加入Bootstrap 5。

1.加入安裝Bootstrap 5命令。

pip install django-bootstrap-v5


2.修改程式settings.py

  1
  2
  3
  4
  5
  6
  7
  8
  9
 10
 11
 12
 13
 14
 15
 16
 17
 18
 19
 20
 21
 22
 23
 24
 25
 26
 27
 28
 29
 30
 31
 32
 33
 34
 35
 36
 37
 38
 39
 40
 41
 42
 43
 44
 45
 46
 47
 48
 49
 50
 51
 52
 53
 54
 55
 56
 57
 58
 59
 60
 61
 62
 63
 64
 65
 66
 67
 68
 69
 70
 71
 72
 73
 74
 75
 76
 77
 78
 79
 80
 81
 82
 83
 84
 85
 86
 87
 88
 89
 90
 91
 92
 93
 94
 95
 96
 97
 98
 99
100
101
102
103
104
105
106
107
108
109
110
111
112
113
114
115
116
117
118
119
120
121
122
123
124
125
126
127
128
129
130
131
132
133
134
135
"""
Django settings for mysite project.

Generated by 'django-admin startproject' using Django 4.0.6.

For more information on this file, see
https://docs.djangoproject.com/en/4.0/topics/settings/

For the full list of settings and their values, see
https://docs.djangoproject.com/en/4.0/ref/settings/
"""

from pathlib import Path

# Build paths inside the project like this: BASE_DIR / 'subdir'.
BASE_DIR = Path(__file__).resolve().parent.parent


# Quick-start development settings - unsuitable for production
# See https://docs.djangoproject.com/en/4.0/howto/deployment/checklist/

# SECURITY WARNING: keep the secret key used in production secret!
SECRET_KEY = 'django-insecure-8c5r7ez2#g2j5n@yxeczdyhw6-zwgj_l64=nark$wc_mn+kf*4'

# SECURITY WARNING: don't run with debug turned on in production!
DEBUG = True

ALLOWED_HOSTS = ['cmlin.pythonanywhere.com']


# Application definition

INSTALLED_APPS = [
    'django.contrib.admin',
    'django.contrib.auth',
    'django.contrib.contenttypes',
    'django.contrib.sessions',
    'django.contrib.messages',
    'django.contrib.staticfiles',
    'bootstrap5',
    'myapp',
]

MIDDLEWARE = [
    'django.middleware.security.SecurityMiddleware',
    'django.contrib.sessions.middleware.SessionMiddleware',
    'django.middleware.common.CommonMiddleware',
    'django.middleware.csrf.CsrfViewMiddleware',
    'django.contrib.auth.middleware.AuthenticationMiddleware',
    'django.contrib.messages.middleware.MessageMiddleware',
    'django.middleware.clickjacking.XFrameOptionsMiddleware',
]

ROOT_URLCONF = 'mysite.urls'

TEMPLATES = [
    {
        'BACKEND': 'django.template.backends.django.DjangoTemplates',
        'DIRS': [BASE_DIR/'templates'],
        'APP_DIRS': True,
        'OPTIONS': {
            'context_processors': [
                'django.template.context_processors.debug',
                'django.template.context_processors.request',
                'django.contrib.auth.context_processors.auth',
                'django.contrib.messages.context_processors.messages',
            ],
        },
    },
]

WSGI_APPLICATION = 'mysite.wsgi.application'


# Database
# https://docs.djangoproject.com/en/4.0/ref/settings/#databases

DATABASES = {
    'default': {
        'ENGINE': 'django.db.backends.sqlite3',
        'NAME': BASE_DIR / 'db.sqlite3',
    }
}


# Password validation
# https://docs.djangoproject.com/en/4.0/ref/settings/#auth-password-validators

AUTH_PASSWORD_VALIDATORS = [
    {
        'NAME': 'django.contrib.auth.password_validation.UserAttributeSimilarityValidator',
    },
    {
        'NAME': 'django.contrib.auth.password_validation.MinimumLengthValidator',
    },
    {
        'NAME': 'django.contrib.auth.password_validation.CommonPasswordValidator',
    },
    {
        'NAME': 'django.contrib.auth.password_validation.NumericPasswordValidator',
    },
]


# Internationalization
# https://docs.djangoproject.com/en/4.0/topics/i18n/

LANGUAGE_CODE = 'en-us'

TIME_ZONE = 'UTC'

USE_I18N = True

USE_TZ = True


# Static files (CSS, JavaScript, Images)
# https://docs.djangoproject.com/en/4.0/howto/static-files/

STATIC_URL = 'static/'

# Default primary key field type
# https://docs.djangoproject.com/en/4.0/ref/settings/#default-auto-field

DEFAULT_AUTO_FIELD = 'django.db.models.BigAutoField'

# default static files settings for PythonAnywhere.
# see https://help.pythonanywhere.com/pages/DjangoStaticFiles for more info
MEDIA_ROOT = '/home/cmlin/mysite/media'
MEDIA_URL = '/media/'
STATIC_ROOT = '/home/cmlin/mysite/static'
STATIC_URL = '/static/'
STATICFILES_DIRS = [
    BASE_DIR/'static',
    ]

3.修訂index.html

 1
 2
 3
 4
 5
 6
 7
 8
 9
10
11
12
13
14
15
16
17
18
19
20
21
22
23
24
25
26
27
28
29
<!DOCTYPE html>
<html>
<head>
  {% load bootstrap5 %}
  {% bootstrap_css %}
  {% bootstrap_javascript %}
</head>
<body>
<div class="container">
  <ul class="nav bg-info">
    <li class="nav-item">
      <a class="nav-link link-light" href="/">首頁</a>
    </li>
    <li class="nav-item">
      <a class="nav-link link-light" href="/vegetable/">蔬菜</a>
    </li>
    <li class="nav-item">
      <a class="nav-link link-light" href="/fruit/">水果</a>
    </li>
  </ul>
<h1>虎科小農超市</h1>

<p>虎科大是一所很重視永續發展暨社會責任的大學</p>
  {% block content %}
  {% endblock %}
</div>

</body>
</html>

4.修訂fruit.html

 1
 2
 3
 4
 5
 6
 7
 8
 9
10
11
12
13
14
15
16
17
18
19
20
21
22
23
24
25
26
27
28
29
<!DOCTYPE html>
<html>
<head>
  {% load bootstrap5 %}
  {% bootstrap_css %}
  {% bootstrap_javascript %}
</head>
<body>
<div class="container">
  <ul class="nav bg-info">
    <li class="nav-item">
      <a class="nav-link link-light" href="/">首頁</a>
    </li>
    <li class="nav-item">
      <a class="nav-link link-light" href="/vegetable/">蔬菜</a>
    </li>
    <li class="nav-item">
      <a class="nav-link link-light" href="/fruit/">水果</a>
    </li>
  </ul>
<h1>水果</h1>

<img src='../static/images/fruits.jpg'>
  {% block content %}
  {% endblock %}
</div>

</body>
</html>

5.修訂vegetable.html

 1
 2
 3
 4
 5
 6
 7
 8
 9
10
11
12
13
14
15
16
17
18
19
20
21
22
23
24
25
26
27
28
29
<!DOCTYPE html>
<html>
<head>
  {% load bootstrap5 %}
  {% bootstrap_css %}
  {% bootstrap_javascript %}
</head>
<body>
<div class="container">
  <ul class="nav bg-info">
    <li class="nav-item">
      <a class="nav-link link-light" href="/">首頁</a>
    </li>
    <li class="nav-item">
      <a class="nav-link link-light" href="/vegetable/">蔬菜</a>
    </li>
    <li class="nav-item">
      <a class="nav-link link-light" href="/fruit/">水果</a>
    </li>
  </ul>

<h1>蔬菜</h1>

<img src='../static/images/vegetable.jpg'>
  {% block content %}
  {% endblock %}
</div>
</body>
</html>

6.執行結果:(記得要在Web功能表單中,按下Reload鍵)


2024年3月22日 星期五

在pythonanywhere設計Django網站的功能表

對pythonanywhere不熟悉的讀者,請先閱讀這篇文章:善用pythonanywhere開發Django網站

1.建立mysite的Django專案


2.增加template目錄、myapp


3.利用image creator產生蔬菜和水果兩張圖片


4.修訂mysite/settings.py

  1
  2
  3
  4
  5
  6
  7
  8
  9
 10
 11
 12
 13
 14
 15
 16
 17
 18
 19
 20
 21
 22
 23
 24
 25
 26
 27
 28
 29
 30
 31
 32
 33
 34
 35
 36
 37
 38
 39
 40
 41
 42
 43
 44
 45
 46
 47
 48
 49
 50
 51
 52
 53
 54
 55
 56
 57
 58
 59
 60
 61
 62
 63
 64
 65
 66
 67
 68
 69
 70
 71
 72
 73
 74
 75
 76
 77
 78
 79
 80
 81
 82
 83
 84
 85
 86
 87
 88
 89
 90
 91
 92
 93
 94
 95
 96
 97
 98
 99
100
101
102
103
104
105
106
107
108
109
110
111
112
113
114
115
116
117
118
119
120
121
122
123
124
125
126
127
128
129
130
131
132
133
134
"""
Django settings for mysite project.

Generated by 'django-admin startproject' using Django 4.0.6.

For more information on this file, see
https://docs.djangoproject.com/en/4.0/topics/settings/

For the full list of settings and their values, see
https://docs.djangoproject.com/en/4.0/ref/settings/
"""

from pathlib import Path

# Build paths inside the project like this: BASE_DIR / 'subdir'.
BASE_DIR = Path(__file__).resolve().parent.parent


# Quick-start development settings - unsuitable for production
# See https://docs.djangoproject.com/en/4.0/howto/deployment/checklist/

# SECURITY WARNING: keep the secret key used in production secret!
SECRET_KEY = 'django-insecure-8c5r7ez2#g2j5n@yxeczdyhw6-zwgj_l64=nark$wc_mn+kf*4'

# SECURITY WARNING: don't run with debug turned on in production!
DEBUG = True

ALLOWED_HOSTS = ['cmlin.pythonanywhere.com']


# Application definition

INSTALLED_APPS = [
    'django.contrib.admin',
    'django.contrib.auth',
    'django.contrib.contenttypes',
    'django.contrib.sessions',
    'django.contrib.messages',
    'django.contrib.staticfiles',
    'myapp',
]

MIDDLEWARE = [
    'django.middleware.security.SecurityMiddleware',
    'django.contrib.sessions.middleware.SessionMiddleware',
    'django.middleware.common.CommonMiddleware',
    'django.middleware.csrf.CsrfViewMiddleware',
    'django.contrib.auth.middleware.AuthenticationMiddleware',
    'django.contrib.messages.middleware.MessageMiddleware',
    'django.middleware.clickjacking.XFrameOptionsMiddleware',
]

ROOT_URLCONF = 'mysite.urls'

TEMPLATES = [
    {
        'BACKEND': 'django.template.backends.django.DjangoTemplates',
        'DIRS': [BASE_DIR/'templates'],
        'APP_DIRS': True,
        'OPTIONS': {
            'context_processors': [
                'django.template.context_processors.debug',
                'django.template.context_processors.request',
                'django.contrib.auth.context_processors.auth',
                'django.contrib.messages.context_processors.messages',
            ],
        },
    },
]

WSGI_APPLICATION = 'mysite.wsgi.application'


# Database
# https://docs.djangoproject.com/en/4.0/ref/settings/#databases

DATABASES = {
    'default': {
        'ENGINE': 'django.db.backends.sqlite3',
        'NAME': BASE_DIR / 'db.sqlite3',
    }
}


# Password validation
# https://docs.djangoproject.com/en/4.0/ref/settings/#auth-password-validators

AUTH_PASSWORD_VALIDATORS = [
    {
        'NAME': 'django.contrib.auth.password_validation.UserAttributeSimilarityValidator',
    },
    {
        'NAME': 'django.contrib.auth.password_validation.MinimumLengthValidator',
    },
    {
        'NAME': 'django.contrib.auth.password_validation.CommonPasswordValidator',
    },
    {
        'NAME': 'django.contrib.auth.password_validation.NumericPasswordValidator',
    },
]


# Internationalization
# https://docs.djangoproject.com/en/4.0/topics/i18n/

LANGUAGE_CODE = 'en-us'

TIME_ZONE = 'UTC'

USE_I18N = True

USE_TZ = True


# Static files (CSS, JavaScript, Images)
# https://docs.djangoproject.com/en/4.0/howto/static-files/

STATIC_URL = 'static/'

# Default primary key field type
# https://docs.djangoproject.com/en/4.0/ref/settings/#default-auto-field

DEFAULT_AUTO_FIELD = 'django.db.models.BigAutoField'

# default static files settings for PythonAnywhere.
# see https://help.pythonanywhere.com/pages/DjangoStaticFiles for more info
MEDIA_ROOT = '/home/cmlin/mysite/media'
MEDIA_URL = '/media/'
STATIC_ROOT = '/home/cmlin/mysite/static'
STATIC_URL = '/static/'
STATICFILES_DIRS = [
    BASE_DIR/'static',
    ]

5.修訂mysite/urls.py

 1
 2
 3
 4
 5
 6
 7
 8
 9
10
11
12
13
14
15
16
17
18
19
20
21
22
23
24
25
"""mysite URL Configuration

The `urlpatterns` list routes URLs to views. For more information please see:
    https://docs.djangoproject.com/en/4.0/topics/http/urls/
Examples:
Function views
    1. Add an import:  from my_app import views
    2. Add a URL to urlpatterns:  path('', views.home, name='home')
Class-based views
    1. Add an import:  from other_app.views import Home
    2. Add a URL to urlpatterns:  path('', Home.as_view(), name='home')
Including another URLconf
    1. Import the include() function: from django.urls import include, path
    2. Add a URL to urlpatterns:  path('blog/', include('blog.urls'))
"""
from django.contrib import admin
from django.urls import path
from myapp.views import index, vegetable, fruit

urlpatterns = [
    path('admin/', admin.site.urls),
    path('', index),
    path('vegetable/', vegetable),
    path('fruit/', fruit),
]

6.修訂myapp/vews.py

 1
 2
 3
 4
 5
 6
 7
 8
 9
10
11
from django.shortcuts import render

# Create your views here.
def index(request):
    return render(request, 'index.html', locals())

def vegetable(request):
    return render(request, 'vegetable.html', locals())

def fruit(request):
    return render(request, 'fruit.html', locals())

7.新增template/index.html

 1
 2
 3
 4
 5
 6
 7
 8
 9
10
11
12
13
14
15
<!DOCTYPE html>
<html>
<body>

<h1>虎科小農超市</h1>

<p>虎科大是一所很重視永續發展暨社會責任的大學</p>

<nav>
<a href="/vegetable/">蔬菜</a> |
<a href="/fruit/">水果</a> |
</nav>

</body>
</html>

8.新增template/vegetable.html

 1
 2
 3
 4
 5
 6
 7
 8
 9
10
<!DOCTYPE html>
<html>
<body>

<h1>蔬菜</h1>

<img src='../static/images/vegetable.jpg'>

</body>
</html>

9.新增template/fruit.html

 1
 2
 3
 4
 5
 6
 7
 8
 9
10
<!DOCTYPE html>
<html>
<body>

<h1>水果</h1>

<img src='../static/images/fruits.jpg'>

</body>
</html>>

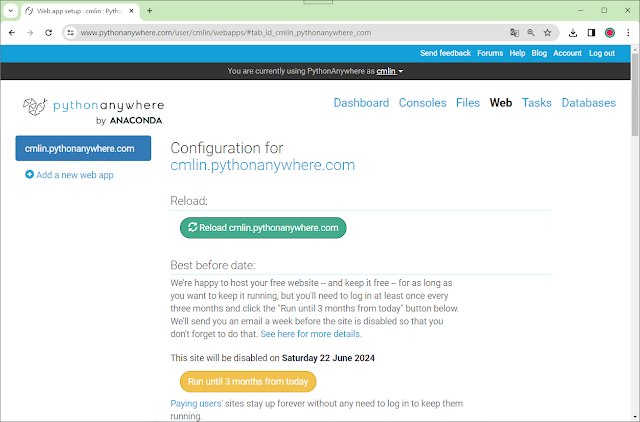
10.重新整理,按下下圖Reload,再按下URL來查看結果

11.執行結果


用圖形排列來訓練雙迴圈以及函式的技巧

 範例 一、用雙迴圈畫方形並排列成三角形

 1
 2
 3
 4
 5
 6
 7
 8
 9
10
11
12
13
14
15
16
17
18
import turtle
c = turtle.Turtle()
for i in range(1,6):
    for j in range(-2,3-i+1):
        c.penup()
        c.goto(-500+i*150,j*150)
        c.pendown()
        c.color("red")
        c.begin_fill()
        c.forward(100)
        c.left(90)
        c.forward(100)
        c.left(90)
        c.forward(100)
        c.left(90)
        c.forward(100)
        c.left(90)
        c.end_fill()

執行結果:


範例二、用雙迴圈畫方形並排列成三角形,但內部畫圓來顯示

 1
 2
 3
 4
 5
 6
 7
 8
 9
10
11
12
13
14
15
16
17
18
19
20
21
22
23
24
25
26
27
import turtle
c = turtle.Turtle()
for i in range(1,6):
    for j in range(-2,3-i+1):
        if i==1 or j==-2 or j==3-i:
            c.penup()
            c.goto(-500+i*150,j*150)
            c.pendown()
            c.color("red")
            c.begin_fill()
            c.forward(100)
            c.left(90)
            c.forward(100)
            c.left(90)
            c.forward(100)
            c.left(90)
            c.forward(100)
            c.left(90)
            c.end_fill()
        else:
            c.penup()
            c.goto(-500+i*150+50,j*150)
            c.pendown()
            c.color("black")
            c.begin_fill()
            c.circle(50)
            c.end_fill()   

執行結果:

範例三:以隨機產生圖案和顏色

 1
 2
 3
 4
 5
 6
 7
 8
 9
10
11
12
13
14
15
16
17
18
19
20
21
22
23
24
25
26
27
28
29
30
import turtle
import random
c = turtle.Turtle()
c.speed(0)
color=["black", "red", "blue", "yellow", "green", "white"]
for i in range(1,6):
    for j in range(-2,3-i+1):
        if random.randint(1,100)%2:
            c.penup()
            c.goto(-500+i*150,j*150)
            c.pendown()
            c.color(color[random.randint(0,5)])
            c.begin_fill()
            c.forward(100)
            c.left(90)
            c.forward(100)
            c.left(90)
            c.forward(100)
            c.left(90)
            c.forward(100)
            c.left(90)
            c.end_fill()
        else:
            c.penup()
            c.goto(-500+i*150+50,j*150)
            c.pendown()
            c.color(random.random(),random.random(), random.random())
            c.begin_fill()
            c.circle(50)
            c.end_fill()            

執行結果:

範例四、承上題,把畫方形用函式取代

 1
 2
 3
 4
 5
 6
 7
 8
 9
10
11
12
13
14
15
16
17
18
19
20
21
22
23
24
25
26
27
28
29
30
31
32
33
34
35
import turtle
import random

def square(c):
    c.begin_fill()
    c.forward(100)
    c.left(90)
    c.forward(100)
    c.left(90)
    c.forward(100)
    c.left(90)
    c.forward(100)
    c.left(90)
    c.end_fill()
    
c = turtle.Turtle()
c.speed(0)
color=["black", "red", "blue", "yellow", "green", "white"]

for i in range(1,6):
    for j in range(-2,3-i+1):
        if random.randint(1,100)%2:
            c.penup()
            c.goto(-500+i*150,j*150)
            c.pendown()
            c.color(color[random.randint(0,5)])
            square(c)
        else:
            c.penup()
            c.goto(-500+i*150+50,j*150)
            c.pendown()
            c.color(random.random(),random.random(), random.random())
            c.begin_fill()
            c.circle(50)
            c.end_fill()            

執行結果: