micro:bit Python Editor:https://python.microbit.org/v/3

從上圖來看,由左到右分別為主功能表、程式編輯區、以及micro:bit模擬區,感覺上設計很友善。在左下方的語言和設置選項,可以更改為繁體中文。


1.變數(Variables)
變數可用來儲存可改變的數據,例如:作品的名稱、長或寛等。
2.顯示器(Display)
顯示數據在micro:bit 5x5 矩陣LED上,clear()表示清除,show()為顯示。
範例一、運用scroll和show來顯示文字或數字,scroll會以捲動方式呈現。
1 2 3 4 5 | from microbit import display name = 'Tree Art' display.scroll(name) width = 2 display.show(width) |
範例二、用Image來設計矩陣LED顯示的圖案,以0-9數字表示,0表示全暗,9表示全亮,':'表示換行。set_pixel(x,y,亮度)可以設計(x,y)的亮度。
1 2 3 4 5 6 7 | from microbit import display display.show(Image('01234:56789:' '01234:' '56789:' '01234')) display.set_pixel(1,0,9) |
執行結果:

3.按鈕(Buttons)
範例三、is_pressed()和was_pressed()的差別,前者是當下按下,而後者是曾經按下。
1 2 3 4 5 6 7 8 9 10 | from microbit import * while True: if button_a.is_pressed() and button_b.is_pressed(): display.scroll('A and B') elif button_a.is_pressed(): display.scroll('A') elif button_b.was_pressed(): display.scroll('B') sleep(1000) |
範例四:讀取按鍵被按下次數
1 2 3 4 5 | from microbit import * display.scroll('Press A') sleep(3000) display.scroll(button_a.get_presses()) |
4.迴圈(Loops)
範例五、雙迴圈
1 2 3 4 5 6 | from microbit import * for y in range(5): for x in range(5): display.set_pixel(x, y, 9) sleep(50) |
5.邏輯(Logic)
範例六、if-break的使用範列
1 2 3 4 5 6 7 8 9 10 | from microbit import * while True: if button_a.was_pressed(): display.show('A') elif button_b.was_pressed(): display.show('B') if accelerometer.was_gesture('shake'): break display.scroll('Game over') |
6.加速度感測器(Accelermeter)
範例七、當加速度感測器偵測到遙動以及向上時,分別顯示相對應圖示。
1 2 3 4 5 6 7 | from microbit import * while True: if accelerometer.was_gesture('shake'): display.show(Image.CONFUSED) if accelerometer.was_gesture('up'): display.show(Image.ARROW_N) |
7.註解(Comments)
用#做為註解的開頭符號,範例請參考範例八。
8.數學(Maths)
範例八、取亂數、絕對值、和整數等數學運算
1 2 3 4 5 6 7 8 9 | from microbit import * import random #隨機產生1到6的其中一個數字,並顯示在5x5矩陣LED上 display.scroll(random.randint(1, 6)) #取得加速計的y軸數值,並取其絕對值 display.scroll(abs(accelerometer.get_y())) #取4.9數值的整數值 display.scroll(int(4.9)) |
9.列表(陣列)(Lists(aarays))
範例九、樹藝是利用樹皮、葉脈、種子的工藝
1 2 3 4 5 6 7 8 9 10 11 12 13 | from microbit import * TreeArt=[] TreeArt.append('bark')#樹皮 TreeArt.append('vein')#葉脈 TreeArt.append('seed')#種子 display.scroll('Tree Art is the art of using ') while True: for index, name in enumerate(TreeArt): display.scroll(name) if index<2: display.scroll(', ') else: display.scroll('.') |
說明:for index, name in enumerate(TreeArt),利用enumerate(TreeArt)分別回傳項目的索引值和名稱。
10.功能或函式(Functions)
範例十、定義函式
1 2 3 4 5 6 7 8 9 10 11 12 13 14 15 16 17 18 | from microbit import * #定義函式 def ShowTreeArt(): TreeArt=[] TreeArt.append('bark')#樹皮 TreeArt.append('vein')#葉脈 TreeArt.append('seed')#種子 display.scroll('Tree Art is the art of using ') for index, name in enumerate(TreeArt): display.scroll(name) if index<2: display.scroll(', ') else: display.scroll('.') while True: ShowTreeArt()#呼叫函式 display.clear() sleep(2000) |
11.無線電(Radio)
範例十一、Send a smile,網址:https://python.microbit.org/v/3/ideas/send-a-smile
1 2 3 4 5 6 7 8 9 10 11 12 13 14 | from microbit import * import radio radio.config(group=1) radio.on() while True: message = radio.receive() if message: display.show(Image.HAPPY) if button_a.was_pressed(): display.clear() radio.send('smile') |
說明:

上圖右下角有模擬無線電傳送功能,在其左方有一個下拉表單,按下後可以查看傳送和接收情形。

12.光度(Light level)
範例十二、讀取光度
1 2 3 4 | from microbit import * display.scroll(display.read_light_level()) |
執行結果:

13.溫度(Temperature)
範例十三、溫度
1 2 3 | from microbit import * display.scroll(temperature()) |
執行結果:

14.羅盤(Compass)
1 2 3 4 5 6 7 8 9 10 11 | from microbit import * display.scroll(compass.heading()) magnet_strength_x = compass.get_x() display.scroll(magnet_strength_x) magnet_strength_y = compass.get_y() display.scroll(magnet_strength_y) magnet_strength_z = compass.get_z() display.scroll(magnet_strength_z) magnet_strength_all = compass.get_field_strength() display.scroll(magnet_strength_all) |
執行結果:

15.聲音(Sound)
範例十五、聲音和語音
1 2 3 4 5 6 7 8 | import music import speech from microbit import * music.play(music.BIRTHDAY) speech.say('Hello, world. How are you?') music.play(['c', 'd', 'e', 'c']) audio.play(Sound.GIGGLE) |
16.麥克風(Microphone) V2
範例十六、麥克風
1 2 3 4 5 6 7 | from microbit import * while True: if microphone.current_event() == SoundEvent.LOUD: display.show(Image.HAPPY) elif microphone.current_event() == SoundEvent.QUIET: display.show(Image.ASLEEP) |
執行結果:

17.觸控標誌(Touch logo) V2
範例十七、觸控標誌
1 2 3 4 5 | from microbit import * while True: if pin_logo.is_touched(): display.show(Image.HAPPY) |
執行結果:

18.數據記錄(Data logging) V2
範例十八、每隔1秒,記錄溫度、聲音、和光度。
1 2 3 4 5 6 7 8 9 10 11 12 13 14 15 | from microbit import * import log log.set_labels('temperature', 'sound', 'light') @run_every(s=1) def log_data(): log.add({ 'temperature': temperature(), 'sound': microphone.sound_level(), 'light': display.read_light_level() }) while True: sleep(100000) |
執行結果:

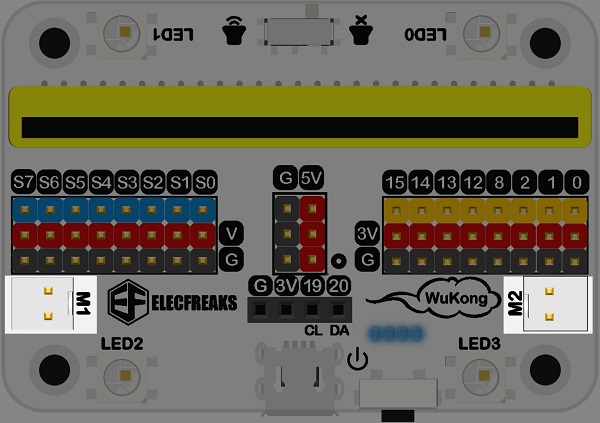
19.引腳(Pins)
20.NeoPixels
有關引腳和NeoPixel的範例,可以參考micro:bit -悟空板(WuKong):NeoPixel測試 (Python版)
21.資料處理(Data types)
範例十九、數字轉字串
1 2 3 4 | from microbit import * score = 17 display.scroll('Score: ' + str(score)) |
22.字串操作(String manipulation)
可以參考範例十九
23.文字輸入和輸出(Text input and output)
範例二十、文字輸入和輸出
1 2 3 4 5 6 7 | from microbit import * while True: name = input('What is your name? ') print('Hello', name) display.scroll('Hello'+ name) sleep(1000) |
執行結果:

24.高等數學(Advanced maths)
範例二十一、數學和邏輯運算
1 2 3 4 5 6 7 8 9 10 11 12 13 14 15 16 17 18 19 20 21 | from microbit import * from math import * display.scroll(pi) display.scroll(sqrt(25)) display.scroll(cos(1)) display.scroll(radians(180))#角度轉徑度 display.scroll(degrees(3))#徑度轉角度 display.scroll(log(10, 2)) number = 0b11111111#二進位 display.scroll(number) number = 0xFF#十六進位 display.scroll(number) x = 0b11110000 y = 0b10101010 display.scroll(bin(x & y))#和 display.scroll(bin(x | y))#或 display.scroll(bin(x ^ y))#互斥 display.scroll(bin(x << 4))#左移 display.scroll(bin(x >> 2))#右移 display.scroll(bin(~x))#取補數 |