
準備材料:
- micro:bit主板 x 1
- USB 連接線 x 1
- GVS接腳的LED x1
- GVS接腳的土壤溼度計 x 1
- 悟空板 WuKong x 1
接線:
- LED接在P15
- 土壤溼度感測器接在P0
程式:

執行結果:
準備材料:
接線:
程式:
執行結果:
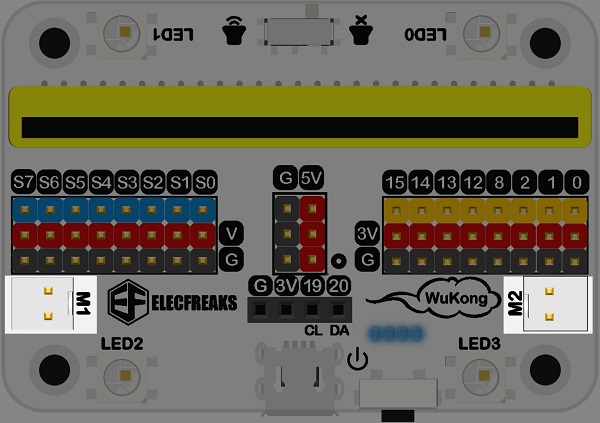
悟空板介紹:Wukong Breakout Board 悟空擴充板
馬達連接接腳
程式編輯:https://makecode.microbit.org/#editor
安裝悟空板的驅動

選擇上圖wukong選項。
範例一、馬達測試:

執行結果:
範例二、按鈕控制

執行結果:
範例一:分別以紅色、綠色、藍色、白色點亮悟空板上的四顆燈
1 2 3 4 5 6 7 8 9 10 11 12 13 | # Imports go at the top from microbit import * import neopixel np = neopixel.NeoPixel(pin16, 4) # Code in a 'while True:' loop repeats forever while True: np[0] = (255, 0, 0) np[1] = (0, 255, 0) np[2] = (0, 0, 255) np[3] = (255, 255, 255) np.show() |

1 2 3 4 5 6 7 8 9 10 11 12 13 | # Imports go at the top from microbit import * import neopixel np = neopixel.NeoPixel(pin16, 4) leds=[(255,0,0), (0,255,0), (0,0,255), (255,255,255)] # Code in a 'while True:' loop repeats forever while True: np[0] = leds[0] np[1] = leds[1] np[2] = leds[2] np[3] = leds[3] np.show() |
1 2 3 4 5 6 7 8 9 10 11 12 13 14 15 | # Imports go at the top from microbit import * import neopixel np = neopixel.NeoPixel(pin16, 4) i = 0 leds=[(255,0,0), (0,255,0), (0,0,255), (255,255,255)] # Code in a 'while True:' loop repeats forever while True: np[0] = leds[i] np[1] = leds[(i+1)%4] np[2] = leds[(i+2)%4] np[3] = leds[(i+3)%4] np.show() sleep(500) i=(i+1)%4 |
1 2 3 4 5 6 7 8 9 10 11 12 13 | # Imports go at the top from microbit import * import neopixel np = neopixel.NeoPixel(pin16, 4) i = 0 leds=[(255,0,0), (0,255,0), (0,0,255), (255,255,255)] # Code in a 'while True:' loop repeats forever while True: for j in range(4): np[j] = leds[(i+j)%4] np.show() sleep(500) i=(i+1)%4 |
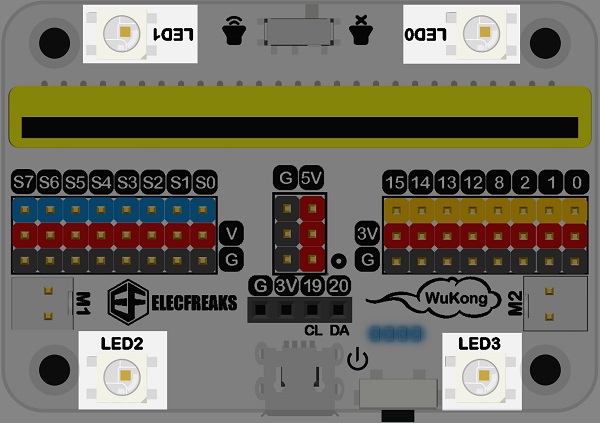
悟空板介紹:Wukong Breakout Board 悟空擴充板
在悟空板上Pin 16接上四顆LED,分別是LED1, LED2, LED3, 和LED4,如下圖。
程式編輯:https://makecode.microbit.org/#editor

在上圖右下方,點選Extensions選項。

點選上圖左方 neopixel的選項,就可以安裝驅動程式。
範例一、依序點亮

執行結果:
範例二、每隔0.5秒循環

執行結果:
範例三、依照聲音大小用長條圖來改變燈條燈數

執行結果: