
2013年7月13日 星期六
[ Vuforia AR ] 認識目標物(Targets)
對於發展擴增實境APP來說,目標物(Targets)是非常要的。在Vuforia SDK中,何謂目標物?就是指要在真實世界中,用來被偵測或被追蹤的物件。在Vuforia AR中目標物可分成下列幾種:
TrackableResult是指對應到目標物結果,在TrackableResult可以分成:
- 影像目標物(Image Targets):這類就是過去所指無標誌(Markerless)擴增實境,舉凡照片、書封面、產品包裝等都是。
- 帶框標誌(Frame Marker):就是傳統標誌的擴增實境,一般遊戲卡等。
- 多邊目標物(Multi-targets):這類目標物都是使用在3D物件上。
- 虛擬按鍵(Virtual Buttons):在影像目標物上,用一小塊方形來代表按鍵。
- 文字(Text):簡單文字。
- ImageTarget
- MultiTarget
- Marker
- Word
TrackableResult是指對應到目標物結果,在TrackableResult可以分成:
- ImageTargetResult
- MultiTargetResult
- MarkerResult
- WordResult
[ Vuforia AR ] Vuforia AR APP開發流程
Vuforia AR APP開發流程,可分成兩大類:
此部份可以分成本機資料庫(Device Database)和雲端資料庫(Cloud Database),假如目標物少於100個,就可以考慮使用本機資料庫,雲端資料庫則可使用超過百萬個目標物,整體而言本機資料庫反應時間較快,約2-3 Frame,約0.1秒,但雲端資料庫則必須視網連線狀況,約2-3秒。不管是使用本機資料庫或雲端資料庫,都需要藉助目標物管理器(Target Manager)。流程請參閱下圖。

文字目標物開發流程

- 影像目標物(Image Targets)開發流程
- 文字目標物(Word Targets)開發流程
此部份可以分成本機資料庫(Device Database)和雲端資料庫(Cloud Database),假如目標物少於100個,就可以考慮使用本機資料庫,雲端資料庫則可使用超過百萬個目標物,整體而言本機資料庫反應時間較快,約2-3 Frame,約0.1秒,但雲端資料庫則必須視網連線狀況,約2-3秒。不管是使用本機資料庫或雲端資料庫,都需要藉助目標物管理器(Target Manager)。流程請參閱下圖。
文字辦識僅能辦識英文單字,目前提供超過10萬個常用的單字,開發流程請參考下圖。
[ mixare ] 一套開放式源始碼擴增實境瀏覽器資源分享
今天一位網友介紹這套軟體mixare,敏哥嘗試把它滙入到eclipse,執行後感覺不錯,跟大家分享。利用mixare關鍵字可以找到mixare官方網站http://www.mixare.org/。
 從上圖可以看出,這套工具同時支援Android和iOS,以下是它的功能介紹影片。
在官方網站的功能表中,有"Download"功能,按下後如下圖:


在官方網站的功能表中,有"Download"功能,按下後如下圖:

下載Android程式,利用eclipse的Import功能滙入:

記得要處理下圖紅色部份。

執行結果


2013年7月12日 星期五
[ Vuforia AR ] 為何要選用Vuforia SDK來開發擴增實境APP
在上一篇文章中,可以看到Vuforia同時支援三種平台,包括:Android, iOS, Unity等。敏哥試過Vuforia SDK提供的Android影像標的(Image Targets)範例,感覺很不錯。閱讀Developing with Vuforia文章,對於文章提到的幾個特性,感到Vuforia是一套不錯的AR開發平台,值得大家一起來使用。這些特性包括:

由特性及分工來看,Vuforia是一套相當好的行動裝置擴增實境的開發平台,我們將後續為大家解說。
- 快速地偵測標的物。
- 使用雲端進行識別可同時處理高達100萬的目標物。
- 針對即時目標物產生,可以讓用戶自行定義。
- 可以進行文字識別。
- 更強健的追踪,當裝置移動時,追踪物件不容易遺失。
- 可同時追踪多達5個目標物。
- 在現實世界中的條件有更好的結果如較差光線及目標物部分被覆蓋等。
- 效能佳確保更好和更逼真的圖形上呈現在裝置上。
由特性及分工來看,Vuforia是一套相當好的行動裝置擴增實境的開發平台,我們將後續為大家解說。
2013年7月10日 星期三


2012年11月18日 星期日
[ iOS ] 利用StoryBoards,不用寫程式就可以達到畫面切換
Storyboards稱為情節串連圖板或稱為故事畫板,在使用Storyboards時,切換畫面就像是一個故事情節跳到另一個故事情節,完全不用寫程式,相當好用。
1.打開XCode。


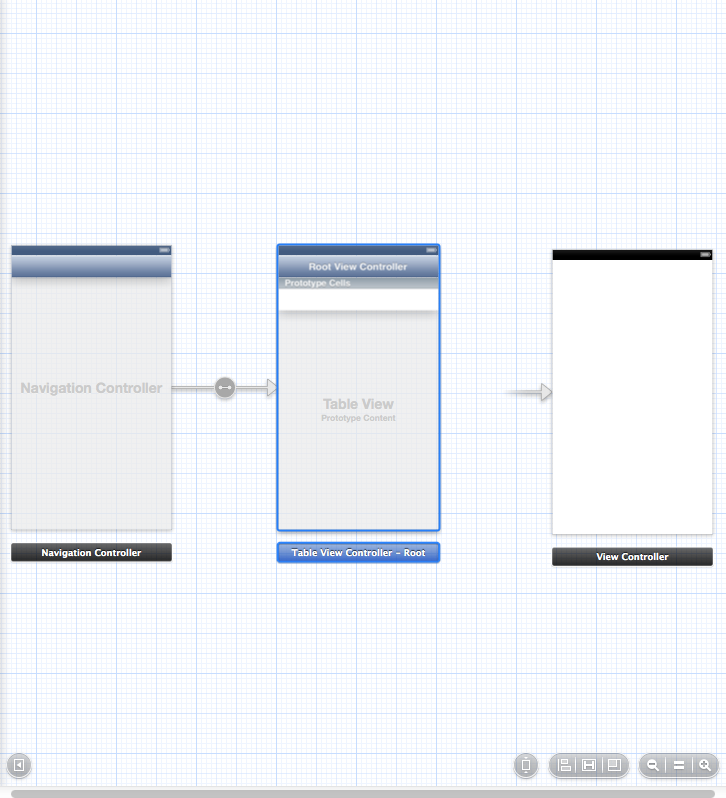

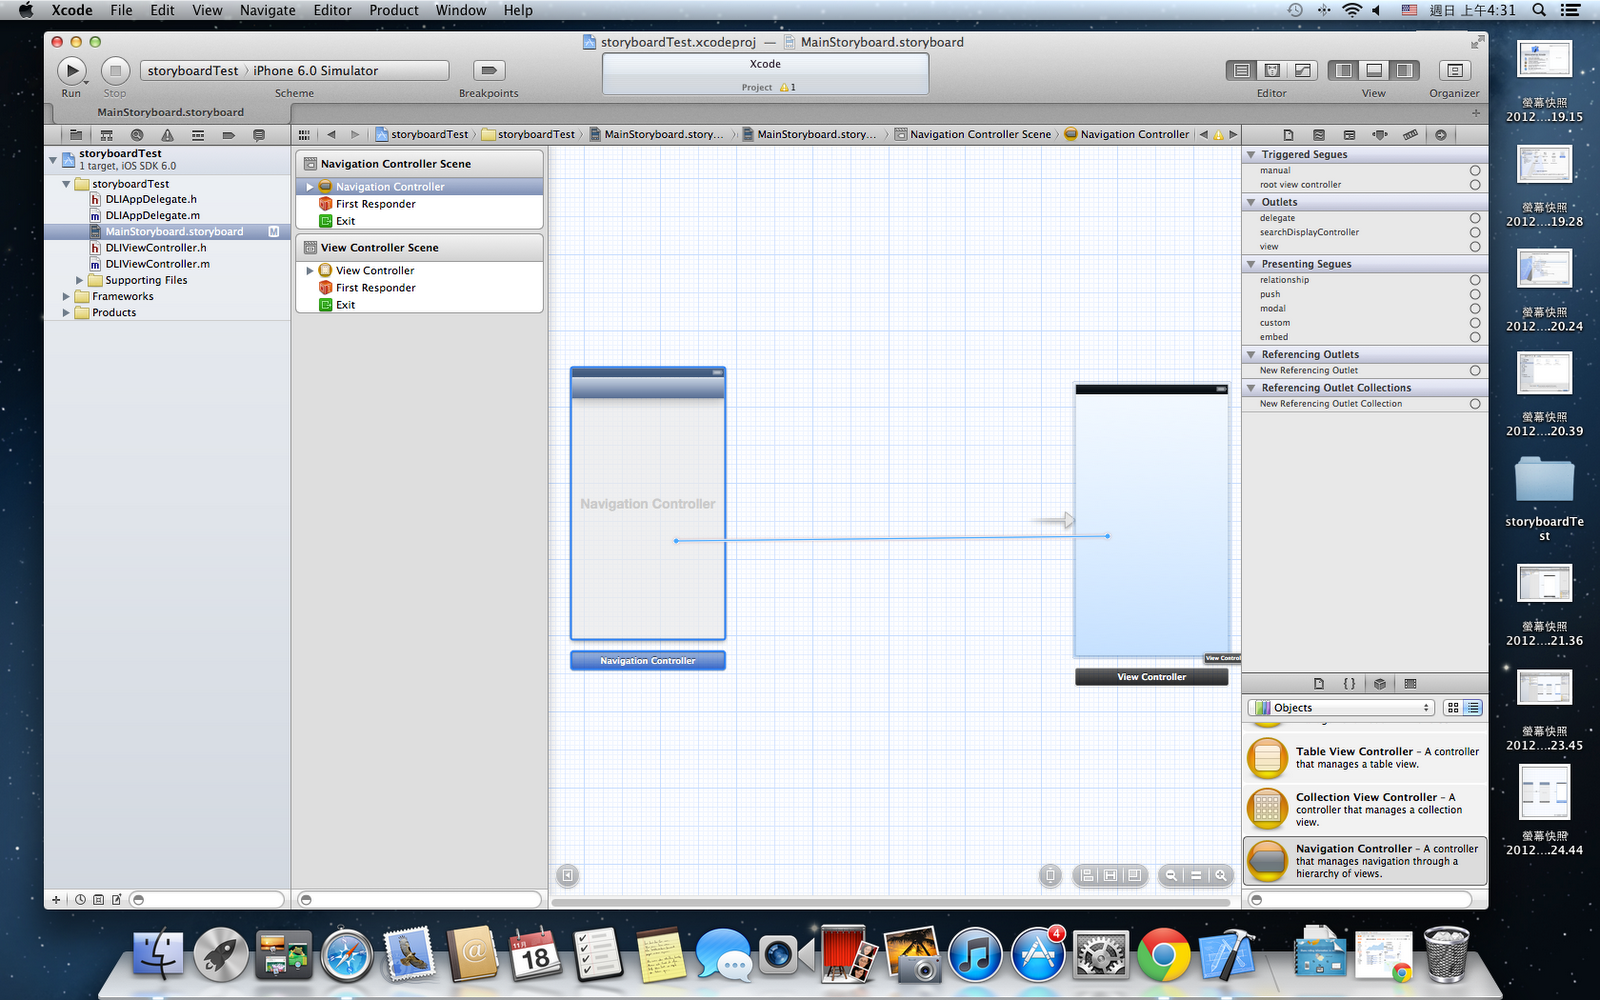


15.選擇push


2012年11月17日 星期六
2012年11月3日 星期六
[ iOS ] 兩個TableView相互切換
1.執行結果如下;


2.DLIViewController.h
//
// DLIViewController.h
// tableView
//
// Created by Lin Cheng-Min on 12/11/3.
// Copyright (c) 2012年 Lin Cheng-Min. All rights reserved.
//
#import
@interface DLIViewController : UIViewController
@property (strong, nonatomic) IBOutlet UITableView *tableView;
@property (strong, nonatomic) NSArray *listData;
@end
3.DLIViewController.m
//
// Created by Lin Cheng-Min on 12/11/3.
// Copyright (c) 2012年 Lin Cheng-Min. All rights reserved.
//
#import "DLIViewController.h"
#import "DLIViewController2.h"
@interface DLIViewController ()
@end
@implementation DLIViewController
@synthesize listData;
- (void)viewDidLoad
{
[super viewDidLoad];
// Do any additional setup after loading the view, typically from a nib.
listData = [[NSArray alloc] initWithObjects:@"a",@"b",@"c", nil];
}
- (void)didReceiveMemoryWarning
{
[super didReceiveMemoryWarning];
// Dispose of any resources that can be recreated.
}
-(NSInteger)tableView:(UITableView *)tableView numberOfRowsInSection:(NSInteger)section{
return [listData count];
}
-(UITableViewCell *)tableView:(UITableView *)tableView cellForRowAtIndexPath:(NSIndexPath *)indexPath{
static NSString *tableIdentifier = @"Simple table";
UITableViewCell *cell = [tableView dequeueReusableCellWithIdentifier:tableIdentifier];
if(cell == nil){
cell = [[UITableViewCell alloc] initWithStyle:UITableViewCellStyleDefault reuseIdentifier:tableIdentifier];
}
cell.textLabel.text = [listData objectAtIndex:indexPath.row];
UIImage *cellImage = [UIImage imageNamed:@"nkut_logo.jpg"];
cell.imageView.image = cellImage;
return cell;
}
-(void)tableView:(UITableView *)tableView didEndDisplayingCell:(UITableViewCell *)cell forRowAtIndexPath:(NSIndexPath *)indexPath{
cell.textLabel.text = [listData objectAtIndex:[indexPath row]];
}
- (void)tableView:(UITableView *)tableView didSelectRowAtIndexPath:(NSIndexPath *)indexPath{
DLIViewController2 *controller = [[DLIViewController2 alloc] initWithNibName:nil bundle:nil];
[self presentViewController:controller animated:YES completion:NULL];
}
@end
4. DLIViewController2.h
//
// DLIViewController2.h
// tableView
//
// Created by Lin Cheng-Min on 12/11/3.
// Copyright (c) 2012年 Lin Cheng-Min. All rights reserved.
//
#import
@interface DLIViewController2 : UIViewController
@property (strong, nonatomic) IBOutlet UITableView *tableView2;
@property (strong, nonatomic)NSArray *listData2;
@end
5. DLIViewController2.m
// DLIViewController2.m
// tableView
//
// Created by Lin Cheng-Min on 12/11/3.
// Copyright (c) 2012年 Lin Cheng-Min. All rights reserved.
//
#import "DLIViewController.h"
#import "DLIViewController2.h"
@interface DLIViewController2 ()
@end
@implementation DLIViewController2
@synthesize listData2;
- (id)initWithNibName:(NSString *)nibNameOrNil bundle:(NSBundle *)nibBundleOrNil
{
self = [super initWithNibName:nibNameOrNil bundle:nibBundleOrNil];
if (self) {
// Custom initialization
}
return self;
}
- (void)viewDidLoad
{
[super viewDidLoad];
// Do any additional setup after loading the view from its nib.
listData2 = [[NSArray alloc] initWithObjects:@"1",@"2",@"3", nil];
}
- (void)didReceiveMemoryWarning
{
[super didReceiveMemoryWarning];
// Dispose of any resources that can be recreated.
}
-(NSInteger)tableView:(UITableView *)tableView numberOfRowsInSection:(NSInteger)section{
return [listData2 count];
}
-(UITableViewCell *)tableView:(UITableView *)tableView cellForRowAtIndexPath:(NSIndexPath *)indexPath{
static NSString *tableIdentifier = @"Simple table";
UITableViewCell *cell = [tableView dequeueReusableCellWithIdentifier:tableIdentifier];
if(cell == nil){
cell = [[UITableViewCell alloc] initWithStyle:UITableViewCellStyleDefault reuseIdentifier:tableIdentifier];
}
cell.textLabel.text = [listData2 objectAtIndex:indexPath.row];
return cell;
}
-(void)tableView:(UITableView *)tableView didEndDisplayingCell:(UITableViewCell *)cell forRowAtIndexPath:(NSIndexPath *)indexPath{
cell.textLabel.text = [listData2 objectAtIndex:[indexPath row]];
}
- (void)tableView:(UITableView *)tableView didSelectRowAtIndexPath:(NSIndexPath *)indexPath{
DLIViewController *controller = [[DLIViewController alloc] initWithNibName:nil bundle:nil];
[self presentViewController:controller animated:YES completion:NULL];
}
@end
[ iOS ] TableView和WebView 的整合
1. 參考 http://cheng-min-i-taiwan.blogspot.tw/2012/10/ios-webview.html及http://cheng-min-i-taiwan.blogspot.tw/2012/11/ios-tableview_2055.html。
2. 打開DLIViewController2.xib檔,加入WebView物件。
 3.增加Referencing Outlet。
 4.程式列表


2. 打開DLIViewController2.xib檔,加入WebView物件。


//
// DLIViewController2.m
// tableView
//
// Created by Lin Cheng-Min on 12/11/3.
// Copyright (c) 2012年 Lin Cheng-Min. All rights reserved.
//
#import "DLIViewController2.h"
@interface DLIViewController2 ()
@end
@implementation DLIViewController2
@synthesize webView;
- (id)initWithNibName:(NSString *)nibNameOrNil bundle:(NSBundle *)nibBundleOrNil
{
self = [super initWithNibName:nibNameOrNil bundle:nibBundleOrNil];
if (self) {
// Custom initialization
}
return self;
}
- (void)viewDidLoad
{
[super viewDidLoad];
// Do any additional setup after loading the view from its nib.
NSURL *url = [NSURL URLWithString:@"http://www.google.com"];
NSURLRequest *request = [NSURLRequest requestWithURL:url];
[webView loadRequest:request];
}
- (void)didReceiveMemoryWarning
{
[super didReceiveMemoryWarning];
// Dispose of any resources that can be recreated.
}
@end
5. 執行結果


[ iOS ] TableView簡易教學 ﹣ 選擇後切換畫面
1. 參考前一篇TableView教學說明 http://cheng-min-i-taiwan.blogspot.tw/2012/11/ios-tableview_3.html 以及 畫面切換說明。http://cheng-min-i-taiwan.blogspot.tw/2012/10/ios.html
2. 選擇File->New 建立第二個畫面程式。


//
// DLIViewController.m
// tableView
//
// Created by Lin Cheng-Min on 12/11/3.
// Copyright (c) 2012年 Lin Cheng-Min. All rights reserved.
//
#import "DLIViewController.h"
#import "DLIViewController2.h"
@interface DLIViewController ()
@end
@implementation DLIViewController
@synthesize listData;
- (void)viewDidLoad
{
[super viewDidLoad];
// Do any additional setup after loading the view, typically from a nib.
listData = [[NSArray alloc] initWithObjects:@"a",@"b",@"c", nil];
}
- (void)didReceiveMemoryWarning
{
[super didReceiveMemoryWarning];
// Dispose of any resources that can be recreated.
}
-(NSInteger)tableView:(UITableView *)tableView numberOfRowsInSection:(NSInteger)section{
return [listData count];
}
-(UITableViewCell *)tableView:(UITableView *)tableView cellForRowAtIndexPath:(NSIndexPath *)indexPath{
static NSString *tableIdentifier = @"Simple table";
UITableViewCell *cell = [tableView dequeueReusableCellWithIdentifier:tableIdentifier];
if(cell == nil){
cell = [[UITableViewCell alloc] initWithStyle:UITableViewCellStyleDefault reuseIdentifier:tableIdentifier];
}
cell.textLabel.text = [listData objectAtIndex:indexPath.row];
UIImage *cellImage = [UIImage imageNamed:@"nkut_logo.jpg"];
cell.imageView.image = cellImage;
return cell;
}
-(void)tableView:(UITableView *)tableView didEndDisplayingCell:(UITableViewCell *)cell forRowAtIndexPath:(NSIndexPath *)indexPath{
cell.textLabel.text = [listData objectAtIndex:[indexPath row]];
}
- (void)tableView:(UITableView *)tableView didSelectRowAtIndexPath:(NSIndexPath *)indexPath{
DLIViewController2 *controller = [[DLIViewController2 alloc] initWithNibName:nil bundle:nil];
[self presentViewController:controller animated:YES completion:NULL];
}
@end
4. 執竹結果


[ iOS ] TableView 簡易教學 ﹣ 選擇後的動作
1. 參考前一篇說明 http://cheng-min-i-taiwan.blogspot.tw/2012/11/ios-tableview_3.html
2. 增加TableView被選擇後的程式(DLIViewController.m 中藍色字)

2. 增加TableView被選擇後的程式(DLIViewController.m 中藍色字)
//
// DLIViewController.m
// tableView
//
// Created by Lin Cheng-Min on 12/11/3.
// Copyright (c) 2012年 Lin Cheng-Min. All rights reserved.
//
#import "DLIViewController.h"
@interface DLIViewController ()
@end
@implementation DLIViewController
@synthesize listData;
- (void)viewDidLoad
{
[super viewDidLoad];
// Do any additional setup after loading the view, typically from a nib.
listData = [[NSArray alloc] initWithObjects:@"a",@"b",@"c", nil];
}
- (void)didReceiveMemoryWarning
{
[super didReceiveMemoryWarning];
// Dispose of any resources that can be recreated.
}
-(NSInteger)tableView:(UITableView *)tableView numberOfRowsInSection:(NSInteger)section{
return [listData count];
}
-(UITableViewCell *)tableView:(UITableView *)tableView cellForRowAtIndexPath:(NSIndexPath *)indexPath{
static NSString *tableIdentifier = @"Simple table";
UITableViewCell *cell = [tableView dequeueReusableCellWithIdentifier:tableIdentifier];
if(cell == nil){
cell = [[UITableViewCell alloc] initWithStyle:UITableViewCellStyleDefault reuseIdentifier:tableIdentifier];
}
cell.textLabel.text = [listData objectAtIndex:indexPath.row];
UIImage *cellImage = [UIImage imageNamed:@"nkut_logo.jpg"];
cell.imageView.image = cellImage;
return cell;
}
-(void)tableView:(UITableView *)tableView didEndDisplayingCell:(UITableViewCell *)cell forRowAtIndexPath:(NSIndexPath *)indexPath{
cell.textLabel.text = [listData objectAtIndex:[indexPath row]];
}
- (void)tableView:(UITableView *)tableView didSelectRowAtIndexPath:(NSIndexPath *)indexPath{
NSString * string=[listData objectAtIndex:[indexPath row]];
UIAlertView *alert=[[UIAlertView alloc] initWithTitle:@"提示" message:string delegate:self cancelButtonTitle:@"確定" otherButtonTitles: nil];
[alert show];
}
@end
3.執行結果

[ iOS ] TableView 簡易教學 ﹣ 放置小圖示
1.請參考前一篇教學
2.把圖片拖拉至專案中。
 3.新增圖示程式 (藍色字)

2.把圖片拖拉至專案中。

//
// DLIViewController.m
// tableView
//
// Created by Lin Cheng-Min on 12/11/3.
// Copyright (c) 2012年 Lin Cheng-Min. All rights reserved.
//
#import "DLIViewController.h"
@interface DLIViewController ()
@end
@implementation DLIViewController
@synthesize listData;
- (void)viewDidLoad
{
[super viewDidLoad];
// Do any additional setup after loading the view, typically from a nib.
listData = [[NSArray alloc] initWithObjects:@"a",@"b",@"c", nil];
}
- (void)didReceiveMemoryWarning
{
[super didReceiveMemoryWarning];
// Dispose of any resources that can be recreated.
}
-(NSInteger)tableView:(UITableView *)tableView numberOfRowsInSection:(NSInteger)section{
return [listData count];
}
-(UITableViewCell *)tableView:(UITableView *)tableView cellForRowAtIndexPath:(NSIndexPath *)indexPath{
static NSString *tableIdentifier = @"Simple table";
UITableViewCell *cell = [tableView dequeueReusableCellWithIdentifier:tableIdentifier];
if(cell == nil){
cell = [[UITableViewCell alloc] initWithStyle:UITableViewCellStyleDefault reuseIdentifier:tableIdentifier];
}
cell.textLabel.text = [listData objectAtIndex:indexPath.row];
UIImage *cellImage = [UIImage imageNamed:@"nkut_logo.jpg"];
cell.imageView.image = cellImage;
return cell;
}
-(void)tableView:(UITableView *)tableView didEndDisplayingCell:(UITableViewCell *)cell forRowAtIndexPath:(NSIndexPath *)indexPath{
cell.textLabel.text = [listData objectAtIndex:[indexPath row]];
}
@end

[ iOS ] TableView 簡易教學
1.建立專案

2.輸入專案名稱


4.選擇DLIViewController.m檔案


- 將 TableView 的 dataSource Outlet 跟 File Owner 做連結
- 將 TableView 的 delegate Outlet 跟 File Owner 做連結

//
// DLIViewController.h
// tableView
//
// Created by Lin Cheng-Min on 12/11/3.
// Copyright (c) 2012年 Lin Cheng-Min. All rights reserved.
//
#import
@interface DLIViewController : UIViewController
@property (strong, nonatomic) IBOutlet UITableView *tableView;
@property (strong, nonatomic) NSArray *listData;
@end

// DLIViewController.m
// tableView
//
// Created by Lin Cheng-Min on 12/11/3.
// Copyright (c) 2012年 Lin Cheng-Min. All rights reserved.
//
#import "DLIViewController.h"
@interface DLIViewController ()
@end
@implementation DLIViewController
@synthesize listData;
- (void)viewDidLoad
{
[super viewDidLoad];
// Do any additional setup after loading the view, typically from a nib.
listData = [[NSArray alloc] initWithObjects:@"a",@"b",@"c", nil];
}
- (void)didReceiveMemoryWarning
{
[super didReceiveMemoryWarning];
// Dispose of any resources that can be recreated.
}
-(NSInteger)tableView:(UITableView *)tableView numberOfRowsInSection:(NSInteger)section{
return [listData count];
}
-(UITableViewCell *)tableView:(UITableView *)tableView cellForRowAtIndexPath:(NSIndexPath *)indexPath{
static NSString *tableIdentifier = @"Simple table";
UITableViewCell *cell = [tableView dequeueReusableCellWithIdentifier:tableIdentifier];
if(cell == nil){
cell = [[UITableViewCell alloc] initWithStyle:UITableViewCellStyleDefault reuseIdentifier:tableIdentifier];
}
cell.textLabel.text = [listData objectAtIndex:indexPath.row];
return cell;
}
-(void)tableView:(UITableView *)tableView didEndDisplayingCell:(UITableViewCell *)cell forRowAtIndexPath:(NSIndexPath *)indexPath{
cell.textLabel.text = [listData objectAtIndex:[indexPath row]];
}
@end


訂閱:
文章 (Atom)