
上篇說明 Coral USB 加速器在樹梅派的安裝與使用 PyCoral 函式庫實作分類分類(Classification),但實在太久沒寫文章,上一篇文章寫得不甚好至今回頭修了好幾次,接著本篇則是實作另一個範例物件偵測(Object Detection)。
在上個範例中放置的圖片是一隻鸚鵡,假如圖片還有白鷺、天鵝、...等其他動物,那麼在物件偵測就可以把它框起來並各個偵測出來相對應的名稱。
本篇實作所使用環境如下:
HardWare:
- Raspberry Pi 4
- google coral usb accelerator
SoftWare:
- Raspberry Pi OS (64-bit, January 28th 2022)
Skill:
- Linux operate
- Python 3.9
- OpenCV
1.在 Edge TPU 上執行模型
a.下載模型、標籤和測試圖片:
cd ~/coral/pycoral
bash examples/install_requirements.sh detect_image.py
b.執行對圖片的辨識:
使用Coral USB 加速器:
python3 examples/detect_image.py \
--model test_data/ssd_mobilenet_v2_coco_quant_postprocess_edgetpu.tflite \
--labels test_data/coco_labels.txt \
--input test_data/grace_hopper.bmp \
--output ${HOME}/grace_hopper_processed.bmp


上述執行執行結果我們可以見到一張海軍准將 葛麗絲·霍普(COBOL 之母)的相片中花了 14.xx ms 辨識出 person 及 tie 兩個位置並以紅色框框起。
c.examples/detect_image.py 程式碼:
程式碼用到 PyCoral API[2],細節部分可以到官網去查詢。以下是程式碼大概的說明:
Line 45~53 : 在圖片上繪出紅色框及辨識的資訊
Line 72 : 載入標籤檔內容
Line 73 : 載入模型
Line 76 : 開啟圖檔
Line 77 : 計算出來原圖與模型輸入解析度縮圖比
Line 80~88 : 輸出執行時間
其中 Line 87 使用函式:
pycoral.adapters.detect.get_objects(interpreter, score_threshold=- inf, image_scale=1.0, 1.0)
是用來從檢測模型中獲取作為檢測對象列表結果。
interpreter --> 用於查詢結果的 tf.lite.Interpreter。
score_threshold --> 結果的評分值。所有返回的結果都具有大於等於該值的分數。
image_scale --> 邊界框的縮放因子,從 0 - 1.0。
Line 90~98 : 輸出辨識結果
Line 100~104 : 繪出紅色框並存檔、顯示
2.修改程式碼:
前述的程式來至於 Coral USB 加速器範例程式碼;使用的是靜態圖片做物件辨識的來源,接下來我們來修改這個範例程式碼並加上 OpenCV 讓程式可以透過攝影鏡頭(wabcam)來進行即時物件辨識。
OpenCV(Open Source Computer Vision Library)[1]是一個跨平台的影像處理函式庫。由英特爾發起並參與開發以BSD授權條款授權發行,可以在商業和研究領域中免費使用。OpenCV可用於開發即時的圖像處理、電腦視覺以及圖型識別程式。
a.安裝 OpenCV 所需要的套件
圖檔包括 JPG、JPEG、PNG 等依賴項目:
sudo apt install libjpeg-dev libpng-dev
HD5 datasets (透過pip安裝OpenCV需要):
sudo apt install libhdf5-dev libhdf5-serial-dev libhdf5-103
影音解碼依賴項目:
sudo apt install libavcodec-dev libavformat-dev libswscale-dev libv4l-dev
sudo apt install libxvidcore-dev libx264-dev
顯示圖片依賴項目:
sudo apt install libfontconfig1-dev libcairo2-dev
sudo apt install libgdk-pixbuf2.0-dev libpango1.0-dev
sudo apt install libgtk2.0-dev libgtk-3-dev
加速運算依賴項目:
sudo apt install libatlas-base-dev gfortran
b.安裝 python OpenCV.
pip3 install opencv-python
c.測試是否安裝無誤:
python -c "import cv2; print(cv2.__version__)"
d.改寫程式:
您可以按照 examples/detect_image.py 來修改亦可新增如下程式碼:
路徑: examples/CV_detect_image.py
1 2 3 4 5 6 7 8 9 10 11 12 13 14 15 16 17 18 19 20 21 22 23 24 25 26 27 28 29 30 31 32 33 34 35 36 37 38 39 40 41 42 43 44 45 46 47 48 49 50 51 52 53 54 55 56 57 58 59 60 61 62 63 64 65 66 67 68 69 70 71 72 73 74 75 76 77 78 79 80 81 82 83 84 | """ Example usage: bash examples/install_requirements.sh detect_image.py python3 examples/CV_detect_image.py \ --model test_data/ssd_mobilenet_v2_coco_quant_postprocess_edgetpu.tflite \ --labels test_data/coco_labels.txt """ import argparse import cv2 import time from PIL import Image from pycoral.adapters import common from pycoral.adapters import detect from pycoral.utils.dataset import read_label_file from pycoral.utils.edgetpu import make_interpreter def draw_objects(frame, objs, labels): """Draws the bounding box and label for each object.""" for obj in objs: bbox = obj.bbox percent = int(100 * obj.score) label = '{}% {}'.format(percent, labels.get(obj.id, obj.id)) cv2.rectangle(frame, (bbox.xmin, bbox.ymin), (bbox.xmax, bbox.ymax), (0, 255, 0), 2) cv2.putText(frame, label, (bbox.xmin + 10, bbox.ymin + 10), cv2.FONT_HERSHEY_SIMPLEX, 0.7, (0, 0, 255), 2) cv2.namedWindow('frame', flags=cv2.WINDOW_GUI_NORMAL) cv2.resizeWindow('frame', 640, 480) cv2.imshow('frame', frame) def main(): parser = argparse.ArgumentParser( formatter_class=argparse.ArgumentDefaultsHelpFormatter) parser.add_argument('-m', '--model', required=True, help='File path of .tflite file') parser.add_argument('-l', '--labels', help='File path of labels file') parser.add_argument('-t', '--threshold', type=float, default=0.4, help='Score threshold for detected objects') parser.add_argument('-c', '--camera_id', type=int, help='Index of which video source to use. ', default = 0) args = parser.parse_args() labels = read_label_file(args.labels) if args.labels else {} interpreter = make_interpreter(args.model) interpreter.allocate_tensors() cam = cv2.VideoCapture(args.camera_id) codec = 1196444237.0 # MJPG cam.set(cv2.CAP_PROP_FOURCC, codec) capture_resolution_hw = [640, 480, 30] print('設定相機X解析度', cam.set(cv2.CAP_PROP_FRAME_WIDTH, capture_resolution_hw[0])) print('設定相機Y解析度', cam.set(cv2.CAP_PROP_FRAME_HEIGHT, capture_resolution_hw[1])) print('設定相機FPS', cam.set(cv2.CAP_PROP_FPS, capture_resolution_hw[2])) while cam.isOpened(): ret, frame = cam.read() if not ret: break cv2_im = frame image = Image.fromarray(cv2.cvtColor(frame, cv2.COLOR_BGR2RGB)) _, scale = common.set_resized_input( interpreter, image.size, lambda size: image.resize(size, Image.ANTIALIAS)) start = time.perf_counter() interpreter.invoke() inference_time = time.perf_counter() - start objs = detect.get_objects(interpreter, args.threshold, scale) #print('%.2f ms' % (inference_time * 1000)) draw_objects(frame, objs, labels) if cv2.waitKey(1) & 0xFF == ord('q'): break cam.release() cv2.destroyAllWindows() if __name__ == '__main__': main() |
e.執行結果:
python3 examples/CV_detect_image.py \
--model test_data/ssd_mobilenet_v2_coco_quant_postprocess_edgetpu.tflite \
--labels test_data/coco_labels.txt

f.程式碼說明:
Line 23~33 : 在圖片上繪出紅色框及辨識的資訊
Line 48 : 載入標籤檔內容
Line 49 : 載入模型
Line 52~58 : 開啟webcam,並設定解析度、FPS等參數
Line 66 : 把webcam抓取到的畫面轉換成 RGB 格式
Line 67 : 計算出來原圖與模型輸入解析度縮圖比
Line 70~74 : 物件偵測
Line 76~78 : 顯示結果(如上圖)。
以上是透過 Coral USB 加速器官網所提供的物件偵測範例修改成可以透過 webcam 即時抓取畫面進行物件偵測。
執行時可以透過 --threshold 參數來修整辨識的細膩,程式預設是0.4,相同畫面越小值辨識會越多,但誤差相對增大可以按照不同環境下不同的參數來進行。
後記:
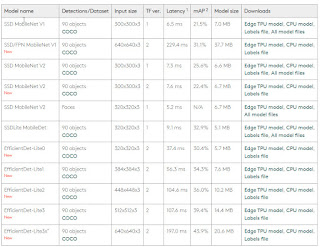
Coral USB 加速器官網中提供了不少的範例[2],同時也提供了目前在 AI 上應用的模型[3], 包括: 圖像分類(Image classification)、物件偵測(Object detection)、語意分割(Semantic segmentation)、人體姿勢(Pose estimation)及語音辨識(Speech recognition)。這五項算模型應用已經可以做到非常多的應用,本篇範例中使用的是 SSD MobileNet V2 的模型,如果覺得辨識不好官網提供了11個模型可以試試[4]。
疫情期間,看到最多的物件偵測(Object detection)應用可以說就是"口罩偵測"的應用,一般口罩偵測會先抓到人臉,然後在訓練可以判斷人臉有戴口罩跟沒戴口罩的模型進行物件偵測,一旦偵測到沒戴口罩就馬上驅動一段預先錄好的 mp3 進行播放用於警惕口罩沒戴好的人。如果想要實作的可以到網路上搜尋一下就可以看到很多類似範例以及分享出來的訓練模型。
除此之外物件偵測也常見於電子圍籬應用,例如工廠輸送帶危險區域偵測是否有人誤闖、火車站月台邊是否有人太靠近鐵軌或是居家小偷的入侵偵測等應用。
參考:
1.OpenCV
https://opencv.org/
https://zh.wikipedia.org/wiki/OpenCV
2.Code examples:
https://coral.ai/examples/
3.Trained TensorFlow models for the Edge TPU
https://coral.ai/models/
4.An object detection model can identify multiple objects and their location in an image.
https://coral.ai/models/object-detection/