Android的RIL全名為(Radio Interface Layer),它提供一個在Android電話服務及無線電硬體間的抽象層,社員可以參考
http://www.nextinnovation.org/doku.php?id=android_ril有詳細說明,另外在該網頁的下方有原始程式的連結。
2010年4月30日 星期五
「雲端運算產業發展方案」開跑了
行政院29日通過「雲端運算產業發展方案」,將在未來5年內投入約新台幣240億元發展雲端運算產業,希望能促成投資新台幣1千億、新增5萬個就業人口,並讓雲端產值累計達新台幣1兆元。
雲端運算是政府要積極推動的四大新興智慧型產業之一,依照這個方案,未來政府將發展4C,也就是創新研發雲端裝置產品(Client)、持續推動寬頻建設(Connectivity)、發展雲端系統與經營資料中心(Cloud)及發展雲端應用軟體(Commerce)並整合相關產業鏈;推動政府雲端應用創造需求;發展全方位協調、統合與管理執行方案。同時要提升學校、研究單位及人員的素質並加強基礎研究及產業科技的研發。
雲端運算是政府要積極推動的四大新興智慧型產業之一,依照這個方案,未來政府將發展4C,也就是創新研發雲端裝置產品(Client)、持續推動寬頻建設(Connectivity)、發展雲端系統與經營資料中心(Cloud)及發展雲端應用軟體(Commerce)並整合相關產業鏈;推動政府雲端應用創造需求;發展全方位協調、統合與管理執行方案。同時要提升學校、研究單位及人員的素質並加強基礎研究及產業科技的研發。
2010年4月29日 星期四
OpenGL學生第一個作業

package se.jayway.opengl.tutorial;

import java.nio.ByteBuffer;
import java.nio.ByteOrder;
import java.nio.FloatBuffer;
import java.nio.ShortBuffer;

import javax.microedition.khronos.opengles.GL10;

public class Square {
 // Our vertices.
 private float vertices[] = {
        -17.0f,  5.0f, 0.0f,  // 0,
        -17.0f,  0.0f, 0.0f,  // 1,
        -15.0f,  5.0f, 0.0f,  // 2,
         -15.0f,  0.0f, 0.0f,  // 3,
         -17.0f,  -5.0f, 0.0f,    //4,
         -15.0f,  -5.0f, 0.0f,   //5,
         -13.0f,  5.0f,  0.0f,   //6
         -11.0f,  5.0f,  0.0f, //7
         -13.0f,  0.0f,  0.0f,  //8
         -11.0f,  0.0f,  0.0f,  //9
         -13.0f,  -5.0f,  0.0f,  //10
         -11.0f,   -5.0f,  0.0f,  //11
         -9.0f,   5.0f,   0.0f,  //12
         -9.0f,   0.0f,   0.0f,   //13
         -9.0f,   -5.0f,   0.0f,   //14
         -6.0f,   2.5f,    0.0f,   //15
         -6.0f,   -2.5f,   0.0f,  //16
         -2.5f,    5.0f,   0.0f,   //17
         -3.5f,    0.0f,   0.0f,   //18
         -4.0f,    -5.0f,   0.0f,   //19
         -1.5f,    0.0f,    0.0f,   //20
         -1.0f,    -5.0f,    0.0f,   //21
         1.0f,     5.0f,    0.0f,    //22
         1.0f,     -5.0f,    0.0f,   //23
         4.0f,     5.0f,   0.0f,    //24
         4.0f,    -5.0f,   0.0f,   //25
         6.0f,    5.0f,     0.0f,   //26
         6.0f,    0.0f,     0.0f,   //27
         9.0f,    5.0f,     0.0f,   //28
         9.0f,    -5.0f,    0.0f,   //29
         11.0f,   5.0f,    0.0f,   //30
         11.0f,    -5.0f,   0.0f,   //31
         14.0f,    5.0f,    0.0f,   //32
         14.0f,   -5.0f,    0.0f,   //33
         };

 // The order we like to connect them.
 private short[] indices = { 0, 1, 0, 2, 2, 3, 1, 3, 3, 5, 4, 5,
                       6, 7, 6, 8, 8, 10, 8, 9, 9, 11, 10, 11,
                       12, 13, 12, 15, 15, 13, 13, 14, 13, 16, 16, 14,
                       17, 18, 18, 19, 17, 20, 20, 21, 18, 20,
                       22, 24, 22, 23, 23, 25, 24, 25,
                       26, 27, 26, 28, 28, 29,
                       30, 31, 30, 32, 32, 33, 31, 33};

 // Our vertex buffer.
 private FloatBuffer vertexBuffer;

 // Our index buffer.
 private ShortBuffer indexBuffer;

 public Square() {
  // a float is 4 bytes, therefore we multiply the number if
  // vertices with 4.
  ByteBuffer vbb = ByteBuffer.allocateDirect(vertices.length * 4);
  vbb.order(ByteOrder.nativeOrder());
  vertexBuffer = vbb.asFloatBuffer();
  vertexBuffer.put(vertices);
  vertexBuffer.position(0);

  // short is 2 bytes, therefore we multiply the number if
  // vertices with 2.
  ByteBuffer ibb = ByteBuffer.allocateDirect(indices.length * 2);
  ibb.order(ByteOrder.nativeOrder());
  indexBuffer = ibb.asShortBuffer();
  indexBuffer.put(indices);
  indexBuffer.position(0);
 }

 /**
  * This function draws our square on screen.
  * @param gl
  */
 public void draw(GL10 gl) {
  // Counter-clockwise winding.
  gl.glFrontFace(GL10.GL_CCW);
  // Enable face culling.
  gl.glEnable(GL10.GL_CULL_FACE);
  // What faces to remove with the face culling.
  gl.glCullFace(GL10.GL_BACK);

  // Enabled the vertices buffer for writing and to be used during
  // rendering.
  gl.glEnableClientState(GL10.GL_VERTEX_ARRAY);
  // Specifies the location and data format of an array of vertex
  // coordinates to use when rendering.
  gl.glVertexPointer(3, GL10.GL_FLOAT, 0, vertexBuffer);

  gl.glDrawElements(GL10.GL_LINES, indices.length,
    GL10.GL_UNSIGNED_SHORT, indexBuffer);

  // Disable the vertices buffer.
  gl.glDisableClientState(GL10.GL_VERTEX_ARRAY);
  // Disable face culling.
  gl.glDisable(GL10.GL_CULL_FACE);
 }

}
勉勵的短文.....在研究的同時...放鬆一下看個文章吧
有一個男孩有著很壞的脾氣,於是他的父親就給了他一袋釘子; 並且告訴他,每當他發脾氣的時候就釘一根釘子在後院的圍籬上。 第一天,這個男孩釘下了37根釘子。慢慢地每天釘下的數量減少了。 他發現控制自己的脾氣要比釘下那些釘子來得容易些。 終於有一天這個男孩再也不會失去耐性亂發脾氣,他告訴他的父親這件事, 父親告訴他,現在開始每當他能控制自己的脾氣的時候,就拔出一根釘子。 一天天地過去了,最後男孩告訴他的父親,他終於把所有釘子都拔出來了。 父親握著他的手來到後院說:你做得很好,我的好孩子。 但是看看那些圍籬上的洞,這些圍籬將永遠不能回復成從前。 你生氣的時候說的話將像這些釘子一樣留下疤痕。 如果你拿刀子捅別人一刀,不管你說了多少次對不起,那個傷口將永遠存在。 話語的傷痛就像真實的傷痛一樣令人無法承受。 註:人與人之間常常因為一些彼此無法釋懷的堅持,而造成永遠的傷害。 如果我們都能從自己做起,開始寬容地看待他人, 相信你(妳)一定能收到許多意想不到的結果....幫別人開啟一扇窗, 也就是讓自己看到更完整的天空....
老師相遇的模擬..和區網的碰撞相似
以下是用Matlab來模擬二位老師在某個早上9點到12點之間相遇的機率
結果執行100次模擬後,發現
不會相遇的機率=0.6536
遇到一次的機率=0.2973
遇到二次的機率= 0.0462
遇到三次的機率=0.0029
遇到四次的機率= 0
遇到五次的機率= 0
因此,即使二位老師都在研究室,他們一個上午出去五次,相遇的機率仍低,
不過這個模型應該考慮老師出去之後還會進門,所以一個要出門而另一個要進門的情況也要考慮,那就在程式中把5次改為10次就好了

% collision simulation
clear;
for kk=1:100;
for t=1:100;
x=zeros(60,1);
y=zeros(60,1);
% 由60個中隨機抽5個
for j=1:5;
flg=1;
while flg==1;
ix(j)=ceil(rand(1,1)*60); %抽一個數字
if x(ix)==1;
flg=1;
else
flg=0;
x(ix(j))=1;
end;
end
end
for j=1:5;
flg=1;
while flg==1;
iy(j)=ceil(rand(1,1)*60); %抽一個數字
if y(iy)==1;
flg=1;
else
flg=0;
y(iy(j))=1;
end;
end
end
count=0;
for jj=1:60;
if x(jj)==1 & y(jj)==1,
count=count+1;
end
end
z(t)=count;
end
% histogram
count1=zeros(1,6);
for iz=1:100;
switch z(iz);
case 0;count1(1)=count1(1)+1;
case 1; count1(2)=count1(2)+1;
case 2; count1(3)=count1(3)+1;
case 3; count1(4)=count1(4)+1;
case 4; count1(5)=count1(5)+1;
case 5; count1(6)=count1(6)+1;
end
end
no_col(kk,:)=count1;
end
mean(no_col)/100
2010年4月28日 星期三
Toast的使用教學
Toast對Android手機來說是用來"顯示一段文字給使用者知道"很好用的物件,在使用上只要配makeText及show兩個函式即可。對於makeText來說,有三個參數要輸入,第一個是必須是Context的物件,Context是一個物件用來表示應用程式執行環境的全域資訊的介面,通常可以指定是Apllication或Activity物件。有一點要特別注意下面程式中第二個函式中第一參數不可直接使用this而要用ToastActivity.this,這是因為您要OnClickListener物件內而非在Actvity下。第二個參數是要顯示的文字,建議讀者多利用在res/value目錄下string.xml來建立字串資源,第三個參數是顯示的時間,有兩個常數可供選擇Toast.LENGTH_SHORT和Toast.LENGTH_LONG。
import android.app.Activity;
import android.os.Bundle;
import android.view.View;
import android.widget.Button;
import android.widget.Toast;
import android.view.View.OnClickListener;

public class ToastActivity extends Activity {
    /** Called when the activity is first created. */
    @Override
    public void onCreate(Bundle savedInstanceState) {
        super.onCreate(savedInstanceState);
        setContentView(R.layout.main);
        Toast.makeText(this, R.string.create, Toast.LENGTH_SHORT).show();
        Button button= (Button) findViewById(R.id.Button01);
        button.setOnClickListener(new OnClickListener(){

   @Override
   public void onClick(View arg0) {
    // TODO Auto-generated method stub
          Toast.makeText(ToastActivity.this, R.string.click, Toast.LENGTH_SHORT).show();
          setTitle("text");
   }

        });
    }
}
2010年4月27日 星期二
關於相遇的問題
99.04. 27
(不能打方程式?)
二位老師的研究室在同一邊,只要二位老師在前後3分鐘內出辦公室就算遇到
我把時槽設為3分鐘
如果考慮一個上午9:00—12:00 共180分鐘,共有60個時槽
二者都在研究室而他們會隨機外出 ,假設他們都會外出5次(上廁所,倒茶,去實驗室,去系辦等)
這就好像二個人各有5顆球,甲有5顆紅球,乙有5顆藍球
他們任意將球投入60個桶子裏,
則
(1)桶子中最多只有一顆球的機率=沒有相遇
(2)只有一個桶子中同時有紅球和藍球的機率=遇見一次的機率
第一個人先放紅球 60個桶子取5個來放球C(60,5) 種放法
第二個人後放藍球 因為有5個桶子已被放入紅球 避免相撞所以只有55個桶子可以放 (55,5)種放法
所以桶子中最多只有一顆球的放法是 C(60,5)*C(55,5)種
如果二個人都任意放 則會有C(60,5)*C(60,5)種放法
所以不會遇到的機率就是 [C(60,5)*C(55,5)]/[C(60,5)*C(60,5)]=0.6370
所以有很大的機率不會遇到(碰撞),珍惜每一次的相遇!
會遇到一次以上的機率=1-0.6370=0.3630
第二個問題待續
實做/觀察 Android Activity的生命週期
在實做Activity的生命週期前,我們先做一些功課:
對於什麼是Activity Lifecycle可以參考網站上這篇--
"Activity的生命週期"
http://cheng-min-i-taiwan.blogspot.com/2010/04/activity.html
Activity的Lifecycle觀念如果沒有建立清楚的話,很有可能會寫出一些浪費記憶體的程式,如果對於Activity Lifecycle那張圖不懂的話,實做一下下面的程式你將發現Activity Lifecycle的觀念會變得清晰多了。
下面影片是Demo一個Activity在按下"Home鍵"及"返回鍵"所呈現的Activity狀態,兩者間的是有差別的喔。
對於什麼是Activity Lifecycle可以參考網站上這篇--
"Activity的生命週期"
http://cheng-min-i-taiwan.blogspot.com/2010/04/activity.html
Activity的Lifecycle觀念如果沒有建立清楚的話,很有可能會寫出一些浪費記憶體的程式,如果對於Activity Lifecycle那張圖不懂的話,實做一下下面的程式你將發現Activity Lifecycle的觀念會變得清晰多了。
下面影片是Demo一個Activity在按下"Home鍵"及"返回鍵"所呈現的Activity狀態,兩者間的是有差別的喔。
2010年4月26日 星期一
2010年4月25日 星期日


善用AIDL工具來產生IPC的介面溝通程式

在前一篇文章介紹利用AIDL來建立程序間的通訊,本篇將接續上一篇文章,來看看神奇的AIDL工具,在圖中有兩個重要的檔案:IRemoteService.aidl和IRemoteService.java,一個放在src目錄另一個放在gen目錄,換句話說AIDL工具會自動讀取IRemoteService.aidl來產生IRemoteService.java,如此可以減輕程式設計師的負擔。兩個程式列表如下:
1. IRemoteService.aidl
package com.example.RemoteServiceController;

interface IRemoteService {
   int sum(int a, int b);
}
2. IRemoteService.java
/*
 * This file is auto-generated.  DO NOT MODIFY.
 * Original file: C:\\Documents and Settings\\user\\workspace\\RemoteServiceController\\src\\com\\example\\RemoteServiceController\\IRemoteService.aidl
 */
package com.example.RemoteServiceController;
public interface IRemoteService extends android.os.IInterface
{
/** Local-side IPC implementation stub class. */
public static abstract class Stub extends android.os.Binder implements com.example.RemoteServiceController.IRemoteService
{
private static final java.lang.String DESCRIPTOR = "com.example.RemoteServiceController.IRemoteService";
/** Construct the stub at attach it to the interface. */
public Stub()
{
this.attachInterface(this, DESCRIPTOR);
}
/**
 * Cast an IBinder object into an com.example.RemoteServiceController.IRemoteService interface,
 * generating a proxy if needed.
 */
public static com.example.RemoteServiceController.IRemoteService asInterface(android.os.IBinder obj)
{
if ((obj==null)) {
return null;
}
android.os.IInterface iin = (android.os.IInterface)obj.queryLocalInterface(DESCRIPTOR);
if (((iin!=null)&&(iin instanceof com.example.RemoteServiceController.IRemoteService))) {
return ((com.example.RemoteServiceController.IRemoteService)iin);
}
return new com.example.RemoteServiceController.IRemoteService.Stub.Proxy(obj);
}
public android.os.IBinder asBinder()
{
return this;
}
@Override public boolean onTransact(int code, android.os.Parcel data, android.os.Parcel reply, int flags) throws android.os.RemoteException
{
switch (code)
{
case INTERFACE_TRANSACTION:
{
reply.writeString(DESCRIPTOR);
return true;
}
case TRANSACTION_sum:
{
data.enforceInterface(DESCRIPTOR);
int _arg0;
_arg0 = data.readInt();
int _arg1;
_arg1 = data.readInt();
int _result = this.sum(_arg0, _arg1);
reply.writeNoException();
reply.writeInt(_result);
return true;
}
}
return super.onTransact(code, data, reply, flags);
}
private static class Proxy implements com.example.RemoteServiceController.IRemoteService
{
private android.os.IBinder mRemote;
Proxy(android.os.IBinder remote)
{
mRemote = remote;
}
public android.os.IBinder asBinder()
{
return mRemote;
}
public java.lang.String getInterfaceDescriptor()
{
return DESCRIPTOR;
}
public int sum(int a, int b) throws android.os.RemoteException
{
android.os.Parcel _data = android.os.Parcel.obtain();
android.os.Parcel _reply = android.os.Parcel.obtain();
int _result;
try {
_data.writeInterfaceToken(DESCRIPTOR);
_data.writeInt(a);
_data.writeInt(b);
mRemote.transact(Stub.TRANSACTION_sum, _data, _reply, 0);
_reply.readException();
_result = _reply.readInt();
}
finally {
_reply.recycle();
_data.recycle();
}
return _result;
}
}
static final int TRANSACTION_sum = (android.os.IBinder.FIRST_CALL_TRANSACTION + 0);
}
public int sum(int a, int b) throws android.os.RemoteException;
}
如何在Android上發展IPC應用程式

Google Android制訂一套新的語言,稱為AIDL (Android Interface Definition Language)來協助程式設計師發展IPC(InterProcess Communication)應用程式。AIDL是以介面為基礎,類似於COM或Corba但較為輕量,它使用代理類別(Proxy Class)在兩程序(客戶端及實作端)傳遞數值。
本文將介紹如何快速建立AIDL應用程式的步驟:
1. 實作Activity
package com.example.RemoteServiceController;

import android.app.Activity;
import android.content.ComponentName;
import android.content.Context;
import android.content.Intent;
import android.content.ServiceConnection;
import android.os.Bundle;
import android.os.IBinder;
import android.os.RemoteException;
import android.view.View;
import android.view.View.OnClickListener;
import android.widget.Button;
import android.widget.TextView;

public class RemoteServiceController extends Activity {
 private IRemoteService iservice=null;
 TextView tv;
 private ServiceConnection connection= new ServiceConnection(){

  @Override
  public void onServiceConnected(ComponentName name, IBinder service) {
   iservice =  IRemoteService.Stub.asInterface(service);
   setTitle("Connect");
   int i = 0;
   try {
    i= iservice.sum(4, 5);

   } catch (RemoteException e) {
    e.printStackTrace();
   }
   tv.setText(Integer.toString(i));
  }

  @Override
  public void onServiceDisconnected(ComponentName name) {
   iservice = null;  }

 };    /** Called when the activity is first created. */
    @Override
    public void onCreate(Bundle savedInstanceState) {
        super.onCreate(savedInstanceState);
        setContentView(R.layout.main);
        tv=(TextView) findViewById(R.id.Text01);
        Button start = (Button) findViewById(R.id.start);
        start.setOnClickListener(new OnClickListener(){
   @Override
   public void onClick(View v) {
    // TODO Auto-generated method stub
    bindService(new Intent(RemoteServiceController.this, RemoteService.class), connection, Context.BIND_AUTO_CREATE);
   }

        });
        Button stop =(Button) findViewById(R.id.stop);
        stop.setOnClickListener(new OnClickListener(){

   @Override
   public void onClick(View v) {
    // TODO Auto-generated method stub
    unbindService(connection);
    setTitle("Disonnect");   }

        });
    }}
2. 建立AIDL介面
package com.example.RemoteServiceController;

interface IRemoteService {
   int sum(int a, int b);
}
3. 建立服務程式
package com.example.RemoteServiceController;

import android.app.Service;
import android.content.Intent;
import android.os.IBinder;
import android.os.RemoteException;

public class RemoteService extends Service {
 private final IRemoteService.Stub binder= new IRemoteService.Stub(){

  @Override
  public int sum(int a, int b) throws RemoteException {
   return a+b;
  }

 };
 @Override
 public IBinder onBind(Intent arg0) {
  // TODO Auto-generated method stub
  return this.binder; }
}
4. 修改AndroidManifest.xml
<service android:name="RemoteService" android:process=":remote">
</service>
2010年4月24日 星期六

2010年4月23日 星期五
CyberLink For Android
最近有同學研究UPNP,今天就來分享一下在Android下的UPNP。
CyberLinkForJava 網頁中有提到Android部分並提供source code 可以試試看,但要注意的是網頁有說明到在模擬器是無法執行的。
CyberLinkForJava 網頁中有提到Android部分並提供source code 可以試試看,但要注意的是網頁有說明到在模擬器是無法執行的。

2010年4月22日 星期四
gcin for windows
以目前電腦硬體的速度來看,即使是三年以上的機器在使用上也不會有"慢"的感覺。
那這時候表示使用者的硬體需求也大致被滿足了。
反觀作業系統的需求呢?
Microsoft 這個作業系統的大廠,是否滿足了我們的需求?
在個人遊走 FreeBSD,Mac,M$ Windows 後的感覺提出來給大家參考。
站在使用者的角度,我們不去看它高深的理論與實作。我們只看使用者介面。
在一個中文環境下的作業系統,使用者第一個接觸的是中文輸入法。
(由於 XWin, MS Win 的 UI 其實都已經很接近了。並沒有什麼新的創意跟分別。)
如果一個新的作業系統你無法接受。
那有兩個情況可以探討。
1.有些使用介面的改變。其實,使用軟體嘛,就是去用它的功能,都有GUI了就不是以效率為優先了。看一下、點一下,大多數 A 軟體有的功能,在 B 軟體也會有。
2.換個OS之後,連中文輸入都不會了?
這個問題就比較麻煩了。這個習慣的問題就很難改了。因為這個是以效率為優先的考量。(很少人打字還慢慢點UI的吧。)
為了解決第二個的問題,找到了在 Unix-Like 常用的中文輸入法 gcin。不過,已經有人把它 port 到 Windows 下了。我個人測試使用了幾個月下來,可以接受。
推薦給大家
gcin for windows
相信習慣了一個通用的輸入法後,你也可以跟我一樣遊走於不同的作業系統。
關於單晶片上的 C & CLIB
在單晶片上,如果想用組合語言當開發語言,那當然是執行效率的首選。可是卻不是開發效率的最佳選擇。
如果想選用C語言為開發工具,當然是可以兼顧到執行效率以及開發效率。如果說購買整套的開發工具,那自然不是問題。可是,如果你想要自己去整合,卻會面臨除了編譯器之外的一個比較重大的問題,就是沒有 C 的標準函數。
C 的編譯器,我們可以找 GCC 來解決,可是 CLIB 呢?
以我以前的經驗,較小的系統,常用到的,會用到的標函數沒幾個。可是自己建置。
如果想要更偷懶,這邊有人已經建好了。
newlib 是一個不錯的選擇。
我想,英文對大家來說會有些恐懼。沒關係,我也找到一個安裝介紹的說明網站。
小藍學習誌 newlib 供大家參考。
有了這樣的 clib,在單晶片的開發上,就簡化很多了。
如果想選用C語言為開發工具,當然是可以兼顧到執行效率以及開發效率。如果說購買整套的開發工具,那自然不是問題。可是,如果你想要自己去整合,卻會面臨除了編譯器之外的一個比較重大的問題,就是沒有 C 的標準函數。
C 的編譯器,我們可以找 GCC 來解決,可是 CLIB 呢?
以我以前的經驗,較小的系統,常用到的,會用到的標函數沒幾個。可是自己建置。
如果想要更偷懶,這邊有人已經建好了。
newlib 是一個不錯的選擇。
我想,英文對大家來說會有些恐懼。沒關係,我也找到一個安裝介紹的說明網站。
小藍學習誌 newlib 供大家參考。
有了這樣的 clib,在單晶片的開發上,就簡化很多了。
2010年4月21日 星期三
2010年4月19日 星期一


軟硬整合的MTK-like「強龍/地頭蛇」商業模式
上星期四(04/15)老師上課有提到一段關於高老師的「強龍/地頭蛇」商業模式。
下面的連結中高老師的文章中有詳細說。
http://android.mis.au.edu.tw/download/Android_Core%20Service.pdf
下面的連結中高老師的文章中有詳細說。
http://android.mis.au.edu.tw/download/Android_Core%20Service.pdf
2010年4月17日 星期六
用感測器模擬程式來執行openmoko Android上iRoll程式(G-Sensor)

首先您可在http://code.google.com/p/iroll/查看iRoll專案,您可選執Dowloads或Source分別下載其執行檔及原始程式。
今天嘗試下載原始程式並利用感知器模擬程式來進行測試。

1. 安裝感測器模擬程式。
2. 修改程式碼。
A. 匯入感知器套件。
import org.openintents.sensorsimulator.hardware.SensorManagerSimulator;
B. 將感知器管理者變數的資料型別從SensorManager改成SensorManagerSimulator
// private SensorManager mySM;
private SensorManagerSimulator mySM;
C. 改寫getSystemService的使用。
// mySM = (SensorManager) getSystemService(Context.SENSOR_SERVICE);
mySM = SensorManagerSimulator.getSystemService(this, SENSOR_SERVICE);
D. 增加連線指令(因感測器模擬程式是使用TCP/IP)
mySM.connectSimulator();
F. 記得在AndroidManifest.xml增加使用Internet的選項。

G. 記得在專案的lib檔放入感測器模擬程式所提供的函式庫sensorsimulator-lib.jar,並設定建立程式的相關資訊。

3. 啟動感知器模擬程式。

4. 設定IP。

5. 連線。

6. 執行iRoll程式。


2010年4月16日 星期五
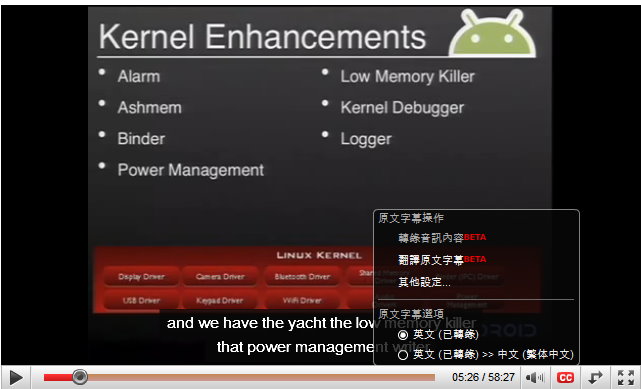
Google I/O Session Videos and Slides
分享一個每年Google都會舉辦一次的Google I/O研討會的講義及影片連結
http://sites.google.com/site/io/
雖然裡面全是英文,但拜YouTube新功能---字幕,聽不懂的話就靠字幕囉!
也可以翻成中文字幕喔!至於中文字幕......我覺得還是不要看好了!
需要字幕功能的話到YouTube網頁上播放,點"紅色框框CC"就會出現選單,選擇你要翻譯的操作後,就可以看到字幕出現了,不過在Google I/O網頁上播放是沒有這樣的功能。
http://sites.google.com/site/io/
雖然裡面全是英文,但拜YouTube新功能---字幕,聽不懂的話就靠字幕囉!
也可以翻成中文字幕喔!至於中文字幕......我覺得還是不要看好了!
需要字幕功能的話到YouTube網頁上播放,點"紅色框框CC"就會出現選單,選擇你要翻譯的操作後,就可以看到字幕出現了,不過在Google I/O網頁上播放是沒有這樣的功能。
[轉貼]Android 的 HAL 技術
 老師這星期上課中有提到Android 的 HAL,下面有個連結裡面說明的比較詳盡
http://blog.mcuol.com/user/AT91RM9200/article/25827_1.htm
如何在eclipse工具下使用NDK
參考Get Your Eclipse-Integrated NDK On!文件。
1. 安裝Cygwin記得選擇c編繹器及make選項。

2. 下載NDK,解開後放在C:\cygwin\home\user。
3. 安裝Eclipse C/C++ Development Tooling工具。
4. 在eclipse中新增NDK的專案。

5. 新增C編輯的選項。

6. 在Cygwin中測試。

7. 在elcipse中編譯C程式。

8. 執行Android程式。
1. 安裝Cygwin記得選擇c編繹器及make選項。

2. 下載NDK,解開後放在C:\cygwin\home\user。
3. 安裝Eclipse C/C++ Development Tooling工具。
4. 在eclipse中新增NDK的專案。

5. 新增C編輯的選項。

6. 在Cygwin中測試。

7. 在elcipse中編譯C程式。

8. 執行Android程式。
2010年4月15日 星期四
建立按鈕事件程序教學
package com.example.hello;
import android.app.Activity;
import android.os.Bundle;
import android.view.View;
import android.view.View.OnClickListener;
import android.widget.Button;
public class HelloActivity extends Activity {
/** Called when the activity is first created. */
@Override
public void onCreate(Bundle savedInstanceState) {
super.onCreate(savedInstanceState);
setContentView(R.layout.main);
Button button=(Button) findViewById(R.id.Button01);
button.setOnClickListener(new OnClickListener(){
public void onClick(View arg0) {
// TODO Auto-generated method stub
setTitle("test");
}
});
}
}
Odin笑談 Android
Android的優點很多,但並不代表其沒有缺點。
大家可以看看Odin所寫的文章,以另一個角度來看Android。
Odin笑談 Android(上)
Odin笑談 Android(中)
Odin笑談Android(下)
大家可以看看Odin所寫的文章,以另一個角度來看Android。
Odin笑談 Android(上)
Odin笑談 Android(中)
Odin笑談Android(下)
2010年4月13日 星期二


訂閱:
文章 (Atom)