2025年2月28日 星期五

在Raspberry Pi 5 8GB主機板安裝Home Assistant

Raspberry Pi 5 帶來了相當大的升級,特別是在處理效能、圖形能力和 I/O 擴展方面。2.4GHz 的 Cortex-A76 CPU 提供更快的運算能力,而 VideoCore VII GPU 讓影像處理更加流暢。雙 4Kp60 HDMI 輸出和升級的 MIPI 介面,讓相機和顯示器的應用更加靈活。此外,RP1「南橋」晶片的加入,大幅提升 USB 和 SD 卡的傳輸效能,甚至提供 PCIe 2.0 接口,擴展可能性更大。這對於開發者、教育用途,甚至是工業應用來說,都是一次重要的升級!你對哪部分最感興趣呢?
我們先使用Raspberry Pi Imager開始燒錄,選擇如下:


但失敗了,最後我們採用自行選裝安裝版本。


從最新版本haos_rpi5-64-15.0.dev20250226.img.xz開裝,再試haos_rpi5-64-14.2.dev20250117.img.xz,最後採用 haos_rpi5-64-13.0.img.xz才成功。

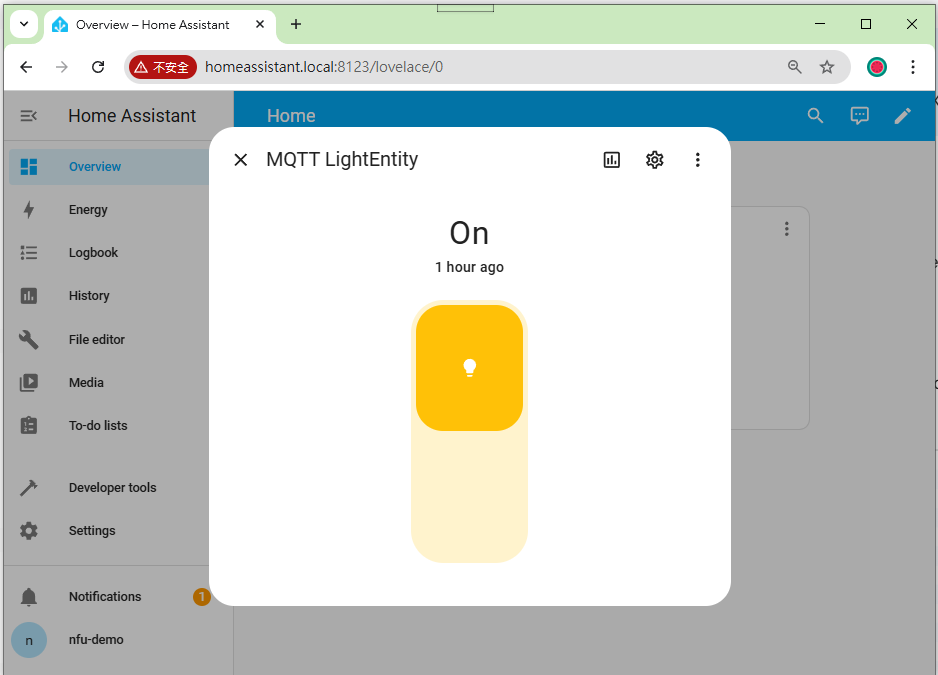
最後,Home Assistant安裝好後,再選擇更新成14.2。


2025年2月23日 星期日

國產WiFi晶片8735 Ultra初體驗

晶片購買:小霸王授權 瑞昱半導體 資策會推廣 國產晶片 8735Ultra

1.下載Arduino軟體

2. 安裝第三方套件
https://github.com/ideashatch/HUB-8735/raw/main/amebapro2_arduino/Arduino_package/ideasHatch.json
請把上方鏈結,貼在Additional boards manager URLs


3.按下左側第二個選項或選擇Tools->Board->Board Manager,然後輸入8735,按下INSTALL。完成畫面如下:

4.等待套件都裝完後,把國產WiFi晶片8735 Ultra接上USB線並接到電腦USB孔,並用裝置管理員檢查連接埠。

5.在arduino IDE環境的tools->port。

6.測試,打開Blink範例。

7.按下Upload鍵,此時會發現無法上傳的錯誤訊息,

8.打開serial monitor,並檢查鮑率設定在115200bps。


9.按下功能鍵不放,再按下重置鍵,切換到燒錄模式。

10.切換到燒錄模式。


11.切換到output模式,再按下Upload鍵,就可以燒錄程式。

12.按下重置鍵,執行已燒錄的程式。


程式碼:

 1
 2
 3
 4
 5
 6
 7
 8
 9
10
11
12
13
14
15
16
17
18
19
20
21
22
23
24
25
26
27
28
29
30
31
32
33
34
35
36
37
/*
  Blink

  Turns an LED on for one second, then off for one second, repeatedly.

  Most Arduinos have an on-board LED you can control. On the UNO, MEGA and ZERO
  it is attached to digital pin 13, on MKR1000 on pin 6. LED_BUILTIN is set to
  the correct LED pin independent of which board is used.
  If you want to know what pin the on-board LED is connected to on your Arduino
  model, check the Technical Specs of your board at:
  https://www.arduino.cc/en/Main/Products

  modified 8 May 2014
  by Scott Fitzgerald
  modified 2 Sep 2016
  by Arturo Guadalupi
  modified 8 Sep 2016
  by Colby Newman

  This example code is in the public domain.

  https://www.arduino.cc/en/Tutorial/BuiltInExamples/Blink
*/

// the setup function runs once when you press reset or power the board
void setup() {
  // initialize digital pin LED_BUILTIN as an output.
  pinMode(LED_BUILTIN, OUTPUT);
}

// the loop function runs over and over again forever
void loop() {
  digitalWrite(LED_BUILTIN, HIGH);  // turn the LED on (HIGH is the voltage level)
  delay(1000);                      // wait for a second
  digitalWrite(LED_BUILTIN, LOW);   // turn the LED off by making the voltage LOW
  delay(1000);                      // wait for a second
}

2025年2月17日 星期一

Home Assistant再加上Web和USB Camera


Add-ons:增加motionEye


Devices&services:增加motionEye

UI:黃底黑字是新增的

 1
 2
 3
 4
 5
 6
 7
 8
 9
10
11
12
13
14
15
16
17
18
19
20
21
22
23
24
25
26
27
28
29
30
31
32
33
34
35
36
37
38
39
40
41
42
43
views:
  - path: default_view
    title: Home
    cards:
      - type: entities
        entities:
          - person.nfu_demo
      - type: entities
        entities:
          - light.bed_room_light
          - light.live_room_light
        title: Light
      - type: entities
        entities:
          - switch.bed_room_switch
          - switch.live_room_switch
        title: Switch
      - show_name: true
        show_icon: true
        type: button
        entity: binary_sensor.windows_contact
        tap_action:
          action: toggle
      - type: iframe
        url: https://www.nfu.edu.tw
        aspect_ratio: 100%
        title: 國立虎尾科技大學
      - camera_view: auto
        type: picture-glance
        image: https://demo.home-assistant.io/stub_config/kitchen.png
        entities:
          - sensor.sun_next_dawn
          - sensor.sun_next_dusk
        camera_image: camera.camera1
        title: 樹莓派
      - camera_view: auto
        type: picture-glance
        title: 尚虎雲
        image: https://demo.home-assistant.io/stub_config/kitchen.png
        entities:
          - sensor.sun_next_midnight
          - sensor.sun_next_noon
        camera_image: camera.camera2

注意! 這次沒有變化configurations.yaml和automations.yaml

Home Assistant上MQTT電燈和開關測試

 畫面:


開關:


Add-ons:

安裝File editor和Mosquitto。


Devices&services:

安裝MQTT


/homeassistant/configuration.yaml:
# Loads default set of integrations. Do not remove.
default_config:

# Load frontend themes from the themes folder
frontend:
  themes: !include_dir_merge_named themes

automation: !include automations.yaml
script: !include scripts.yaml
scene: !include scenes.yaml

mqtt:
    - light:
        - name: Bed room light
          command_topic: "bed_room/light"
        - name: Live room light
          command_topic: "live_room/light"
    - switch:
        - name: Bed room switch
          command_topic: "bed_room/switch"
        - name: Live room switch
          command_topic: "live_room/switch"
    - binary_sensor:
        - name: Windows contact
          state_topic: "home-assistant/window/contact"
          value_template: "{%if is_state(entity_id,\"on\")-%}OFF{%-else-%}ON{%-endif%}"


/homeassistant/automations.yaml

- id: '1739746357824'
  alias: bed light turn on
  description: ''
  triggers:
  - trigger: state
    entity_id:
    - switch.bed_room_switch
    from: 'off'
    to: 'on'
  conditions: []
  actions:
  - action: light.turn_on
    metadata: {}
    data: {}
    target:
      entity_id: light.bed_room_light
  mode: single
- id: '1739746513220'
  alias: bed light turn off
  description: ''
  triggers:
  - trigger: state
    entity_id:
    - switch.bed_room_switch
    from: 'on'
    to: 'off'
  conditions: []
  actions:
  - action: light.turn_off
    metadata: {}
    data: {}
    target:
      entity_id: light.bed_room_light
  mode: single

2025年2月13日 星期四

在Home Assistant上,實作簡易的自動化(Automations)

上一篇文章:在Home Assistant上,實現MQTT Light的功能

本篇延續上一篇文章,以下是實作當太陽下山就點亮電燈的步驟。

1.請點選設定(Settings),再選擇自動化和情境(Automations & Scenes)。


2.選擇右下方的建立自動化(CREATE AUTOMATION)。


3.建立新的自動化(Create new automation)。


4.選擇新增觸發器(ADD TRIGER)。


5.輸入sun,並選擇sun。


6.選擇Sunset,並設定在太陽下山前半小時點亮,再選擇新增行動(ADD ACTION)。


7.選擇Light。


8.選擇Turn on。


9. 選擇實體(Choose entity)。


10. 選擇MQTT LightEntity。


11.選擇存檔


12.取個名字,儲存檔案。


2025年2月12日 星期三

在Home Assistant上,實現MQTT Light的功能

執行畫面:


按下電燈旁的三個點,會出現電燈的控制開關。


MQTT 測試工具:MQTT Explorer 
初始設定:

按下連線鈕後,就可以在下圖的右邊,下達控制命令,左邊可以監控運作的情形。


畫面布局的指令:


configration.yaml的設定:


在Home Assistant添加MQTT Broker,並測試MQTT

 1.點選Settings後再選Add-ons,然後選右下方的Add-on Store,最後選擇安裝Mosqutto broker。


2.選擇安裝按鈕(INSTALL),安裝Mosquitto broker。


3.安裝完成


4.再選Settings,添加裝置和服務(Devices&Services),再選MQTT ADD選項。

5.選擇SUBMIT選項。

6.完成MQTT安裝。

7.點選mqtt。

8. 測試MQTT,Home Assistant和MQTT Explorer需要同步進行測試。
Home Assistant端:


MQTT Explorer端:
新增一個連線,取名Home assistant(名字可以自訂),Host填上192.168.1.123(要看您的Home Assistant配置的IP),輸入帳號和密碼,再按下連線(CONNECT),然後就可以進行測試。

測試結果:


在Home Assistant添加檔案編輯工具(File editor)和網路分享工具(Samba share)

樹莓派上安裝居家助理(Home Assistant)的文章:

本篇文章將在居家助理上安裝兩個常用的工具,分別是檔案編輯工具(File editor)和網路分享工具(Samba share)。
 
1.選擇Settings,再點選Add-ons。


2.點選添加商店(ADD-ON STORE)

3.點選檔案編輯器(File editor),Samba share等到第9步驟時再點。

4.點選安裝(INSTALL)

5.打開當機重新啟動(Watch dog)和顯示在側邊功能表(Show in sidebar)選項,再按下啟動(START)。

6.等待安裝完成後,點選回到上一頁選項。

7.在側邊功能表上發現檔案編輯器(File editor),選點它。

8.就可以用它來編輯相關文件。

9.請執行第1-3步驟,然後再點選Samba share,再執行安裝(INSTALL)。


10.選點上方的配置選項(Configration)。

11.輸入使用者帳號(Username)和密碼(Password),然後按下方的儲存按鈕(SAVE)。

12. 按下上方資訊選項(Info),並按下啟動選項(START)。

13.等待完成安裝後,點選回到上一層按鈕。

14.再按回到添加商店(Add-on Store)。

15.在添加頁面上已經顯示安裝檔案編輯工具(File editor)和網路分享工具(Samba share)。

16.打開Windows的檔案管理員,並點選網路選項,就可以發現Home Assistant的圖示,點兩下啟動它。

17.就可以看到Home Assistant的登入畫面。