目前 ADK有兩個版本:
1. ADK 2011
基於Arduino Mega 2560 開發板,支援8位AVR處理器及Arduino IDE 開發環境,詳見 :
Accessory Development Kit 2011 Guide
Google I/O 2011: Android Open Accessory API and Development Kit
2.ADK2012
基於Arduino Due 開發板,支援32位元ARM Cortex-M3 (Atmel SAM3X8E)及新一代Arduino IDE 開發環境;主要更新支援藍牙連線與支援音訊傳輸兩個項目;也就是說Android設備與外接設備透過ADK不僅可以傳資料還可以傳音訊。
詳見 :
Accessory Development Kit 2012 Guide
Google I/O 2012 - ADK 2.0
本篇文章主要是以ADK 2011為主,所以接下來我們都以 Arduino Mega ADK 與Android實作教學。
以下是本文開發發環境:
Android 3.1 版本以上的手機或平板(本文使用4.1 Jelly Bean版本)
Arduino Mega ADK 開發板
Windows 8.1 64Bit
Eclipse 3.7.2 + ADT 22.3.0 + SDK 22.3
arduino-1.0.5 IDE

實作:
本篇主要是當在Android裝置產生HelloWorld字串送到Arduino 上顯示;而Arduino會產生HelloWorld給Android裝置,程式包括分為Arduino及Android兩個部分。
第一部分 Arduino Mega ADK 開發板
1.首先我們要到Arduino官網下載IDE開發環境。
http://arduino.cc/en/Main/Software

上述我下載的是Windows (ZIP file),所以只要將下載的檔案解壓縮就可以直接執行了。
2.下載ADK套件(adk_release_20120606.zip),到Accessory Development Kit 2011 Guide 官網中找到 Getting Started with the ADK --> Installing the Arduino software and necessary libraries 中的 2. Download and extract the ADK package .... 下載adk_release_(版本號碼).zip。
下載完成並解壓縮後會看到 app 、arduino_libs、hardware三個目錄。
接著將arduino_libs/AndroidAccessory 及 arduino_libs/USB_Host_Shield 兩個目錄拷貝到 <Arduino IDE 安裝目錄>/libraries/ 目錄下。

3. 下載CapSense package(CapacitiveSensor04.zip) ,到Accessory Development Kit 2011 Guide 官網中找到 Getting Started with the ADK --> Installing the Arduino software and necessary libraries 中的3. Download and extract the CapSense package .... -->連結到Arduino官網下載Capacitive Sensing Library。
下載完成並解壓縮後會看到類似 arduino-libraries-CapacitiveSensor-3e33f75 目錄,將libraries下的CapacitiveSensor目錄拷貝到<Arduino IDE 安裝目錄>/libraries/ 目錄下。

4.安裝 Arduino Mega ADK 開發板驅動程式,在步驟1解壓縮目錄中有一個drivers,該目錄底下有執行檔可以安裝Arduino驅動程式,由於我的系統是64位元所以我安裝的是dpinst-amd64.exe這個執行檔。
(如果你的系統是XP 32Bit作業系統請執行dpinst-x86.exe或由裝置管理員來更新驅動程式。)

接著將Arduino Mega ADK 接上電腦的USB埠,將會在裝置管理員-->連接埠(COM和LPT)裡面看到一個 Arduino Mega ADK (COMx) 的裝置,這表示已經安裝好驅動程式了,此時同時要記住(COMx)中的號碼,例如下圖我的裝置是COM4。

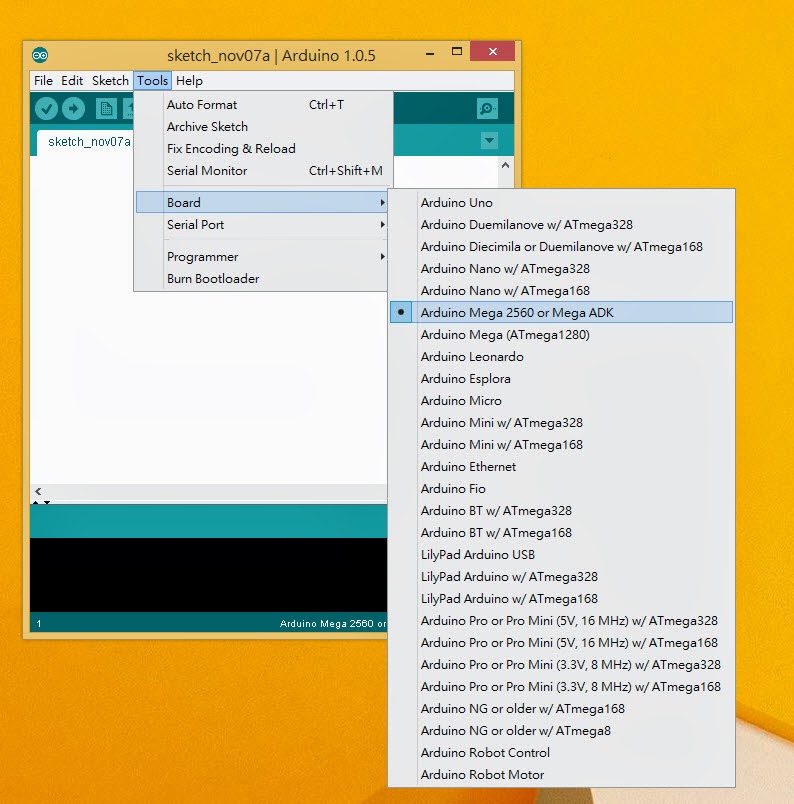
5.開啟 <Arduino IDE 安裝目錄>/ arduino.exe ,你可以看到Arduino IDE畫面,選擇Tools --> Board -->Arduino Mega 2560 or Mega ADK。
6.接著選擇Tools --> Serial Port -->選擇步驟4所記錄下的COM埠。

此時便完成了 Arduino Mega ADK 開發環境。
7.接著將下列Arduino程式碼利用 Arduino IDE燒入到Mega ADK上。
開啟 Arduino IDE並將程式碼貼上

程式碼:
#include <Max3421e.h>
#include <Usb.h>
#include <AndroidAccessory.h>
#define ARRAY_SIZE 25
#define COMMAND_TEXT 0xF
#define TARGET_DEFAULT 0xF
//設備描述
AndroidAccessory acc("Manufacturer",
"Model",
"Description",
"Version",
"URI",
"Serial");
char hello[ARRAY_SIZE] = {'H','e','l','l','o',' ',
'W','o','r','l','d',' ', 'f', 'r', 'o', 'm', ' ',
'A', 'r', 'd', 'u', 'i', 'n', 'o', '!'};
byte rcvmsg[255];
byte sntmsg[3 + ARRAY_SIZE];
//設定B-type連線的Baud Rate
void setup() {
Serial.begin(115200);
acc.powerOn();
}
void loop() {
if (acc.isConnected()) {
//讀取發送文字訊息到byte array
int len = acc.read(rcvmsg, sizeof(rcvmsg), 1);
if (len > 0) {
if (rcvmsg[0] == COMMAND_TEXT) {
if (rcvmsg[1] == TARGET_DEFAULT){
//從checksum byte取得文字長度
byte textLength = rcvmsg[2];
int textEndIndex = 3 + textLength;
//顯示每一個字元輸出到serial
for(int x = 3; x < textEndIndex; x++) {
Serial.print((char)rcvmsg[x]);
delay(250);
}
Serial.println();
delay(250);
}
}
}
//傳送hello訊息到Android
sntmsg[0] = COMMAND_TEXT;
sntmsg[1] = TARGET_DEFAULT;
sntmsg[2] = ARRAY_SIZE;
for(int x = 0; x < ARRAY_SIZE; x++) {
sntmsg[3 + x] = hello[x];
}
acc.write(sntmsg, 3 + ARRAY_SIZE);
delay(250);
}
}
接著進行編譯,你可以選擇 Sketch --> Verify/Compile;又或者按下IDE左上方的 "打勾" 來進行編譯,如下圖:

當編譯無誤後,接著將編譯好的程式燒錄(上傳)到 Arduino,你可以選擇 File --> Upload ;又或者按下IDE左上方的 "指向右方箭頭" 來進行燒錄動作,如下圖:

以上便完成ADK第一部分。接著進行Android程式撰寫。
第二部分 Android 程式
由於程式中有使用到 UsbManager 及 UsbAccessory 等類別,因此程式的 Project Build Target 要使用 2.33版以上的 Google APIs,這個部分可以從專案按右鍵-->Properties-->Android-->Project Build Target 去做設定。
1. Activity程式碼:
import android.app.Activity;
import android.app.PendingIntent;
import android.content.BroadcastReceiver;
import android.content.Context;
import android.content.Intent;
import android.content.IntentFilter;
import android.os.Bundle;
import android.os.ParcelFileDescriptor;
import android.util.Log;
import android.widget.TextView;
import com.android.future.usb.UsbAccessory;
import com.android.future.usb.UsbManager;
import java.io.FileDescriptor;
import java.io.FileInputStream;
import java.io.FileOutputStream;
import java.io.IOException;
public class HelloWorldActivity extends Activity {
private static final String TAG = "ADK";
private PendingIntent mPermissionIntent;
private static final String ACTION_USB_PERMISSION = "com.android.example.USB_PERMISSION";
private boolean mPermissionRequestPending;
private UsbManager mUsbManager;
private UsbAccessory mAccessory;
private ParcelFileDescriptor mFileDescriptor;
private FileInputStream mInputStream;
private FileOutputStream mOutputStream;
private static final byte COMMAND_TEXT = 0xF;
private static final byte TARGET_DEFAULT = 0xF;
private TextView textView;
@Override
public void onCreate(Bundle savedInstanceState) {
super.onCreate(savedInstanceState);
mUsbManager = UsbManager.getInstance(this);
mPermissionIntent = PendingIntent.getBroadcast(this, 0, new Intent(
ACTION_USB_PERMISSION), 0);
IntentFilter filter = new IntentFilter(ACTION_USB_PERMISSION);
filter.addAction(UsbManager.ACTION_USB_ACCESSORY_DETACHED);
registerReceiver(mUsbReceiver, filter);
setContentView(R.layout.main);
textView = (TextView) findViewById(R.id.textView);
}
@Override
public void onResume() {
super.onResume();
if (mInputStream != null && mOutputStream != null) {
return;
}
UsbAccessory[] accessories = mUsbManager.getAccessoryList();
UsbAccessory accessory = (accessories == null ? null : accessories[0]);
if (accessory != null) {
if (mUsbManager.hasPermission(accessory)) {
openAccessory(accessory);
} else {
synchronized (mUsbReceiver) {
if (!mPermissionRequestPending) {
mUsbManager.requestPermission(accessory,
mPermissionIntent);
mPermissionRequestPending = true;
}
}
}
} else {
Log.d(TAG, "mAccessory is null");
}
}
@Override
public void onPause() {
super.onPause();
closeAccessory();
}
@Override
public void onDestroy() {
super.onDestroy();
unregisterReceiver(mUsbReceiver);
}
private final BroadcastReceiver mUsbReceiver = new BroadcastReceiver() {
@Override
public void onReceive(Context context, Intent intent) {
String action = intent.getAction();
if (ACTION_USB_PERMISSION.equals(action)) {
synchronized (this) {
UsbAccessory accessory = UsbManager.getAccessory(intent);
if (intent.getBooleanExtra(
UsbManager.EXTRA_PERMISSION_GRANTED, false)) {
openAccessory(accessory);
} else {
Log.d(TAG, "permission denied for accessory "
+ accessory);
}
mPermissionRequestPending = false;
}
} else if (UsbManager.ACTION_USB_ACCESSORY_DETACHED.equals(action)) {
UsbAccessory accessory = UsbManager.getAccessory(intent);
if (accessory != null && accessory.equals(mAccessory)) {
closeAccessory();
}
}
}
};
private void openAccessory(UsbAccessory accessory) {
mFileDescriptor = mUsbManager.openAccessory(accessory);
if (mFileDescriptor != null) {
mAccessory = accessory;
FileDescriptor fd = mFileDescriptor.getFileDescriptor();
mInputStream = new FileInputStream(fd);
mOutputStream = new FileOutputStream(fd);
Thread thread = new Thread(null, commRunnable, TAG);
thread.start();
Log.d(TAG, "accessory opened");
} else {
Log.d(TAG, "accessory open fail");
}
}
private void closeAccessory() {
try {
if (mFileDescriptor != null) {
mFileDescriptor.close();
}
} catch (IOException e) {
} finally {
mFileDescriptor = null;
mAccessory = null;
}
}
Runnable commRunnable = new Runnable() {
@Override
public void run() {
int ret = 0;
byte[] buffer = new byte[255];
while (ret >= 0) {
try {
ret = mInputStream.read(buffer);
} catch (IOException e) {
break;
}
switch (buffer[0]) {
case COMMAND_TEXT:
final StringBuilder textBuilder = new StringBuilder();
int textLength = buffer[2];
int textEndIndex = 3 + textLength;
for (int x = 3; x < textEndIndex; x++) {
textBuilder.append((char) buffer[x]);
}
runOnUiThread(new Runnable() {
@Override
public void run() {
textView.setText(textBuilder.toString());
}
});
sendText(COMMAND_TEXT, TARGET_DEFAULT,
"Hello World from Android!");
break;
default:
Log.d(TAG, "unknown msg: " + buffer[0]);
break;
}
}
}
};
//將訊息送至Arduino
public void sendText(byte command, byte target, String text) {
int textLength = text.length();
byte[] buffer = new byte[3 + textLength];
if (textLength <= 252) {
buffer[0] = command;
buffer[1] = target;
buffer[2] = (byte) textLength;
byte[] textInBytes = text.getBytes();
for (int x = 0; x < textLength; x++) {
buffer[3 + x] = textInBytes[x];
}
if (mOutputStream != null) {
try {
mOutputStream.write(buffer);
} catch (IOException e) {
Log.e(TAG, "write failed", e);
}
}
}
}
}
2. LayOut (main.xml)
<?xml version="1.0" encoding="utf-8"?>
<LinearLayout xmlns:android="http://schemas.android.com/apk/res/android"
android:layout_width="fill_parent"
android:layout_height="fill_parent"
android:orientation="vertical" >
<TextView
android:id="@+id/textView"
android:layout_width="fill_parent"
android:layout_height="wrap_content"
android:text="@string/hello" />
</LinearLayout>
<?xml version="1.0" encoding="utf-8"?>
<manifest xmlns:android="http://schemas.android.com/apk/res/android"
package="helloworld.adk"
android:versionCode="1"
android:versionName="1.0" >
<uses-sdk android:minSdkVersion="10" />
<uses-feature android:name="android.hardware.usb.accessory" />
<application
android:icon="@drawable/icon"
android:label="@string/app_name" >
<uses-library android:name="com.android.future.usb.accessory" />
<activity
android:name=".HelloWorldActivity"
android:label="@string/app_name"
android:screenOrientation="portrait" >
<intent-filter>
<action android:name="android.intent.action.MAIN" />
<category android:name="android.intent.category.LAUNCHER" />
</intent-filter>
<intent-filter>
<action android:name="android.hardware.usb.action.USB_ACCESSORY_ATTACHED" />
</intent-filter>
<meta-data
android:name="android.hardware.usb.action.USB_ACCESSORY_ATTACHED"
android:resource="@xml/accessory_filter" />
</activity>
</application>
</manifest>
4. 另外,如果程式執行時要出現如下圖的訊息,必需在 res 目錄下新增加一個 xml 目錄,目錄下建立一個 accessory_filter.xml 內容如下:

<?xml version="1.0" encoding="utf-8"?>
<resources>
<usb-accessory manufacturer="Manufacturer" model="Model" version="Version" />
</resources>
其中,manufacturer="Manufacturer" model="Model" version="Version" 的內容是對應到第一部分第7個步驟中的程式碼內容:
//設備描述
AndroidAccessory acc("Manufacturer",
"Model",
"Description",
"Version",
"URI",
"Serial");
執行結果:
Android手機上結果:

Arduino上結果:
下面的畫面你可以在Arduino IDE上選擇 Tools --> Serial Monitor 看到結果! (需確認右下方的連線的Baud Rate跟Arduino定義的一樣)
後記:
1. 程式中Android與Arduino兩端通訊時寫了一個自訂的通訊協定(protocol),我們可以從Arduino程式中找到 rcvmsg (接收) 及 sntmsg(發送) 以及Android 程式中找到 buffer (收送)等陣列,會發現其中兩端連線的協定如下圖所示:

上圖你可以自訂 Command代表指令作用、Target要將指令送到哪個裝置、指令長度、指令內容,如此在兩端通訊時才不會因為干擾之類的情況造成指令內容傳錯,所以這算是一個很不錯具有容錯的協定。
2. 在第一部分步驟2所下載的adk_release_20120606.zip中有一個demokit範例,這是Google所提供對應到Google ADK Board的範例,裡面有不少可以參考來控制電路的地方。
3. 在Android上使用 Arduino ADK 與 Android IOIO 各有優缺, 除了一些基本(控制)電路外,
Arduino ADK來說網路上支援相當豐富不用擔心找不到資源這也是Google選用 Arduino 主要原因,但相對對於初學者必須要了解Arduino輸出入埠的使用同時也要用C寫Code燒錄到Arduino,
而 IOIO的支援就沒有Arduino那麼多了,同時有些功能IOIO無法達到例如1-Wire bus,不過好處是只要會寫Android程式大致上就可以上手。
所以蘿蔔青菜各有喜好,提供給入門的做個參考。
4.由於手機上的USB連線到Arduino的Type A接頭,因此無法使用一般的DDMS進行除錯,這個部分可以使用TCPIP方式進行,詳見官網: USB Host and Accessory 內容中的Debugging considerations 說明。
Debugging considerations
When debugging applications that use USB accessory or host features, you most likely will have USB hardware connected to your Android-powered device. This will prevent you from having an
adb connection to the Android-powered device via USB. You can still access adb over a network connection. To enable adb over a network connection:- Connect the Android-powered device via USB to your computer.
- From your SDK
platform-tools/directory, enteradb tcpip 5555at the command prompt. - Enter
adb connectYou should now be connected to the Android-powered device and can issue the usual:5555 adbcommands likeadb logcat. - To set your device to listen on USB, enter
adb usb.
您好
回覆刪除我android端使用的是安裝在beaglebone black上的aosp版本(4.2.2),但是在一般手機能作動的專案無法使用,想請問aosp版本的android是否也可以使用ADK, 或者需要修改設定? 謝謝
你確定一下:
刪除1. Kernel中有有沒有 CONFIG_USB_ANDROID_ACCESSORY=y
2. 進入系統在 /system/framework 目錄下應該會有 類似com.android.future.usb.accessory.jar之類的檔案
3.前面兩項都有的話,檢查程式AndroidManifest.xml 權限
讚!!!...少數有在提到ADK 文章.
回覆刪除Thanks, Good example...
回覆刪除