2010年4月12日 星期一

連繫或解繫本地服務應用程式

在昨天我們談到啟動或停止本地服務應用程式,今天我們來看看另一種方式:連繫或解繫本地服務應用程式。

請大家注意連繫或解繫動作的順序。

1. 執行畫面

2. 按下bind按鈕


3.按下sum按鈕


4.按下Unbind按鈕
連繫或解繫的活動類別之程式列表如下:
package com.example.localservice;

import android.app.Activity;
import android.content.ComponentName;
import android.content.Context;
import android.content.Intent;
import android.content.ServiceConnection;
import android.os.Bundle;
import android.os.IBinder;
import android.view.View;
import android.view.View.OnClickListener;
import android.widget.Button;
import android.widget.TextView;
import android.widget.Toast;

public class LocalServiceBinder extends Activity {
/** Called when the activity is first created. */
private LocalService mBoundService;
private boolean mIsBound;
private ServiceConnection mConnection = new ServiceConnection(){

@Override
public void onServiceConnected(ComponentName name, IBinder service) {
// TODO Auto-generated method stub
mBoundService = ((LocalService.LocalBinder)service).getService();
Toast.makeText(LocalServiceBinder.this, "service connected",
Toast.LENGTH_SHORT).show();
setTitle("connection");
}

@Override
public void onServiceDisconnected(ComponentName name) {
// TODO Auto-generated method stub
mBoundService =null;
Toast.makeText(LocalServiceBinder.this, "service disconnected",
Toast.LENGTH_SHORT).show();

}

};

@Override
public void onCreate(Bundle savedInstanceState) {
super.onCreate(savedInstanceState);
setContentView(R.layout.main);
Button startbutton = (Button) findViewById(R.id.start);
startbutton.setOnClickListener(new OnClickListener(){
@Override
public void onClick(View arg0) {
// TODO Auto-generated method stub
bindService(new Intent(LocalServiceBinder.this,
LocalService.class), mConnection , Context.BIND_AUTO_CREATE);
mIsBound = true;
}

});
Button stopbutton = (Button) findViewById(R.id.stop);
stopbutton.setOnClickListener(new OnClickListener(){

@Override
public void onClick(View v) {
// TODO Auto-generated method stub
if (mIsBound) {
// Detach our existing connection.
unbindService(mConnection);
mIsBound = false;
}
}

});
final TextView tv = (TextView) findViewById(R.id.TextView01);
Button sum= (Button) findViewById(R.id.sum);
sum.setOnClickListener(new OnClickListener(){

@Override
public void onClick(View arg0) {
// TODO Auto-generated method stub
int c = mBoundService.sum(3, 5);
tv.setText(Integer.toString(c));
}

});
}
}
本地服務之程式列表:
package com.example.localservice;


import android.app.Service;
import android.content.Intent;
import android.os.Binder;
import android.os.IBinder;
import android.widget.Toast;

public class LocalService extends Service {


public class LocalBinder extends Binder {

public LocalService getService() {
// TODO Auto-generated method stub
return LocalService.this;
}
}

private IBinder mBinder = new LocalBinder();

@Override
public void onCreate() {
// TODO Auto-generated method stub
super.onCreate();
Toast.makeText(this, "service created", Toast.LENGTH_SHORT).show();
// The PendingIntent to launch our activity if the user selects this notification
}
public int sum(int a, int b)
{
return a+b;
}
@Override
public void onDestroy() {
// TODO Auto-generated method stub
super.onDestroy();
Toast.makeText(this, "service stoped", Toast.LENGTH_SHORT).show();
}

@Override
public int onStartCommand(Intent intent, int flags, int startId) {
// TODO Auto-generated method stub
return super.onStartCommand(intent, flags, startId);
}

@Override
public boolean onUnbind(Intent intent) {
// TODO Auto-generated method stub
Toast.makeText(this, "service unbinded", Toast.LENGTH_SHORT).show();
return super.onUnbind(intent);
}

@Override
public void onStart(Intent intent, int startId) {
// TODO Auto-generated method stub
super.onStart(intent, startId);
Toast.makeText(this, "service started", Toast.LENGTH_SHORT).show();

}

@Override
public IBinder onBind(Intent intent) {
// TODO Auto-generated method stub
Toast.makeText(this, "service binded", Toast.LENGTH_SHORT).show();
return mBinder;
}

}

在Android下建立RS232通訊應用程式心得分享


利用Android來設計硬體平台時,若您的驅動不是自己開發,而是拿廠商的軟體,在檔案放置的位置上要特別小心,在圖上有兩個檔案是由長高科技提供,所以當您在建立新專案時,請注意其目錄放置位置。以上是所撰寫的原始程式列表(粗體字的部份是長高所撰寫的JNI函式):
package com.example.uart;

import tw.com.dmatek.dma6410xp.uart.Linuxc;
import android.app.Activity;
import android.os.Bundle;
import android.view.View;
import android.view.View.OnClickListener;
import android.widget.Button;
import android.widget.TextView;


public class Uart_Control extends Activity {
/** Called when the activity is first created. */
public int fd=-1;
@Override
public void onCreate(Bundle savedInstanceState) {
super.onCreate(savedInstanceState);
setContentView(R.layout.main);
Button uart1 = (Button) findViewById(R.id.uart1);
uart1.setOnClickListener(new OnClickListener(){


@Override
public void onClick(View v) {
// TODO Auto-generated method stub
if(fd > 0) Linuxc.closeUart(0);
fd=Linuxc.openUart(1);
if(fd>0)
{
setTitle("open uart1 sucess!"+String.valueOf(fd));
Linuxc.setUart(0);//1200bps
}
else
{
setTitle("open device false!"+fd);
}
}

});
Button uart2 = (Button) findViewById(R.id.uart2);
uart2.setOnClickListener(new OnClickListener(){

@Override
public void onClick(View v) {
// TODO Auto-generated method stub
if(fd > 0) Linuxc.closeUart(0);
fd=Linuxc.openUart(2);
if(fd>0)
{
setTitle("open uart2 sucess!"+String.valueOf(fd));
Linuxc.setUart(0);//1200bps
}
else
{
setTitle("open device false!"+fd);
}

}

});
Button send = (Button) findViewById(R.id.send);
send.setOnClickListener(new OnClickListener(){

@Override
public void onClick(View v) {
// TODO Auto-generated method stub
Linuxc.sendMsgUart("123"); }

});
final TextView tv = (TextView) findViewById(R.id.TextView01);
Button receive = (Button) findViewById(R.id.recevice);
receive.setOnClickListener(new OnClickListener(){

@Override
public void onClick(View v) {
// TODO Auto-generated method stub
String str = Linuxc.receiveMsgUart();
tv.setText(str);
}

});
}
}

2010年4月11日 星期日

啟動或關閉本地服務應用程式


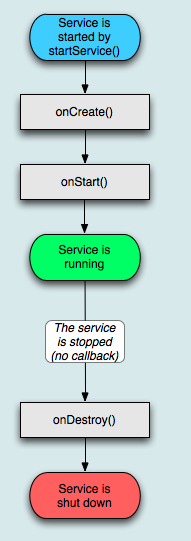
在Android的框架中,Activity扮演著手機的操控程序,它是前景執行的程式,若在某些場合中,不需要人機介面,而是希望在背景下執行,這時我們就需要利用Service。底下為利用Activity來啟動或關閉本地服務範例的步驟:

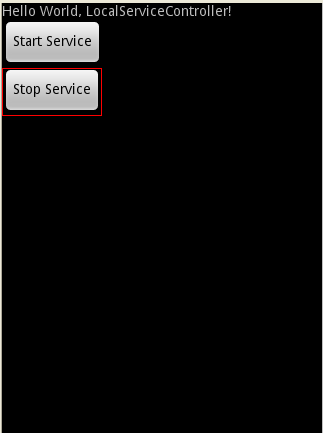
1. 首先建立一個新的專案,繼承Acticity建立LocalServiceController類別。

2. 建立兩個按鈕,其id分別為start和stop。

3. 撰寫這兩個按鈕的事件處理程序,分別呼叫startService及stopService來啟動LocalService的服務程式。
package com.example.localservice;

import android.app.Activity;
import android.content.Intent;
import android.os.Bundle;
import android.view.View;
import android.view.View.OnClickListener;
import android.widget.Button;

public class LocalServiceController extends Activity {
/** Called when the activity is first created. */
@Override
public void onCreate(Bundle savedInstanceState) {
super.onCreate(savedInstanceState);
setContentView(R.layout.main);
Button startbutton = (Button) findViewById(R.id.start);
startbutton.setOnClickListener(new OnClickListener(){
@Override
public void onClick(View arg0) {
// TODO Auto-generated method stub
startService(new Intent(LocalServiceController.this, LocalService.class));
}

});
Button stopbutton = (Button) findViewById(R.id.stop);
stopbutton.setOnClickListener(new OnClickListener(){

@Override
public void onClick(View v) {
// TODO Auto-generated method stub
stopService(new Intent(LocalServiceController.this, LocalService.class));

}

});
}
}
4. 繼承Service類別建立並撰寫LocalService類別。
package com.example.localservice;

import android.app.Service;
import android.content.Intent;
import android.os.IBinder;
import android.widget.Toast;

public class LocalService extends Service {


@Override
public void onCreate() {
// TODO Auto-generated method stub
super.onCreate();
Toast.makeText(this, "service created", Toast.LENGTH_SHORT).show();
}

@Override
public void onDestroy() {
// TODO Auto-generated method stub
super.onDestroy();
Toast.makeText(this, "service stoped", Toast.LENGTH_SHORT).show();
}

@Override
public void onStart(Intent intent, int startId) {
// TODO Auto-generated method stub
super.onStart(intent, startId);
Toast.makeText(this, "service started", Toast.LENGTH_SHORT).show();

}

@Override
public IBinder onBind(Intent intent) {
// TODO Auto-generated method stub
Toast.makeText(this, "service binded", Toast.LENGTH_SHORT).show(); return null;
}

}
5. 利用Toast物件來顯示資料。
Toast.makeText(this, "service created", Toast.LENGTH_SHORT).show();

6. 務必記得在AndroidManifest.xml中增加Local Service服務。


7. 執行程式並觀察訊息顯示的順序,瞭解服務啟動及關閉會呼叫那些程式。


注意並沒有呼叫Bind

2010年4月10日 星期六

在Windows下安裝RNDIS,來進行和openmoko手機連線

依照Neo 1973 and Windows網站提供的資料進行實驗,但無法成功,原因待查,然而長高謝工程師郤能成功連線。
大家能否幫忙找出問題,我實作的步驟如下:

1. 檢查網路資料


2. 設定IP


3. 檢查連線狀態

2010年4月9日 星期五

讓HTC手機支援serial port

昨天與老師在課堂上討論到讓HTC手機支援serial port的問題,在code.google.com上看到一篇文章似乎有解....
不過可惜的是好像是透過USB的方式不是透過藍芽。
http://code.google.com/p/android-serialport-api/wiki/Htc


不過從這個網址可以找到HTC Hero Kernel Source Code喔!
http://developer.htc.com/

Android memory leaks

關於Android記憶體管理部分,有一種現象叫做memory leaks,例如HTC HERO在使用過程中,經常發現記憶體在莫名的情況下從開機後(Free memory)100M使用了幾天後卻是剩下不到30M。

Openmoko & Android 原始碼下載網址


Openmoko是全世界第一支100%開放源碼(open source)的Linux 手機軟體平臺。Android是Google在2007年底所發表的行動裝置的軟體套件。社員們若要在Openmoko手機上裝載Android可以到http://code.google.com/p/android-on-freerunner/downloads/list下載。